How to Convert the MFJ-1278 to a standard TNC-2 & UIDIGI
By Rob Robinette K9OJ
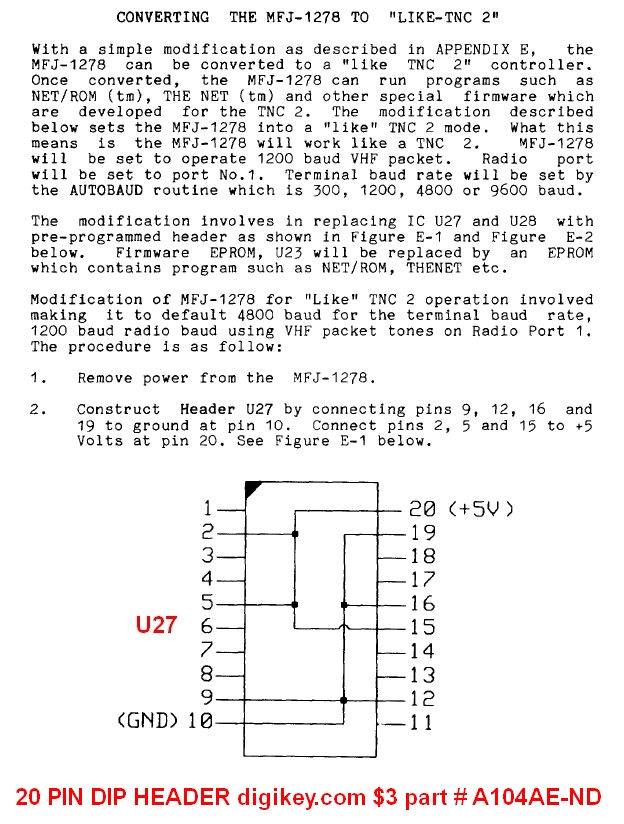
Why Convert?
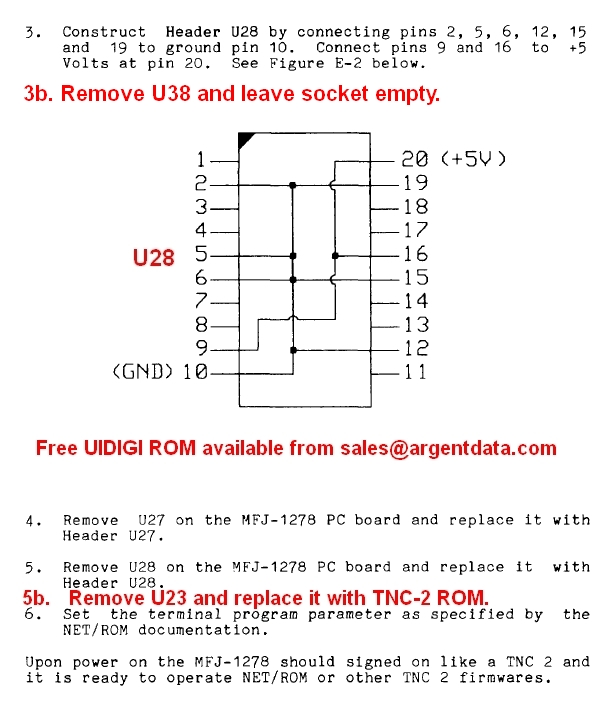
The MFJ-1278 is a TNC-2 clone with added digital communication modes but the software needed to take advantage of all the extra modes is sorely lacking for Windows and Linux. I also was never able to use the 1278's KISS mode successfully which would have allowed it to function simultaneously as an APRS digipeater and internet gateway (IGate) using UIView32.
Doing this simple modification will allow you to use any TNC-2 ROM in your MFJ-1278 so you can add a UIDIGI ROM and turn the 1278 into a stand-alone APRS digipeater. All the APRS digipeater parameters are burned into the ROM so a computer is not needed to control the 1278. Just connect your radio to the 1278's radio port 1, turn them on and you have a modern WIDEn-N (and STATEn-N) compliant APRS digipeater. The UIDIGI ROM will also let you log in and administer sysop commands over the radio or through the serial interface.
The conversion involves pulling the DIP chips in sockets U27, U28 and U38. U27 and U28 are replaced with hard-wired DIP headers--that's all that's required to convert the 1278 to a TNC-2. You then replace the main firmware ROM in U23 with any TNC-2 compatible ROM such as UIDIGI, NET/ROM, ROSE, TheNet or the TAPR TNC-2 v1.1.9 EEPROM (includes true KISS mode) for $25 delivered.
Since I wanted to use the 1278 as an APRS digipeater I downloaded the UIDIGI TNC-2 ROM files from this yahoo group: UIDIGI TNC-2 Firmware Mailing List. I then edited the UIDIGI.TXT file to configure the ROM with my call sign and digipeater parameters. After editing I ran the UIDGCFG.EXE configuration program which modifies the UIDIGI.BIN file with my custom configuration. UIDGCFG.EXE will not run on 64bit Windows, I had to use a computer running Windows 7 32bit to configure my ROM. I recommend you follow the guidance on UIDIGI configuration here: qsl.net/n8deu/uidigi_eprom_settings.htm. The webpage shows how to implement WIDEn-N and STATEn-N routing protocol.
After creating the modified UIDIGI.BIN file it must be burned to a ROM. ArgentData.com is gracious enough to offer free UIDIGI ROM Burning. Just email your configured UIDIGI.bin file to support@argentdata.com and they will burn the .bin file to an EPROM and mail it to you at no charge. The new EPROM is inserted into the 1278's U23 DIP socket.
U27 DIP Header
After the mod the MFJ-1278's serial port will be fixed at 4800baud, 7 data bits, Even parity and 1 stop bit (7E1).
U28 DIP Header
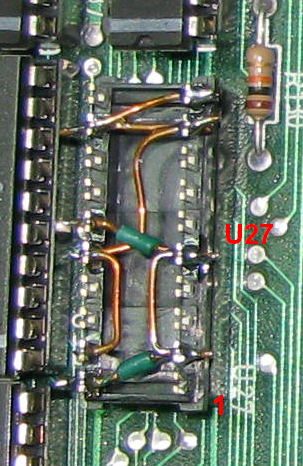
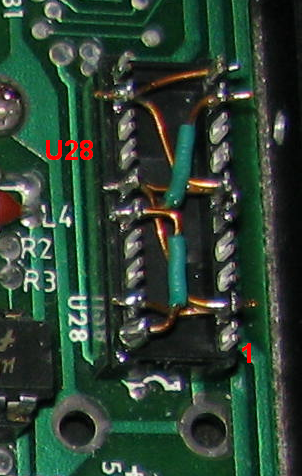
My hard-wire DIP headers. Pin 1 is at lower right when viewed with the 1278's front panel toward you.
MFJ-1278 Circuit Board Layout
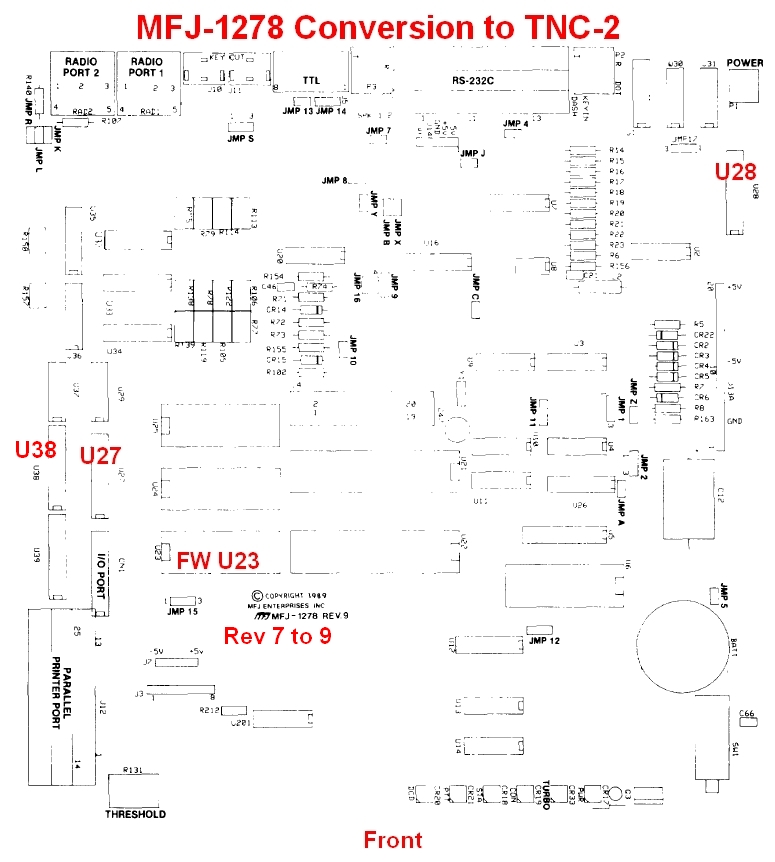
U27 and U28s' pin 1 are at the bottom, U23's pin 1 is to the left.
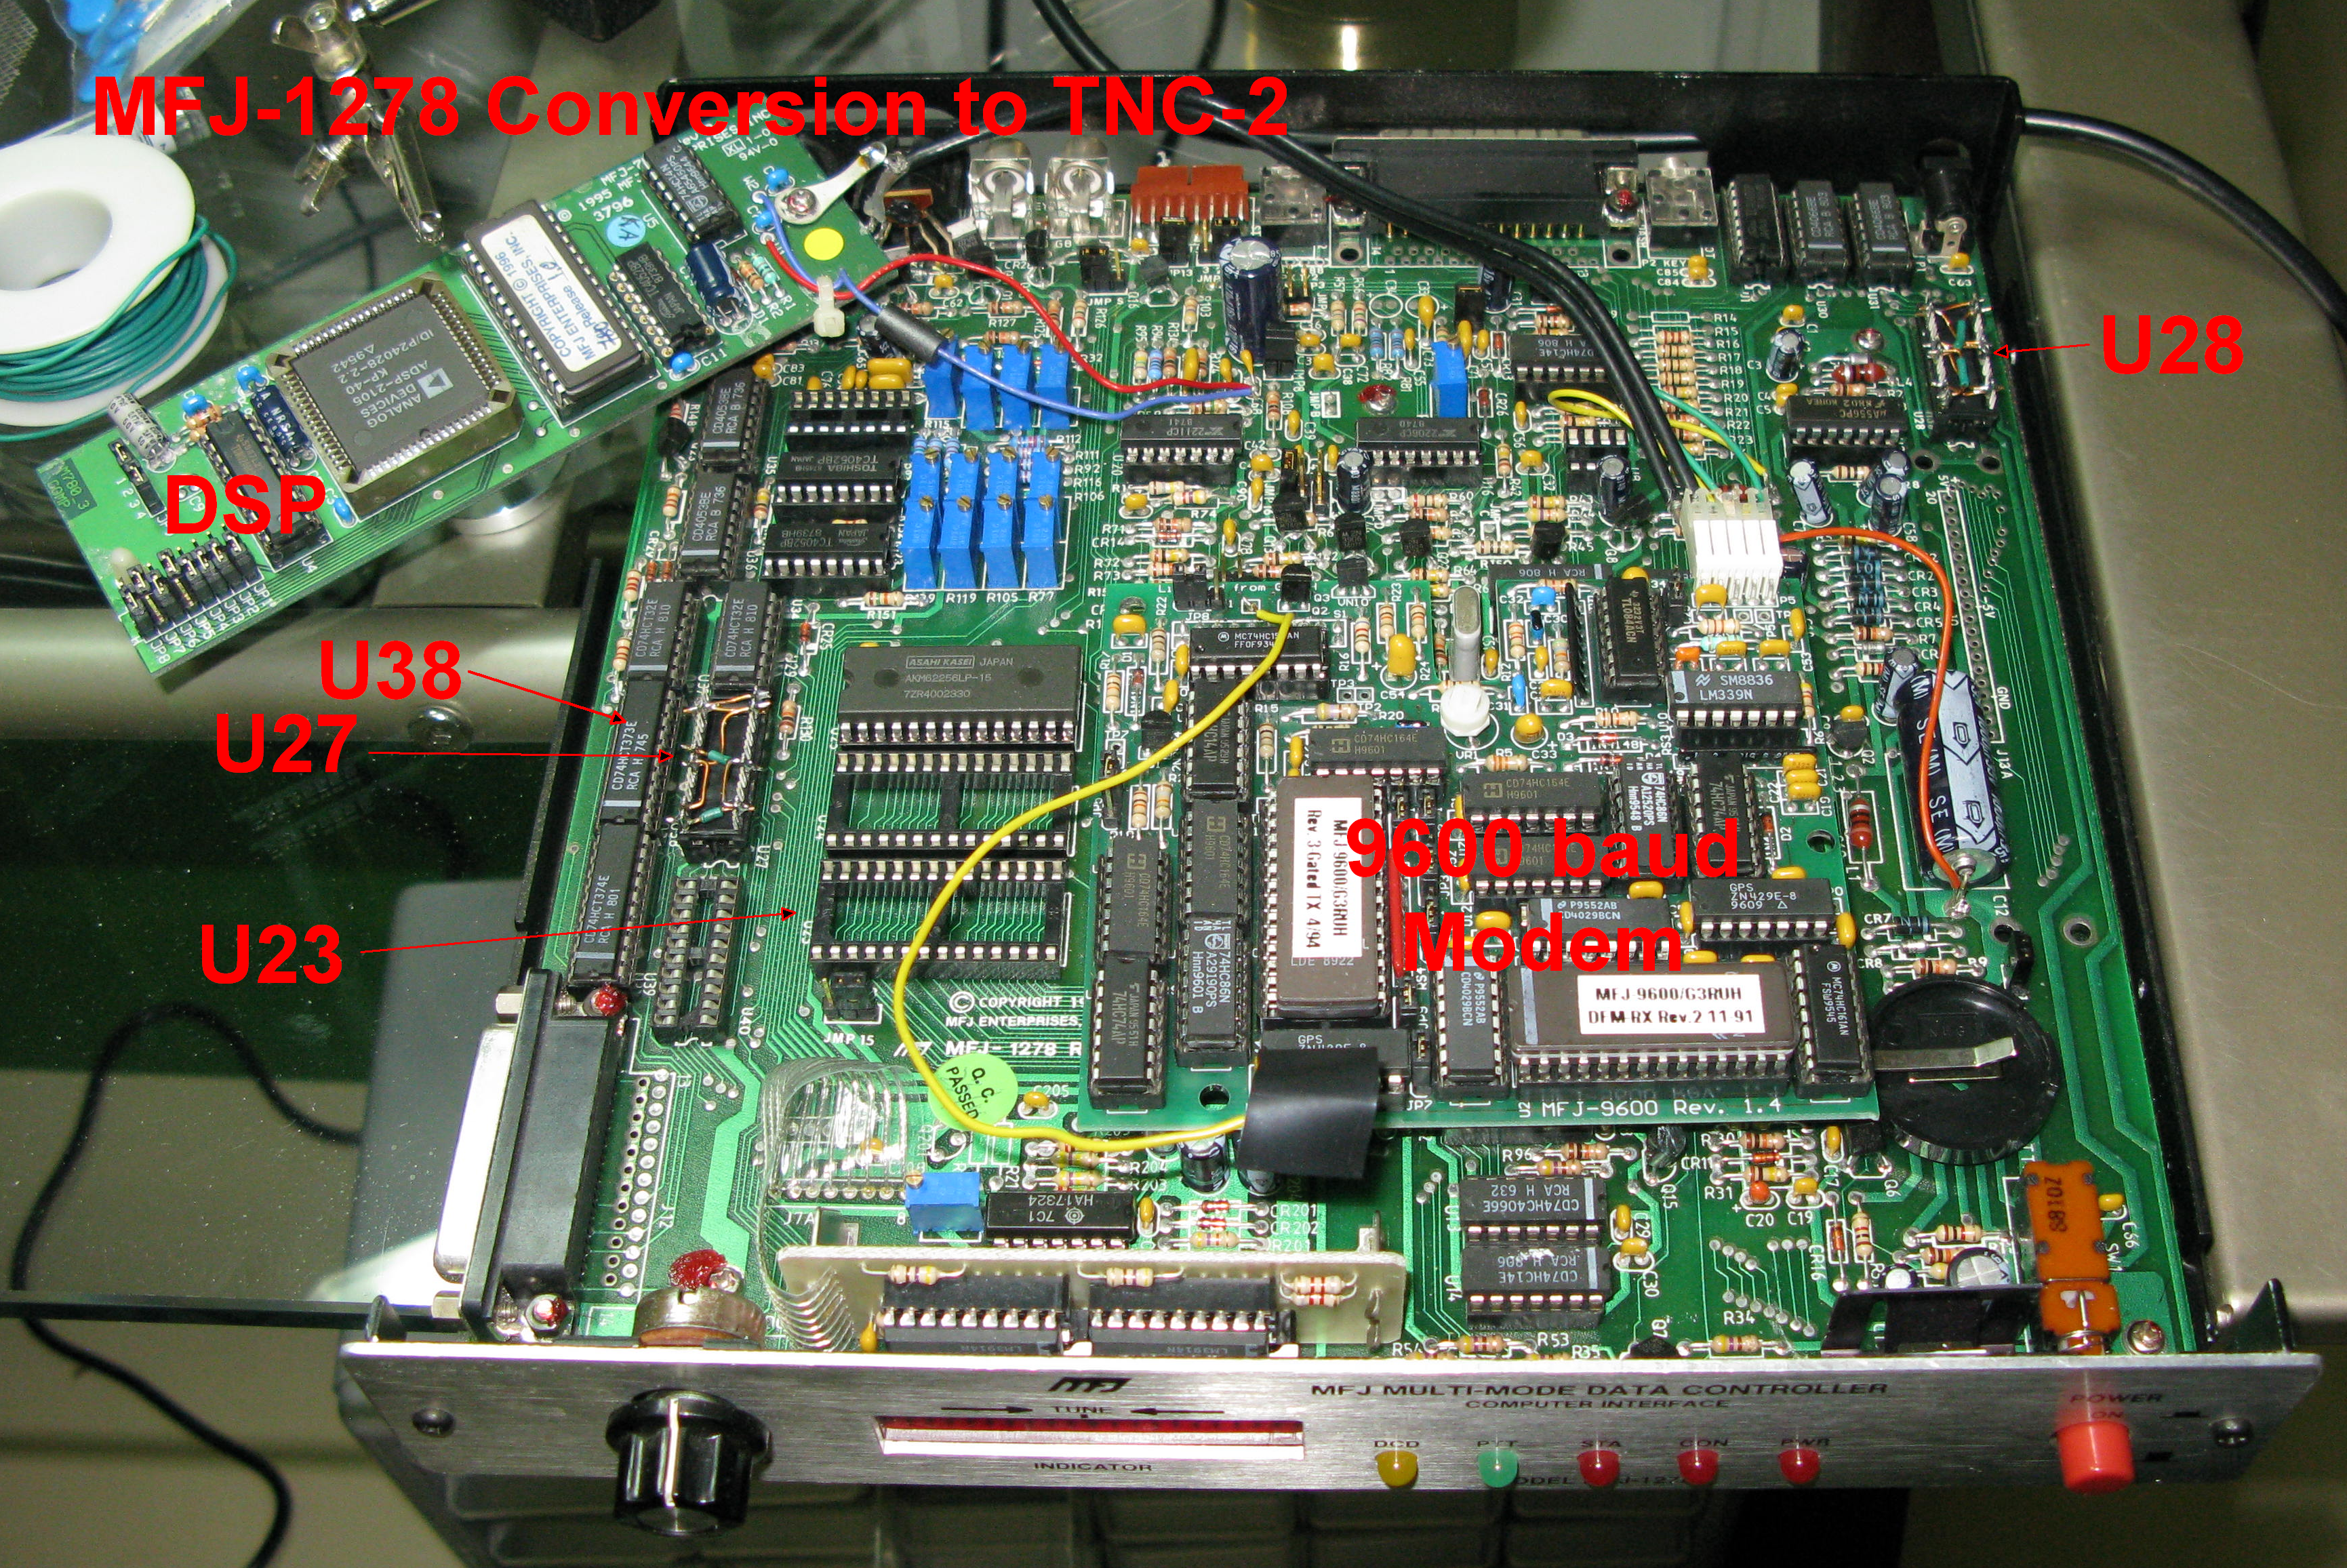
Click image to view larger version. U38 is still in place and the TNC-2 firmware EPROM has not been installed into U23 yet. Optional DSP and G3RUH 9600 baud modem daughter cards shown.
Doing the Mod
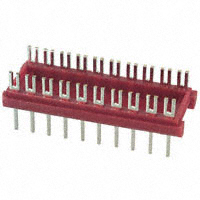
Besides a TNC-2 ROM you will need two of these 20 pin DIP headers ($3 each): Aries Electronics part # 20-600-10 to construct the hard-wired DIP headers.
Aries Series 600 20 pin DIP Header
Remove the 1278's cover by removing the 4 small screws from the sides. Use the layout diagram above to locate U23, U27, U28 and U38. If you have a Rev 1 to 6 circuit board in your MFJ-1278 you may not need to remove U38. If you cannot communicate through the serial port after completing the mod remove U38 and try again, that's what worked for me.
Carefully remove the chips in these three sockets and save them in case you want to revert back to a normal MFJ-1278. Keep yourself grounded while handling these chips and put them in an electrostatic bag if possible. A chip puller really helps get these chips out without bending their leads. A small, thin flat-blade screwdriver can be used to pry the chips up a little to get them started. My chips had been in place since 1987 so they didn't want to budge. U38 is tightly packed so you can't get a chip puller on the ends so I had to carefully pry it up and out using a small jeweler's flat blade screwdriver. U38's socket will remain empty.
If your MFJ-1278 has a DSP daughter card installed like mine you will have to unscrew its standoff screw and carefully lift it up to gain access to U27, U38 and U23.
Follow the diagrams above to construct the hard-wire headers. I used 24 gauge solid core wire that fit nicely in the DIP header's 'forks' and soldered them in place. Two 24 gauge wires will stack nicely in each fork. Make sure you plug the correct header into the correct DIP socket and verify the DIP header orientation. All 3 of the DIP sockets have a small notch in one end to indicate the pin 1 end. Make sure all the DIP header legs are lined up with the socket holes before attempting to push the header into the DIP socket. Mine went in quite easily. U38 will remain empty.
Insert your TNC-2 ROM into U23 and you're ready to go. The 1278 is now a stand-alone TNC-2. Connect your radio (only radio port 1 is active) and get on the air. After the modification the 1278's serial port is hard wired to 4800baud, 7 data bits, Even parity and 1 stop bit (7E1). If that doesn't work try 2400, 7, E, 1.
See my webpage on setting up your digital UHF and VHF radios to work with a digital radio hotspot.
Send questions or corrections to robinette at comcast dot net
Rob Robinette K9OJ