How the KW V3 Shock Works
Original article and graphics by MotoIQ but edited for clarity and added S2000 content
KW Variant III (V3) shocks are very popular with serious Honda S2000 track goers. They're inexpensive shocks that have been proven to work very well on the track. S2000s running V3s hold several track records around the country in Time Trial and club racing. The KW V3 is a gas charged, double damping, dual independent adjustable twin tube damper. Twin tube shocks have oil in an inner and outer tube. The Honda S2000 V3 also has an external remote nitrogen charged hydraulic accumulator (reservoir) that allows fluid to flow between the outer tube and accumulator.
That advanced feature is one of the V3's major drawbacks. NASA's Time Trial TTx, Performance Touring PTx and SCCA's ITE scoring system penalizes the V3 heavily due to the "external reservoir" on the front S2000 V3 shock (the rear stock S2000 shock has the same type external reservoir). The other major issue is KW USA is no longer willing to sell the parts required to rebuild or revalve the V3. KW will rebuild the V3 for you but they will not change the valving. You must purchase their "competition" shocks to get that service.
Although some dismiss twin tube shocks as low end dampers compared to monotube shocks, the KW’s are high precision twin tubes with many of the characteristics of a monotube. The V3’s independent adjustability of compression and rebound damping is also a huge advantage over single adjustable shocks. Independent adjustability is important for any car that is going to be tuned for optimal handling under a wide range of set ups and conditions.
KW V3 Cutaway

1. Rebound adjuster and piston rod. 2. Piston rod seal and guide assembly. 3. Piston valve (rebound) 4. Foot valve (compression) Note: The external reservoir is not shown.
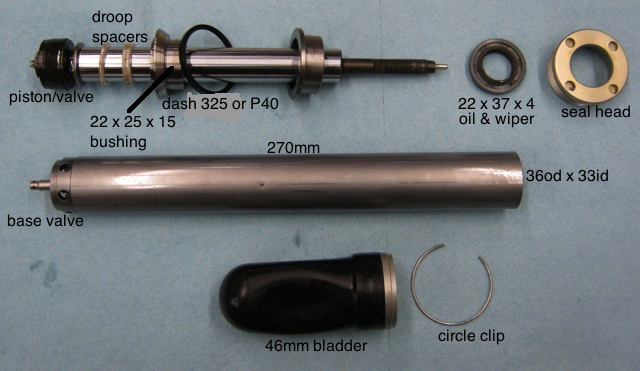
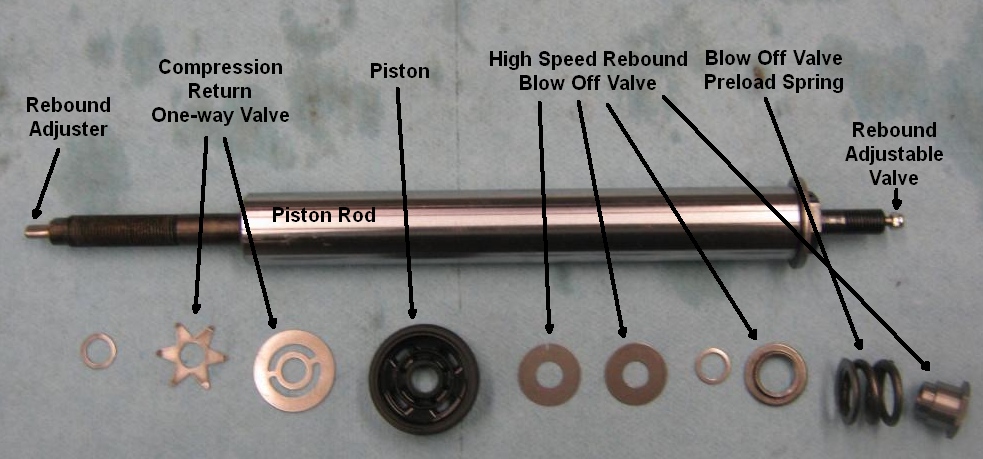
Disassembled S2000 KW V3 Front Shock
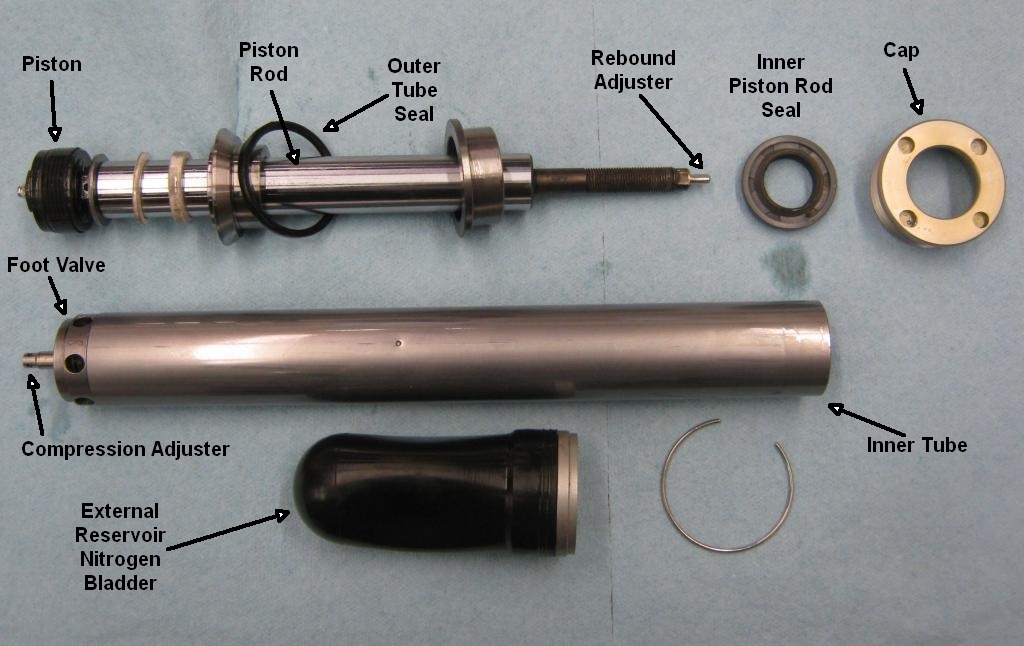
(outer tube with external reservoir not shown)
Rebound Damping

The V3's piston rod rides inside the inner tube with the rebound damping adjuster built into the piston's low speed bleed circuit. An adjustable needle valve controls the size of the low speed rebound bleed orifice. A smaller orifice gives more damping, larger less. The needle valve is attached to a long rod extending to the top of the piston shaft where it can be easily reached and adjusted with an allen wrench or plastic cap. The rebound adjustment primarily affects low speed damping--shock piston velocities in the 0 to 2 inch per second range. Low speed damping adjustment affects body motions such as pitch and roll. Controlling body motion increases stability and enhances car control. The piston also has a nonadjustable spring loaded blow off valve for controlling high speed rebound damping.
Piston Valve During Rebound
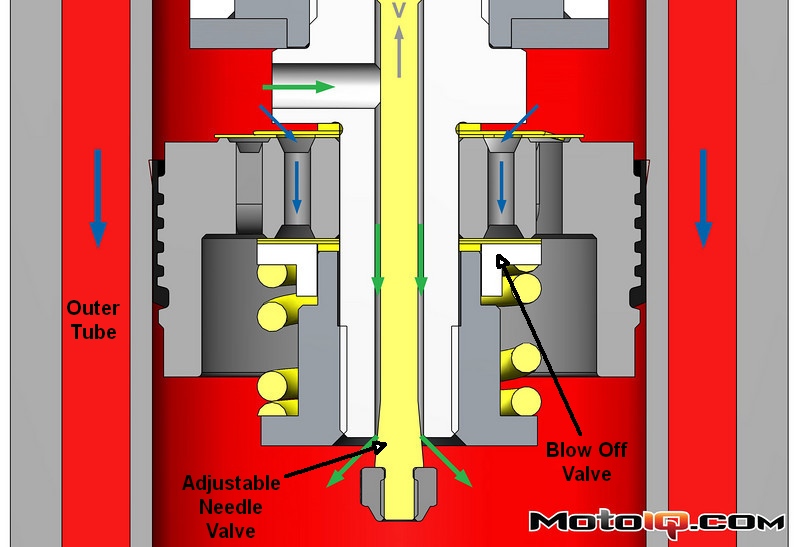
Low speed rebound damping is controlled mostly by the piston on the end of the piston rod. Turning the rebound adjuster located on the top of the piston rod screws the tapered metering needle valve "V" up and down varying the size of the orifice. Low speed fluid flow is represented by green arrows. At higher shaft speeds the high speed damping circuit kicks in. The high speed fluid flow is shown by the blue arrows. High speed rebound damping is controlled by the nonadjustable spring loaded blow off valve.
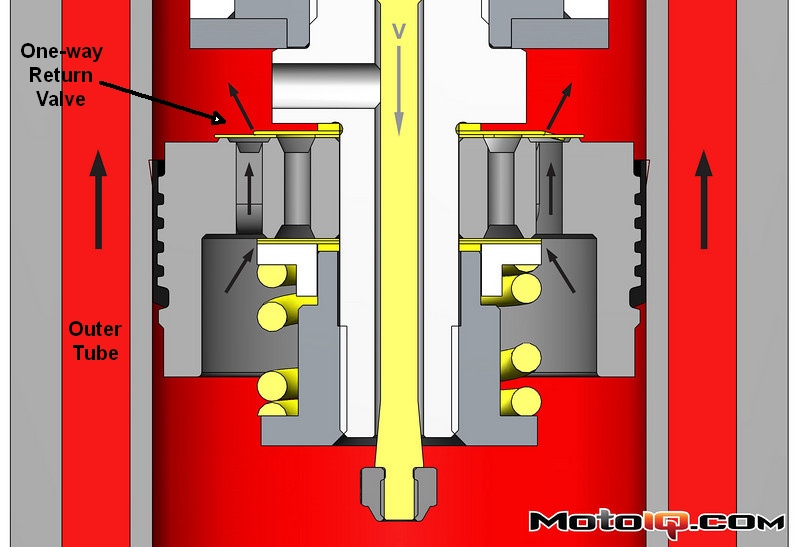
Foot Valve During Rebound
In rebound, the shock's foot valve, located on the bottom of the shock, simply acts as a one way check valve allowing fluid that was displaced by the piston rod into the outer tube and remote hydraulic accumulator to flow back into the inner tube.
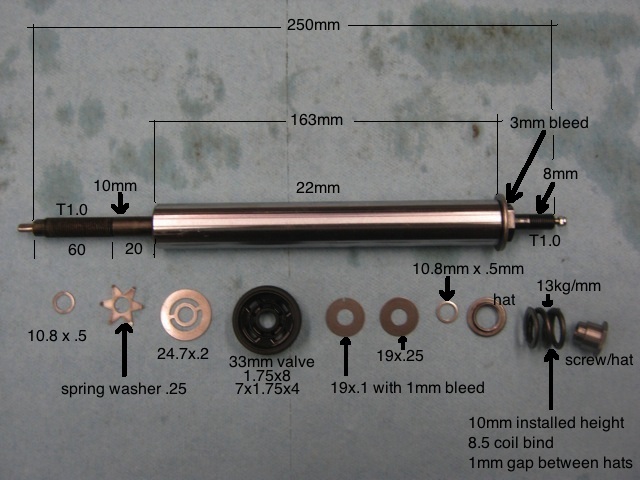
S2000 KW V3 Front Shock Piston and Piston Rod
Compression Damping
The foot valve is located on the bottom of the inner tube and regulates the flow of fluid between the inner and outer tubes. The foot valve has a spring loaded blow off valve to handle high speed compression damping. A spring loaded adjustable needle valve controls the size of the low speed compression damping orifice located in the foot valve. The needle valve's spring preload is adjusted via a pin tool on the bottom of the shock body. Note low speed compression damping is adjusted by varying the needle valve's spring preload, where low speed rebound damping is adjusted by directly moving the piston's needle valve (not spring preload). The compression adjuster mostly influences low speed compression damping, which is the part of the damping curve that influences vehicle body motion.
V3s are relatively easy to adjust. The top rebound adjuster is easy enough to change but the S2000 rear top adjustment can be a pain if you have the spare tire and trunk trim in place. The compression adjuster at the bottom of the shock requires the S2000 to be on jack stands to access them. Some double adjustable shocks require disassembly of the shock so a button can be pushed while the shaft is rotated so it could be a lot worse.
V3s have a large adjustment range which means that a wide range of spring rates can be used without having to revalve the shock. V3 adjusters also have consistent damping increments throughout the adjustment range. Most adjustable shocks, especially the lower cost ones, do not have consistency in the adjustments. The damping force adjusting increments varies greatly from click to click and the adjustment range is small.
Piston Valve During Compression
In compression most of the damping control is handled by the foot valve so the valving in the piston acts mostly as a one-way check valve.
The V3’s damping curve can be tailored from mildly digressive to heavily digressive. A digressive damping curve means that there is more damping at low piston speeds. At higher piston velocities, the two stage blow off valve opens bypassing fluid for less overall damping. Digressive curves give good body pitch and roll control while still allowing a decent ride and minimizing traction reducing tire shock and hop.
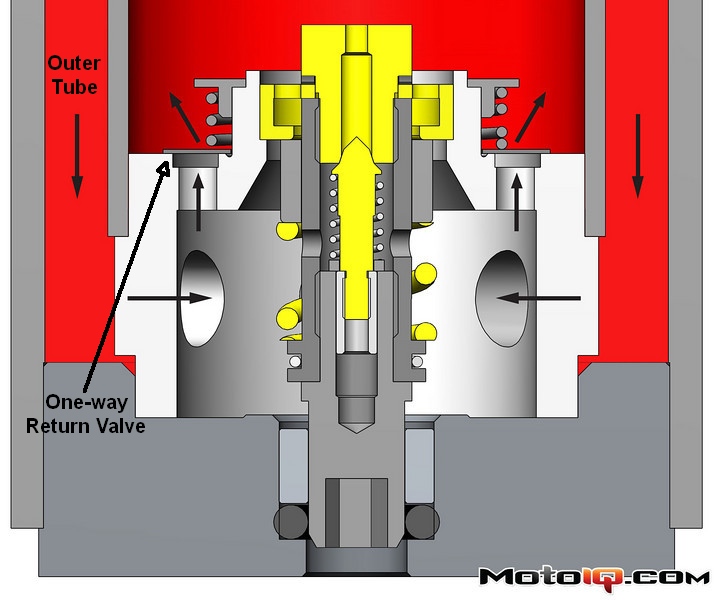
Foot Valve During Compression
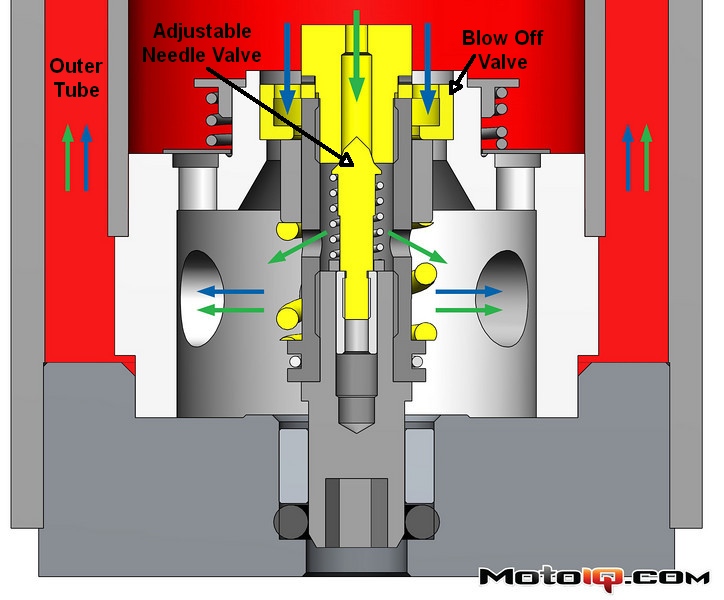
Low speed compression damping adjustment is handled by the foot valve. Low speed fluid flow is shown in green. When the compression adjuster is turned the needle valve spring preload controlling low speed fluid flow is increased. This increases the initial force needed to open the valve. For high speed damping, such as hitting a large bump, the much larger but nonadjustable compression blow off valve opens, its fluid flow is shown in blue. This allows the shock to react and absorb impact.
S2000 Inner Tube and Foot Valve

Spring seen through hole in foot valve is high speed compression blow off valve preload spring, low speed compression needle valve is hidden inside the foot valve.
An advanced feature of the S2000 V3 is the remote external hydraulic accumulator. The accumulator is like a remote reservoir found in high end race shocks. On the V3 this accumulator is a canister with a rubber bladder that is pressurized with nitrogen gas at approximately 60psi. Oil from the outer tube can flow back and forth from the outer tube to the accumulator. The bladder inside the accumulator gives the fluid displaced by the piston rod a place to go. The rubber flexes and the gas compresses giving the incompressible fluid room, preventing the shock from going into hydraulic lock.
Typically, a twin tube shock simply has a volume of air or gas at the top of the outer tube to allow for shaft fluid displacement. This works ok, but under hard use the air can get mixed with the fluid and the frothy mix has less damping than non-emulsified fluid. This mixing of air and oil is the primary cause of shock fade in hard use. Another disadvantage of a standard twin tube is that usually only a low gas pressure can be used if the shock is indeed gas pressurized. Pressurization is good because it reduces fluid cavitation through the valves at high piston speeds. Cavitation is localized boiling in low pressure zones like the backside of shock valves. Cavitation also causes the fluid to foam and lose damping ability. The V3’s remote accumulator and rubber bladder prevent the gas and fluid from mixing. The bladder is pressurized with nitrogen gas to reduce cavitation.
KW addresses some of the longevity issues that coilovers face on street driven cars. Many times the threaded body of the shock corrodes as it’s hard to keep cut threads from rusting even with rust resisting platings and coatings. Typically the spring seat is made of a different metal than the shock body. This causes galvanic corrosion. The shocks on a street car are exposed to the elements and receive very little maintenance. These issues cause the threaded body to corrode to the spring seat making spring seat adjustment difficult. KW addresses this issue by using stainless steel for the shock body coated with their proprietary Inox coating. The spring seat is made of a corrosion proof engineering super plastic. This makes for a coilover body that that is always silky smooth in adjustment and will never corrode, even in salty east coast winters!
The main springs are also paired with helper springs to keep tension on the main springs even when the suspension is at full droop. This helps keep the springs quiet and prevents the possibility of the spring coming out of place over large bumps. The dampers feature modular construction and can be taken apart for rebuilding but KW will not revalve the V3 and they will not sell any parts needed for a rebuild or revalve. Your only option for a rebuild is to send your shocks to KW. They currently charge $167 per shock for a rebuild. There are many V3 users running 600 to 700lb springs that would like to have the shocks revalved for more rebound compression.
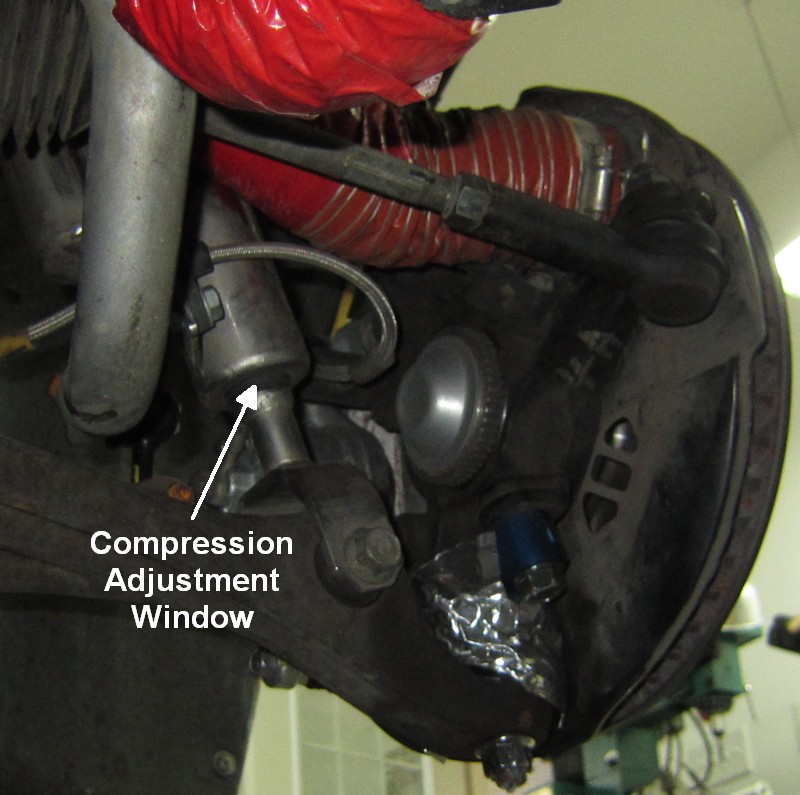
Old Style Pin Tool Compression Adjustment
Front Shock Compression Adjustment Window Behind Plastic Plug
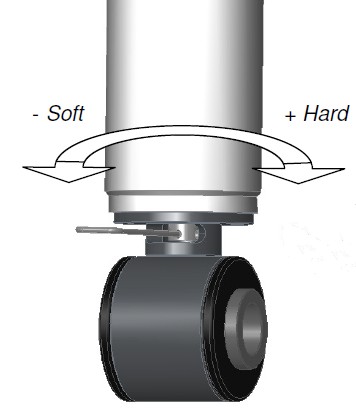
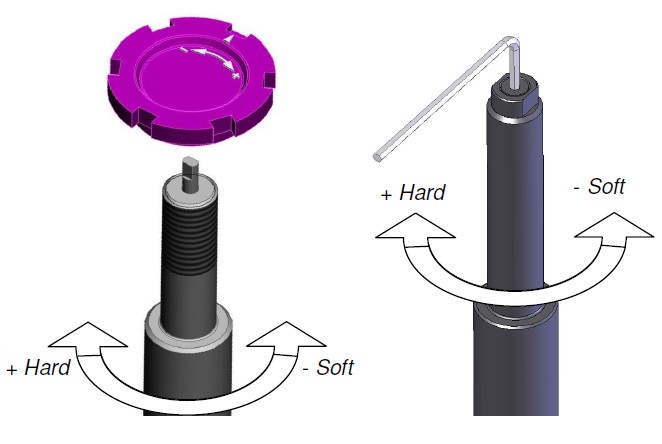
Old Style Rebound Adjuster on Left, New Style on Right
Notes
See this link for info on Tuning the KW V3
The KW V3 Manual is available here (pages 3 & 4 are in English): KW_V3_Manual.pdf
The KW ClubSport Manual is here: KW_Clubsport_Manual.pdf
I remember which adjuster is which with this mnemonic: Bump is Bottom (bump = compression)
I shortened the KW compression adjustment pin tool to make it easier to make adjustments.
KW recommended track settings for the S2000 with the stock 80N/mm (457lb/in) springs:
Compression all around at 0.75 turn out from full stiff (3 sweeps or 6 clicks)
Rebound: Front 0.75 turn out (about 5 clicks); Rear 1.5 turns out (9 clicks)
When changing springs if the spring/shock combination was balanced, the rule of thumb is a stiffer spring requires slightly lower compression and higher rebound. A softer spring requires higher compression and lower rebound.
KW V3s for the S2000 have come from the factory with 80N/mm (Newton per millimeter or 457lbs/in, same springs front and rear) and 90N/mm (513lbs/in) springs. The V3s that came with 90N/mm springs come with stiffer rebound valve shims. V3s currently come with 80N/mm springs. The top rebound adjusters originally came with no click adjusters and used a removable plastic wheel for adjustments. Newer shocks come with an Allen wrench adjuster with 6 clicks per turn. The rebound adjustment range is three full turns or 18 clicks. The bottom compression adjusters originally came with a 1/4 turn "sweep" adjustment made with a metal pin tool. Newer shocks come with a wheel that has 8 clicks per turn. The compression adjustment range is two full turns (8 sweeps or 16 clicks).
The ClubSports come with 100N/mm (571lbs/in) springs. The newest ClubSports come with rear shocks with 3 full turns of compression (24 clicks). The front ClubSports have the standard 2 turns of compression (16 clicks). ClubSports have 15% firmer damper settings than the standard V3 and include nice pillow-ball top hats but are almost twice as expensive as the V3.
Set the ride height by using the suspension motion ratios of front 1.43 and rear 1.49. What this means is for every 1.43 inch of wheel movement the shock absorber moves 1 inch. For example, if you want to lower your car by 0.5 inch divide that by the motion ratio to figure out how much to move the spring perch: 0.5 / 1.43 = 0.35 inch of perch adjustment will give you 0.5 inch of body lowering in the front. For the rear it's 0.5 / 1.49 = 0.34 inch. For every turn of the spring perch collar it moves 0.085" which translates to 0.125" or 1/8" at the wheel.
Springs come from KW at 63mm inside diameter x 152mm in length (2.48 inches x 6 inches). The marking on the KW springs, such as 80 140, means 80N/mm. Aftermarket 2.5 x 6 inch springs fit.
For both the rebound and compression adjusters, screwing them into the shock adds damping; screwing them out reduces damping.
For rain settings both compression and rebound should be reduced.
Rebound greatly affects weight transfer between the front and rear tires. Adding rebound will add stability. Too little will let the car pitch and roll too much but will help with tire wear. Less front rebound damping allows weight transfer to the rear under acceleration.
Less rear rebound allows more weight transfer during braking and trail braking turn in.
Too much rebound can make the car "pack down" in a series of bumps and the car will feel too stiff (this can easily be misdiagnosed as too much compression damping). Too much rebound can also cause skittishness and/or lack of grip in corners.
Controlling rebound is normally more important than compression. This is why most single adjustable shocks give you control of rebound.
To install & remove your shocks you have to move the lower suspension arm down and out of the way. In the front it helps to disconnect one end of the anti-roll (sway) bar to make this easier. This isn't required in the rear. If you have a helper have them push down or even stand on the wheel hub to move it down. If you are installing/removing the shocks alone a long breaker bar will help move the hub down and out of the way. For the front shocks you have to twist the bottom of the shock to help clear the lower A-arm. When removing the shocks remember how you twisted the shock to get it off, you'll have to do the same thing to get it back on.
KW USA 800-445-3767. They charge $167 per shock for a rebuild. They will not re-valve the V3 shock.
I am currently working with a racing suspension shop to re-valve (increase rebound damping) my KW V3 shocks. If successful I'll post the shop's info here.
My Current Suspension Setup & Settings
My 2001 S2000 has a full roll cage and is very stiff so it can run stiffer springs and damper settings than a less modified car. My best lap at Summit Point Main is a 121.7, only seven hundredths of a second off the S2000 lap record. I was running the following suspension for that lap:
I run a Comptech adjustable front anti-roll bar (sway bar) usually set at position 3 or 4 of 5 (5 is stiffest). The rear anti- roll bar is the stock 2001 bar.
I have SPC adjustable ball joints in front for extra camber.
The rear suspension has a Megan Racing bump steer link. The link is also adjustable for toe which allows more camber than stock.
Alignment: Front -3.5º camber, 7.5º caster, 0 toe Rear -3.0º camber, 0.2 inch total toe-in.
Springs: Front 628lbs/inch (110N/mm), Rear 571lbs/inch (100N/mm). All are KW 2.5 x 6 inch.
Compression
Front: 3/4 turn out from full stiff (3 sweeps)
Rear: 1 turn out (4 sweeps)
Rebound
Front: 0.66 turn out (4/6 turn or 4 clicks)
Rear: 0.83 turn out (5/6 turn or 5 clicks)
Spring Perch Settings for Approximately 1 inch Lower Than Stock
Front shocks measured from the ridge just below the threads to the leading edge of the adjuster ring: 2.6 inches.
Rear shocks measured from the beginning of the threads to the leading edge of the adjuster ring: 1.67 inches.
If I can get my V3s re-valved I'm going to use 800lb-in springs in front and 700 in the rear.