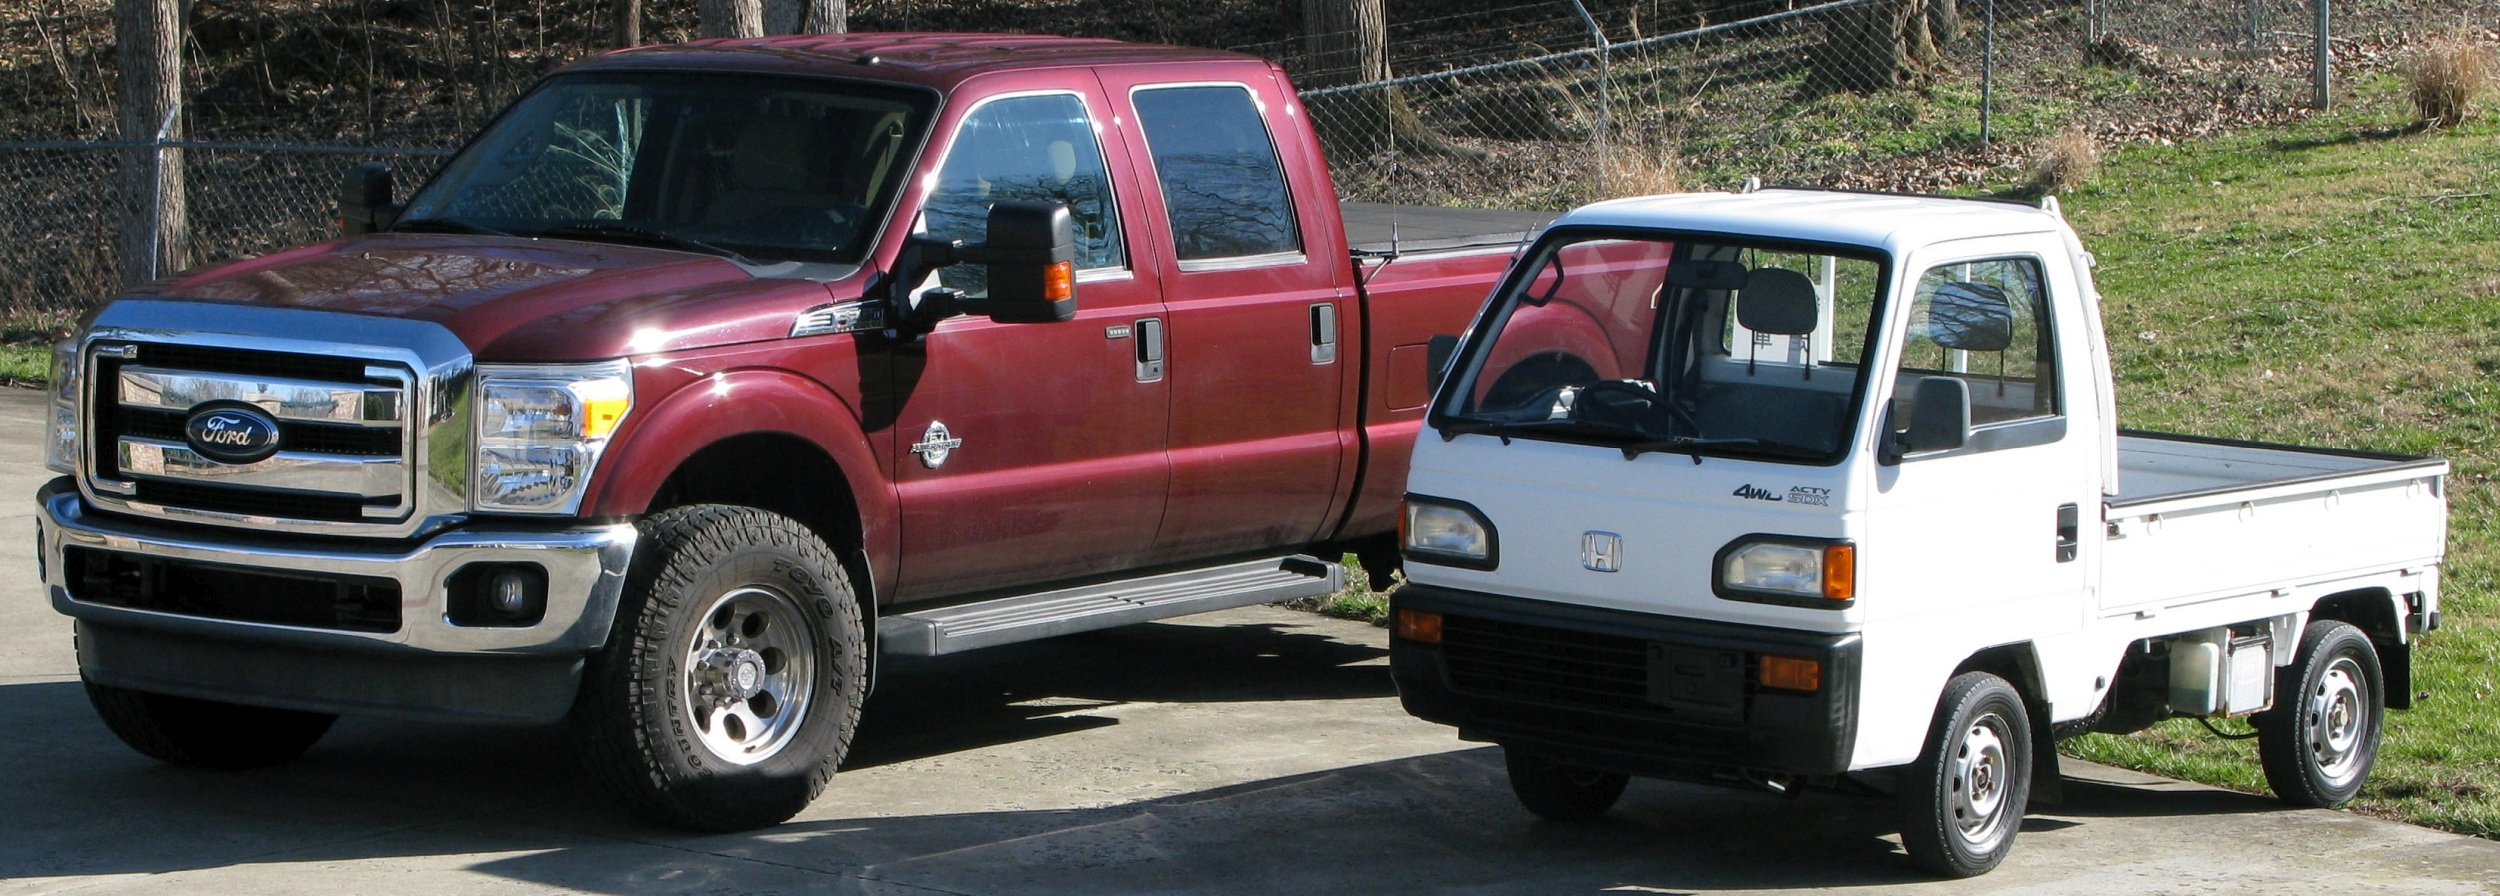
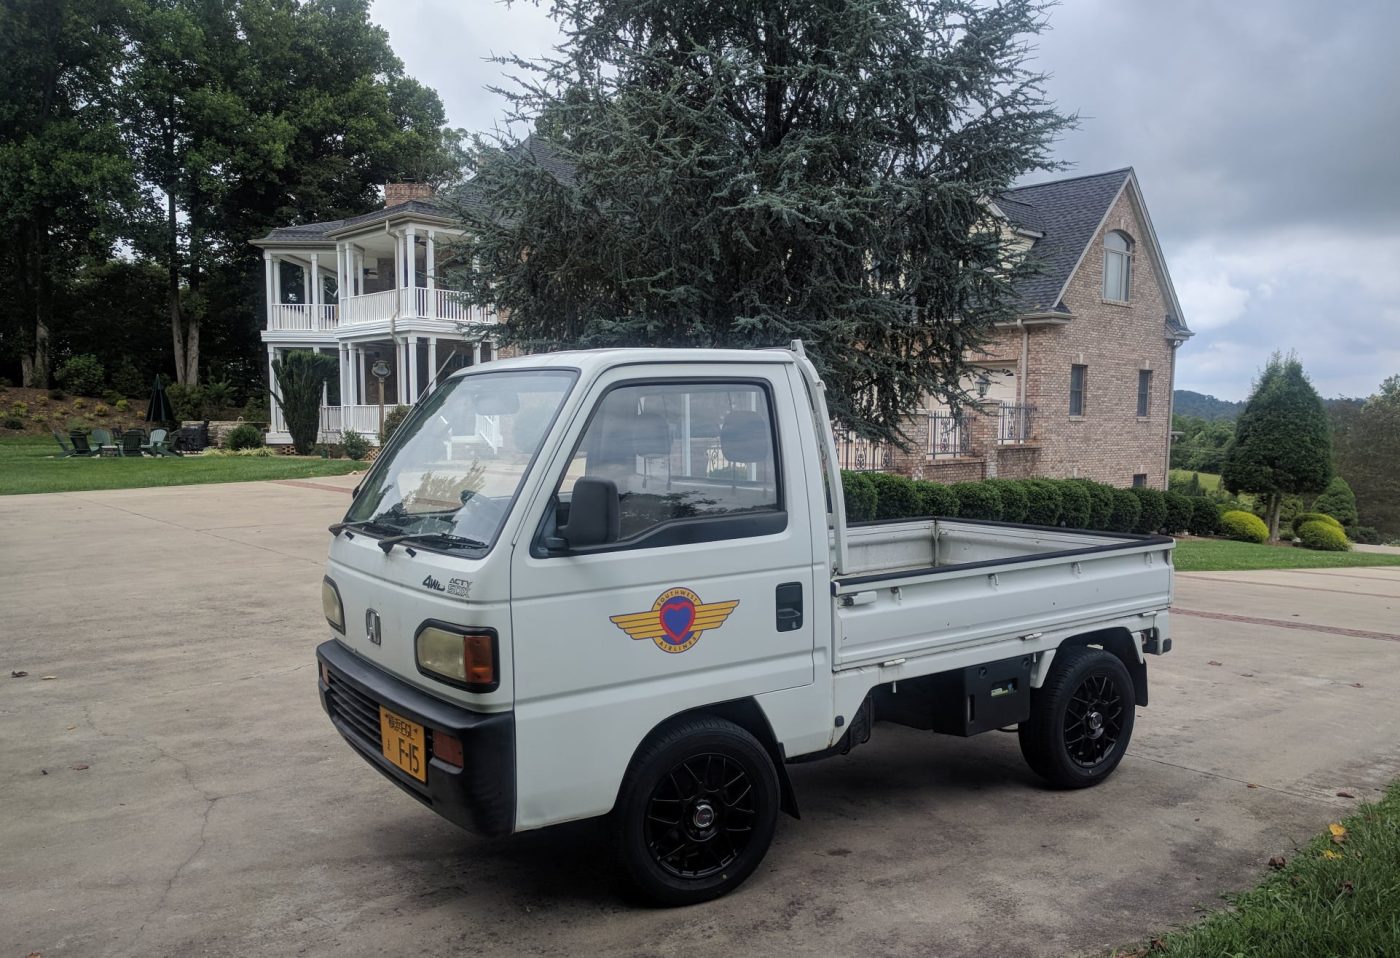
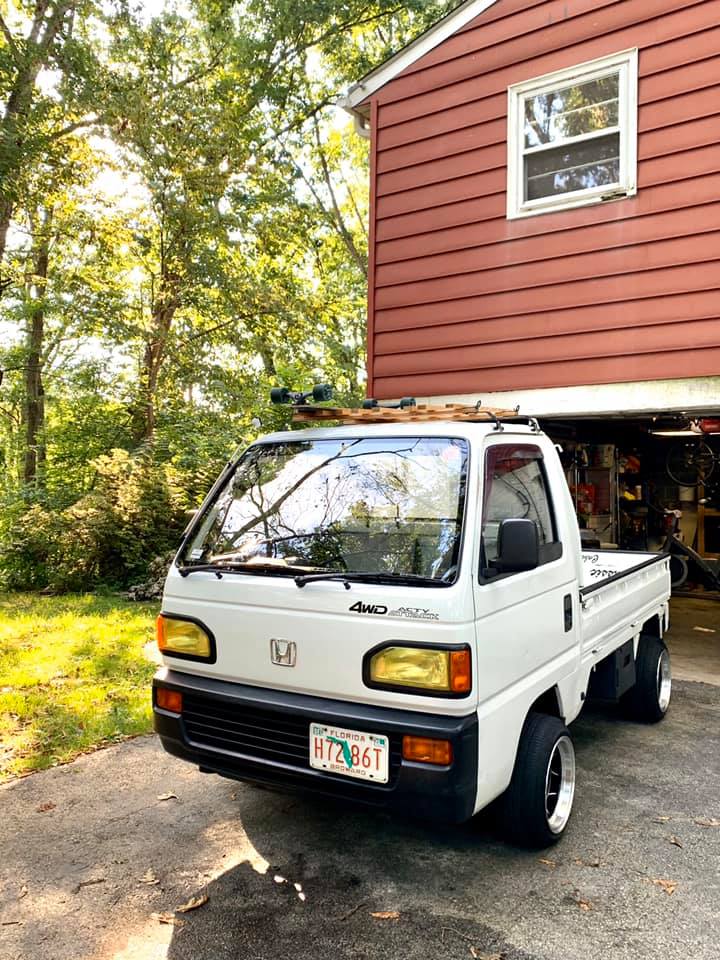
My 1991 ACTY SDX next to a 2012 Ford F250 truck.
1990-1997 Honda ACTY Truck & Van Info
By Rob Robinette
Have comments or corrections? Email rob at: robinette at comcast dot net
I purchased my ACTY micro-truck in January 2019 and couldn't be happier with the little guy. The ACTY, short for "activity", is a Japanese Domestic Market (JDM) micro-truck and micro-van that were never imported into the United States but US importers are now bringing used trucks and vans into the USA and people are snapping them up. When you compare the cost of a new side-by-side for farm work to the ACTY you'll be favorably impressed. US federal law allows the import of 25 year and older vehicles that did not meet EPA and crash standards.
Safety
The ACTY truck and van are NOT safe by modern standards. There is no crash structure between the driver and oncoming vehicles and there are no airbags. An accident that would result in no injury in a modern airbag equipped vehicle can be fatal in these trucks.
I was a driving/racing instructor at Summit Point Raceway (road race circuit) for many years. I know most of us realize what we're getting into but some potential buyers do not consider the risks these vehicles bring. I got an email from a mother that lost her son in an ACTY accident. She had no idea what her son was driving.
The ACTY also lacks an anti-skid brake system (ABS). A panic stop in an ACTY will result in four skidding tires and the loss of steering control. Unless you have a lot of racetrack time in a non-ABS vehicle you will skid all tires in a panic stop and greatly increase its stopping distance. I instructed for Bill Scott Racing (BSR) and NASA on Summit Point Raceway and some of the vehicles we used had an ABS On/Off switch. I know the difference ABS makes to stopping distance and control. Do not tailgate in an ACTY! Give yourself extra stopping distance.
The combination of the ACTY's small size, low weight, no airbags, lack of crash structure and no ABS is a serious safety issue so you should purchase these vehicles with your eyes wide open. Consider them safety-wise to be similar to riding a motorcycle where a texting teenager can kill you at any time. That being said I still enjoy driving my ACTY on the street.
Registration
Everyone should consider any unregistered ACTY as an off-road use only vehicle (unless it's at port with known complete paperwork). Be very wary of anyone selling an unregistered ACTY because if a seller could register it they would. A seller can get twice the price compared to an off-road use only ACTY. If the seller says it can be registered then make him register it before you buy it.
There are at least five documents from Japan that are required for registration and some of them must be translated into English by a certified company. Also, keep in mind that several blue states do not allow ACTY registration for street use so check with your state Department of Motor Vehicles before you buy. The ACTY has a shorter than normal VIN number that can cause registration denial. Many buyers have been burned because they thought registration would be easy so I highly recommend you buy an ACTY with registration and license plates.
If you choose to import an ACTY from Japan I highly recommend you hire an import broker that will handle the vehicle at port and get all the required paperwork for registration.
If you do want an off-road only vehicle for use around your property then you should get a deep discount of around 50% compared to a registered road legal ACTY.
The Honda ACTY comes in rear wheel or all wheel drive. The all wheel drive truck makes a perfect working farm or ranch vehicle. I'm amazed that my mini truck will crawl around my farm and yet easily cruise at 60 miles per hour on the highway. I also like the right-hand drive and manual 5 speed transmission. Shifting with my left hand is fun. This truck gets a lot of attention. People stare, wave and chase me down to ask questions.
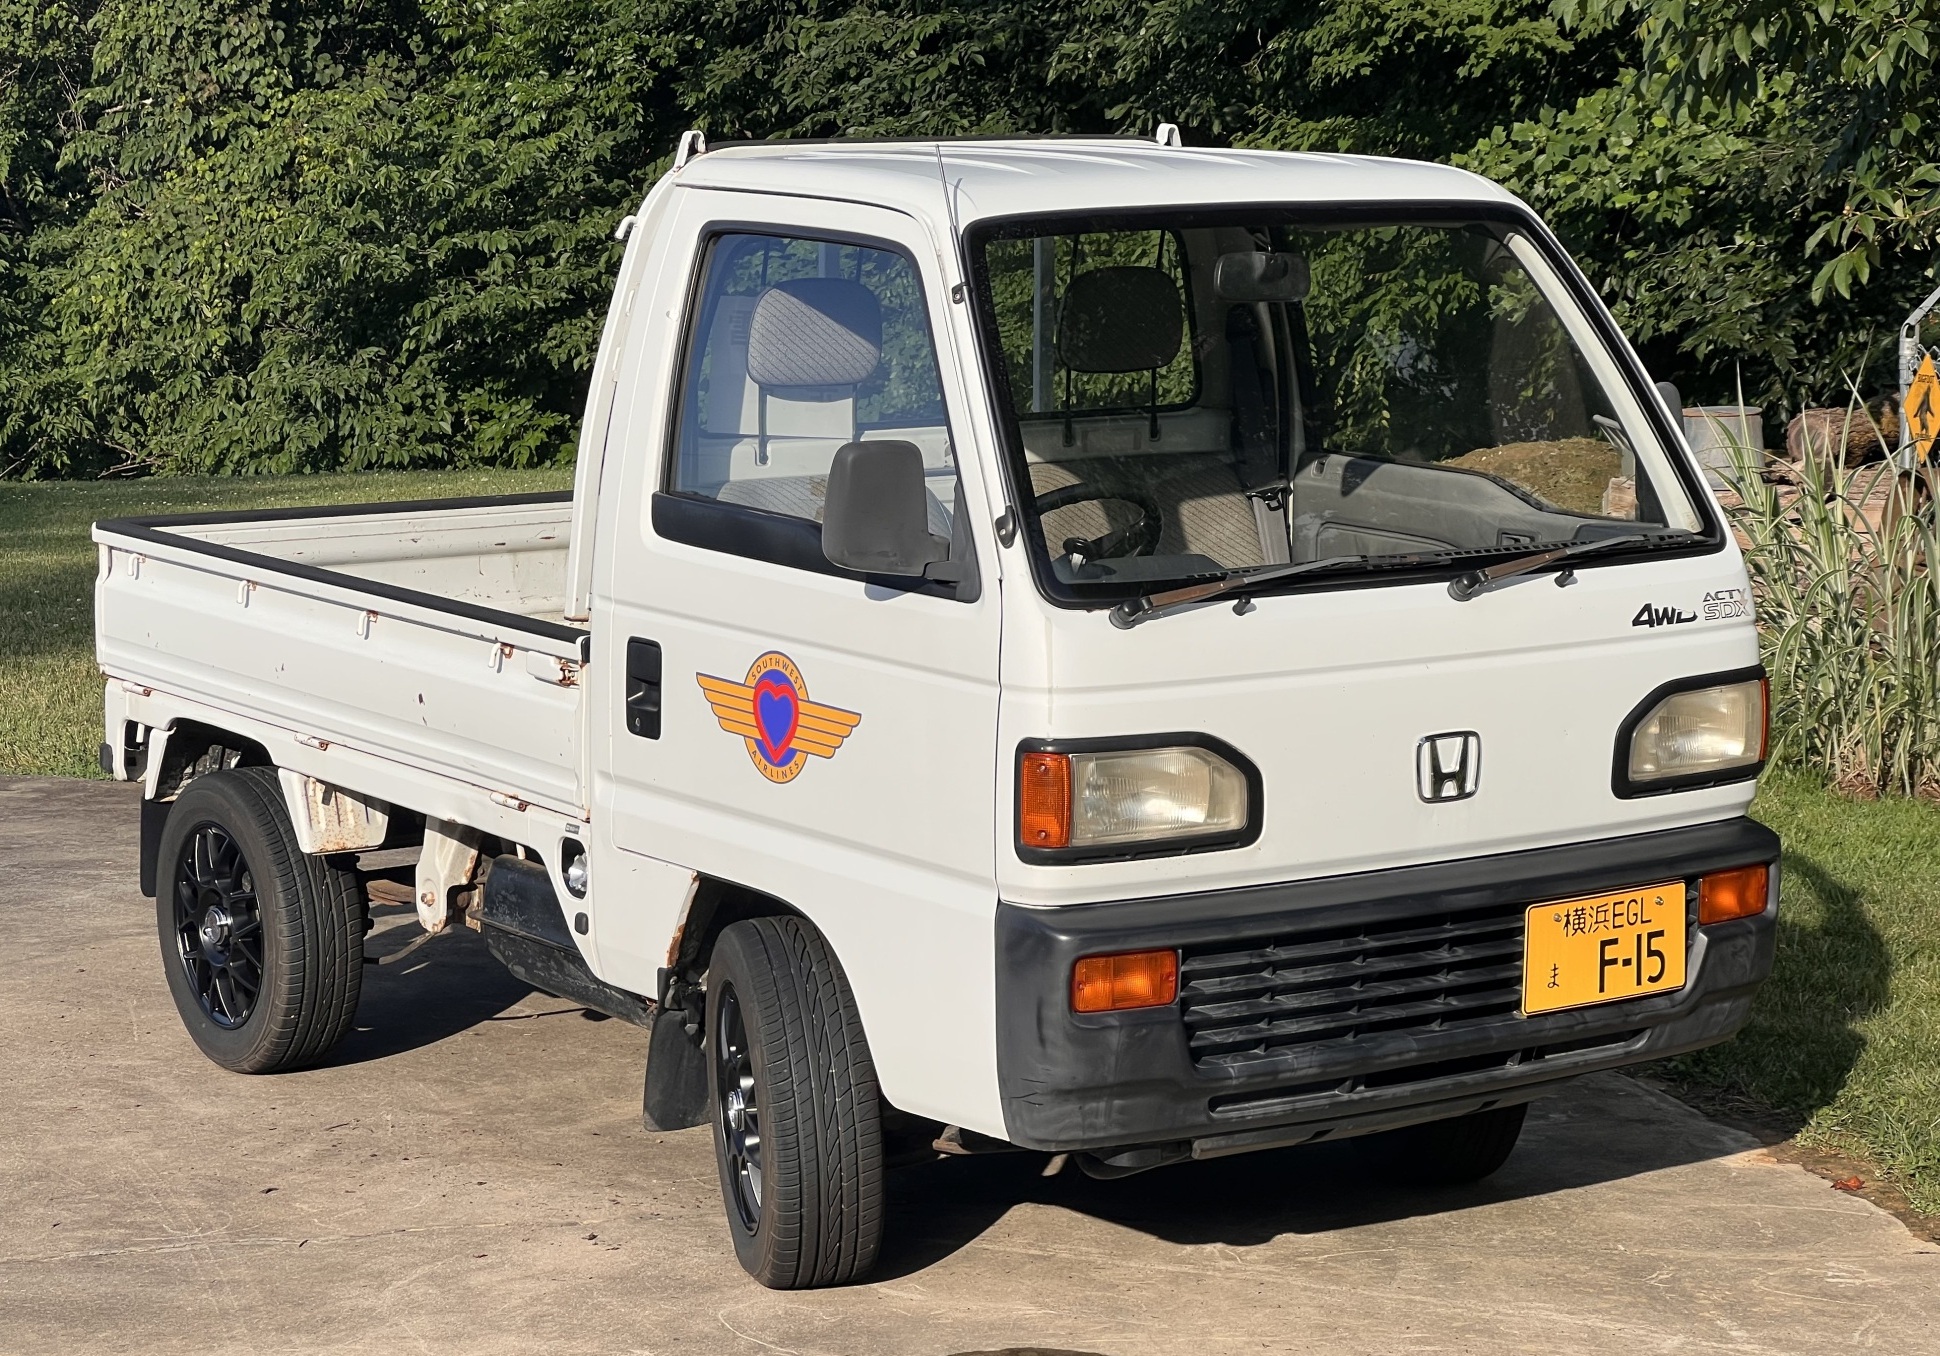
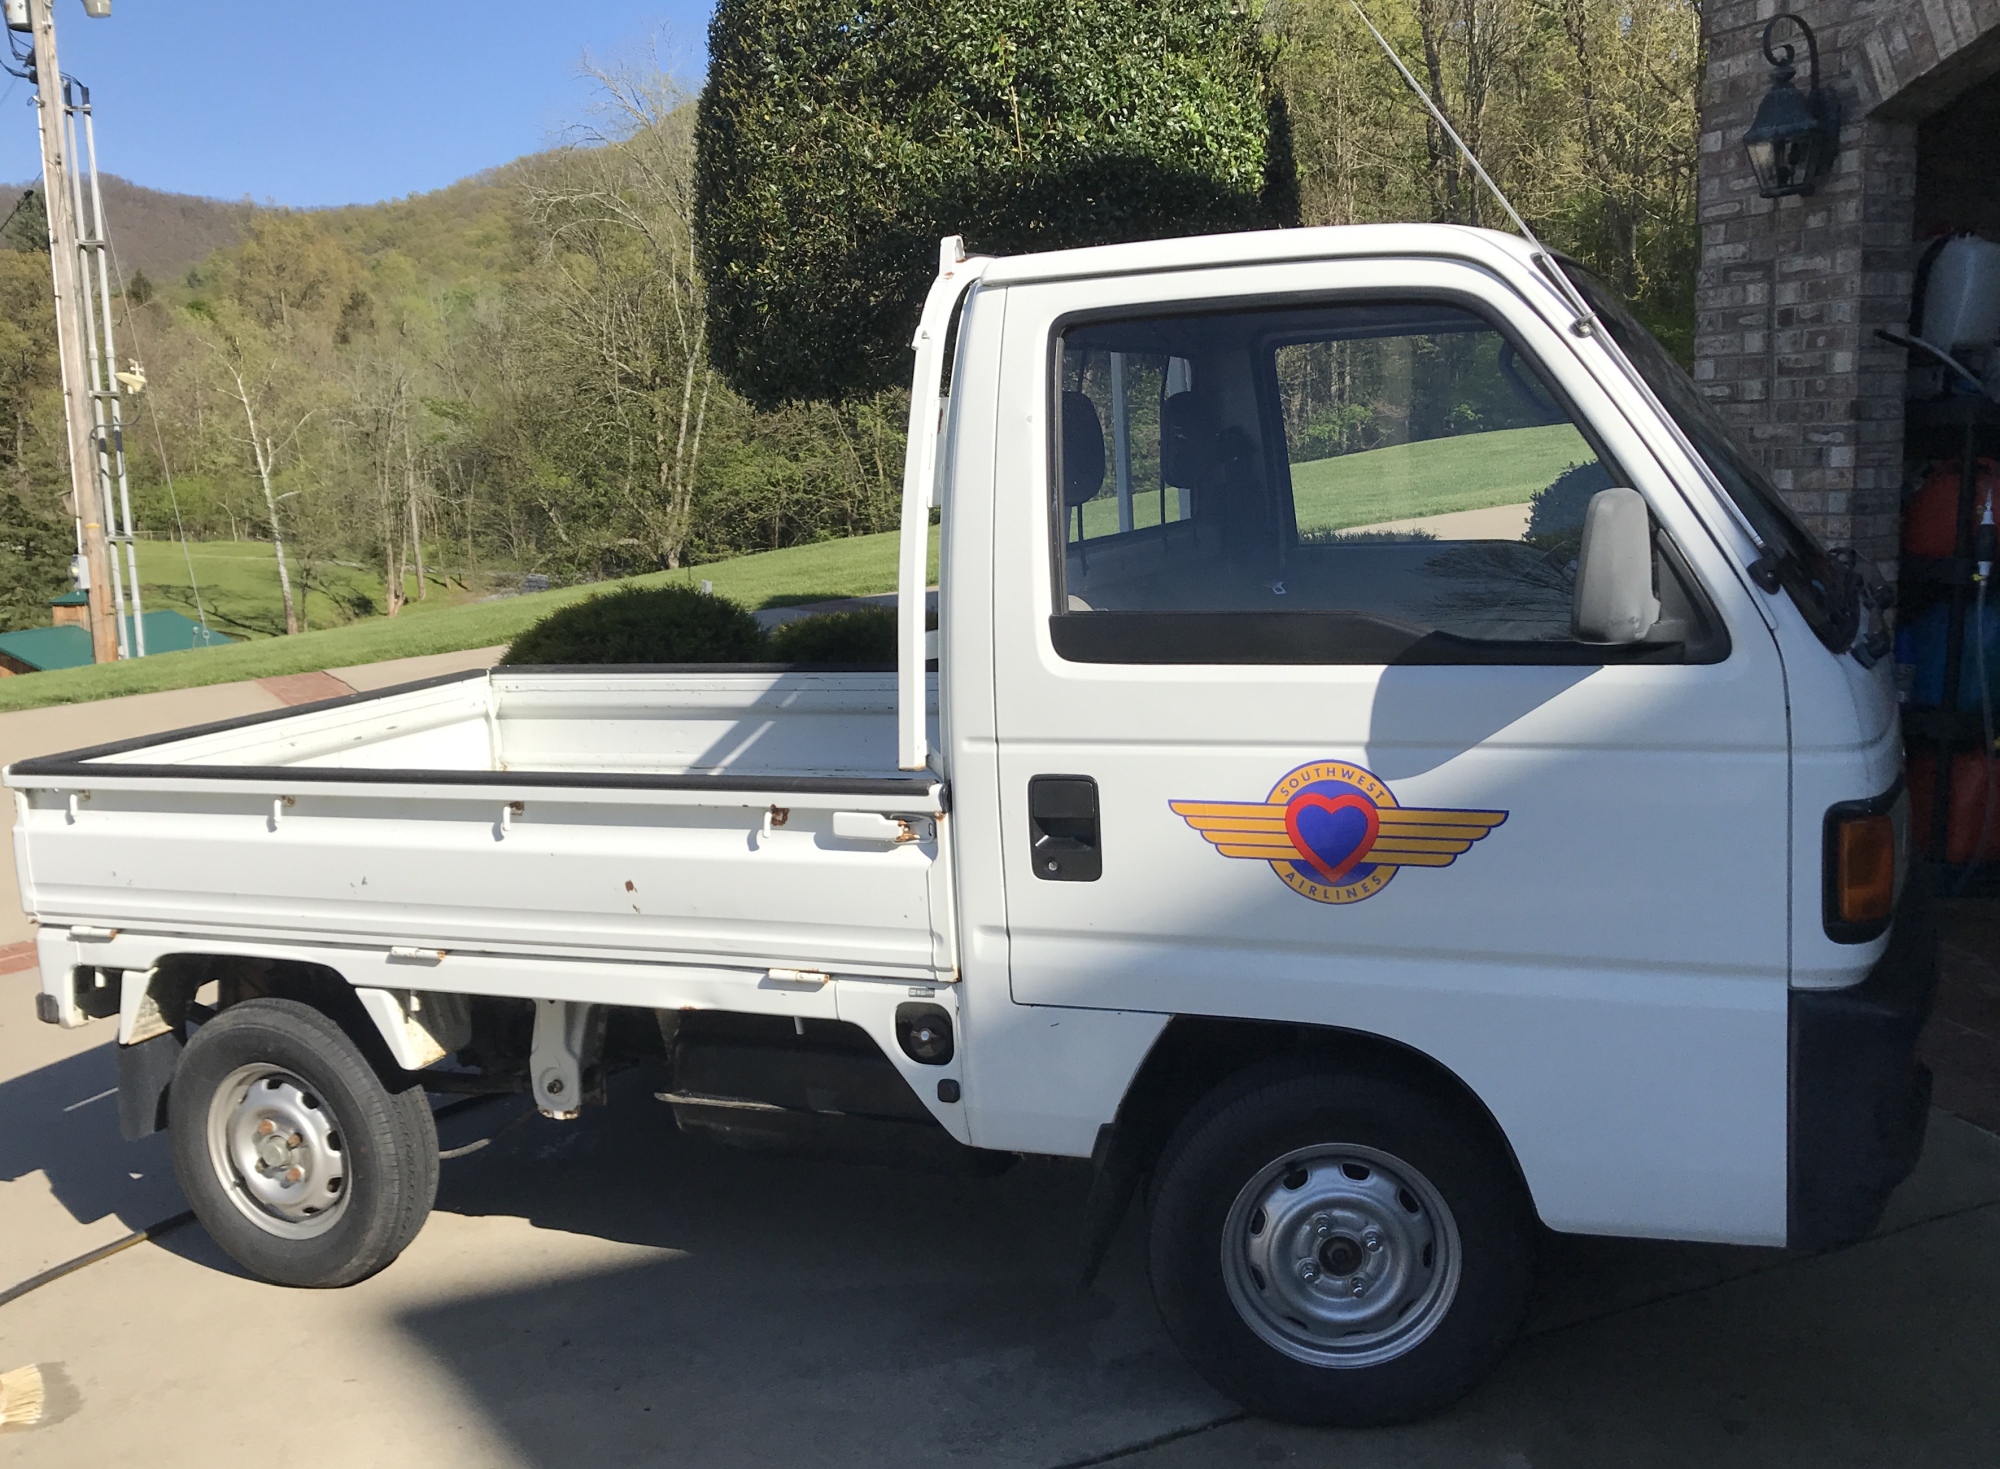
My 1991 ACTY SDX.
This page is a work in progress. As I do more work on my truck I'll add info and pictures. So far I have changed the engine oil, oil filter, transmission oil, front differential oil, air filter, coolant, spark plugs, replaced the front brake disks and brake pads and put on new tires. I also plan to change the rear brake shoes, turn the rear drums, flush the brake fluid, replace the fuel filter, timing belt and water pump.
If you're going to do a lot of your own maintenance I highly recommend the ACTY Honda English Factory Service Manual. It covers the 89 to 97 ACTY van and truck.
My 1991 Honda ACTY truck is an HA4 model (4 wheel drive truck) with a three cylinder EO7A engine with 39 horsepower, 40.5 lb-ft torque, 40.2 cubic inches (660cc, .66 liter) and yet the truck will cruise at 65mph (105kph).
Commonly Imported ACTYs
1990 to 1998 HA3 and HA4
Have front disc and rear drum brakes.1996 and newer ACTYs have fuel injection.
HA4: 660cc engine, manual 4/5 speed transmission (no auto transmission), 4x4 (2 wheel rear drive selectable), wheel lug pattern 4x100
HA3: manual 4/5 speed and auto transmission, 2 wheel rear drive
1988 to 1990 HA1 and HA2
HA2: 4x4, 550 cc engine, Same body style as HA3 & HA4 but with round headlights
HA1: 2 wheel rear drive
1987 and older have round headlights and a 2 cylinder 550cc motor and parts are extremely difficult to find
Table of Contents
Removing the Engine and/or Transmission
Manual Transmission Fluid Change
Front Differential Fluid Change
Drive Shaft U-Joint Replacement
Brake & Clutch Pedal Replacement Rubber Pad
Brake Pedal Brake Light Switch
Air Conditioning Compressor Belt
Replace Air Conditioning Drier
Road Flare LED "flare" fits in the flare holder at front left corner of cab under the dash.
Adobe Illustrator ACTY Decal File by Lars Krohn Print your own ACTY decals.
Snow Plow - Contact trucks@luckysminitrucks.com or www.luckysminitrucks.com
Basic Info
The VIN Number (frame number) is located beneath the driver seat.
The engine and transaxle (transmission + rear differential) is located under the truck bed, forward of the rear axle. There is an engine access panel in the center of the truck bed.
Sticker on back of truck says 350 kg cargo capacity (772 lbs).
PSI: 26 front, 29 rear (I prefer 29psi front and rear)
With two people and more than 100kg of cargo (220lbs): 29 front, 34 rear
Bar: 1.8 front, 2.0 rear, With two people and more than 100kg of cargo (220lbs) 2.0 front, 2.4 rear
Tire Air Pressure Label
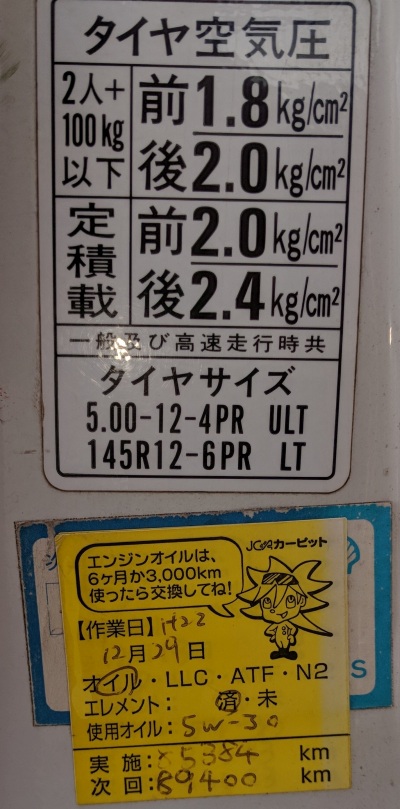
Tire pressure label on the driver door frame. Pressure in kg/cm2=kilogram per cubic centimeter=BAR. Factory tires are listed as 5 inch section width on 12 inch diameter rims & 4 ply radial ultra-light truck (22x4x12) or 145mm section width on 12 inch rims 6 ply radial light truck (LT145/80R12). The yellow sticker on the bottom denotes an engine oil change.
Spare Tire: Located under the bed/cab below the passenger seat.
Fuel Tank: 9.8 gallons or 37 liters of 87 octane fuel.
Jack Points: The manual says you can jack the truck from the front and rear axle beams. There are also two metal protrusion jack points at the extreme front corners. The rear leaf suspension forward mounts (just forward of the rear wheels) are also approved jack points.
Towing: Four wheel drive ACTY's should not be towed over 25mph (40kph) or for long distances. The towing attachment hook is located below the front bumper license plate holder. Make sure the parking brake is released and the transmission is in neutral. If your ACTY has the 4WD-2WD selector bolt I recommend selecting 2 wheel drive for towing.
Engine/Transmission Removal Video
The video covers engine and/or transmission drop, clutch and pilot bearing replacement, rear CV axle removal, coil pack replacement, distributer ring replacement, valve cover gasket, fuel filter and coolant bleeding.
Do all the oil changes after a drive to warm up the engine, transmission and differential oils.
Engine Oil: 10w30 3 quarts (2.9 liter) when changing the filter, 2.8Q (2.7L) when not changing the filter. If operating in temperatures below -22 degrees F (-30C) then use 5w30 oil and change oil every 3 months. The Factory Manual says to change the oil every 10,000km (6,250 miles) or every six months. Since my truck has over 100,000km on the odometer I use Castrol High Mileage Synthetic Blend 10w30 for both the engine and manual transmission. The oil dipstick is in the left rear wheel well.
Engine Oil and Manual Transmission Drain and Fill Bolts
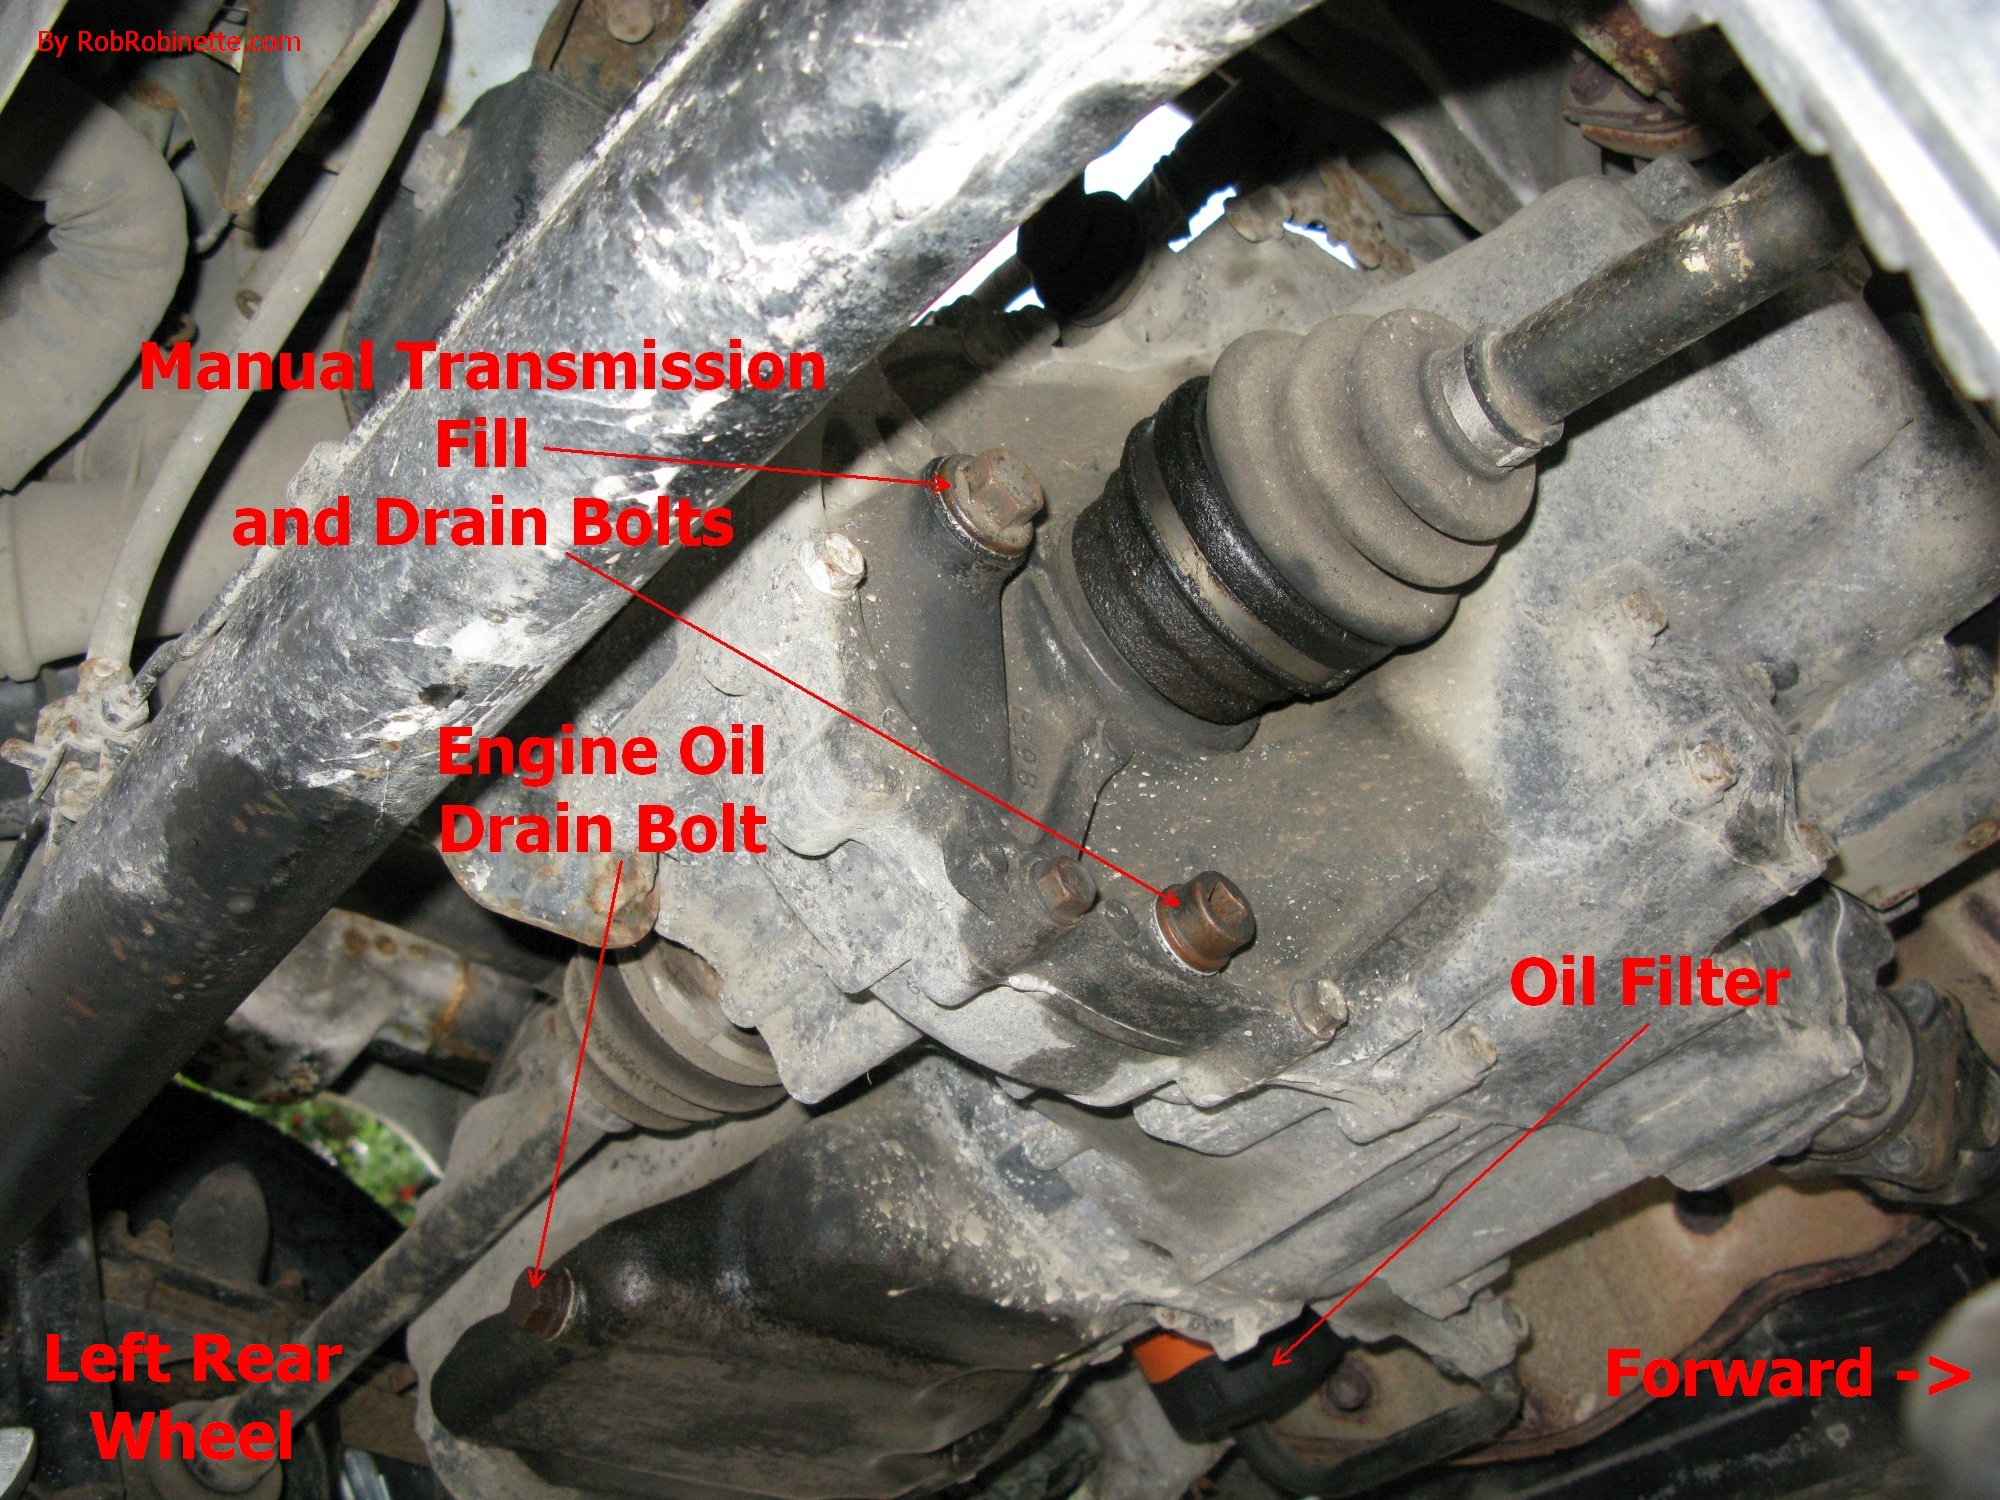
Oil drain bolt at lower left, Fram PH9688 oil filter at lower center. Torque the engine oil drain bolt to 3.5-4.5 kgm.
Oil Filter: The following short filters are the same size as the factory Honda part: (NAPA 1334 or NAPA Gold 1358), Fram PH9688 and Mobile 1 M1-108A. Filter thread size: M20x1.5. Put clean oil in the filter and on the oil filter gasket and threads before installation. I don't recommend the Bosch 3323 (2006 Honda Civic 1.8 oil filter), NAPA 27356 and WIX 57356 because they are tall filters and may be struck by road debris.
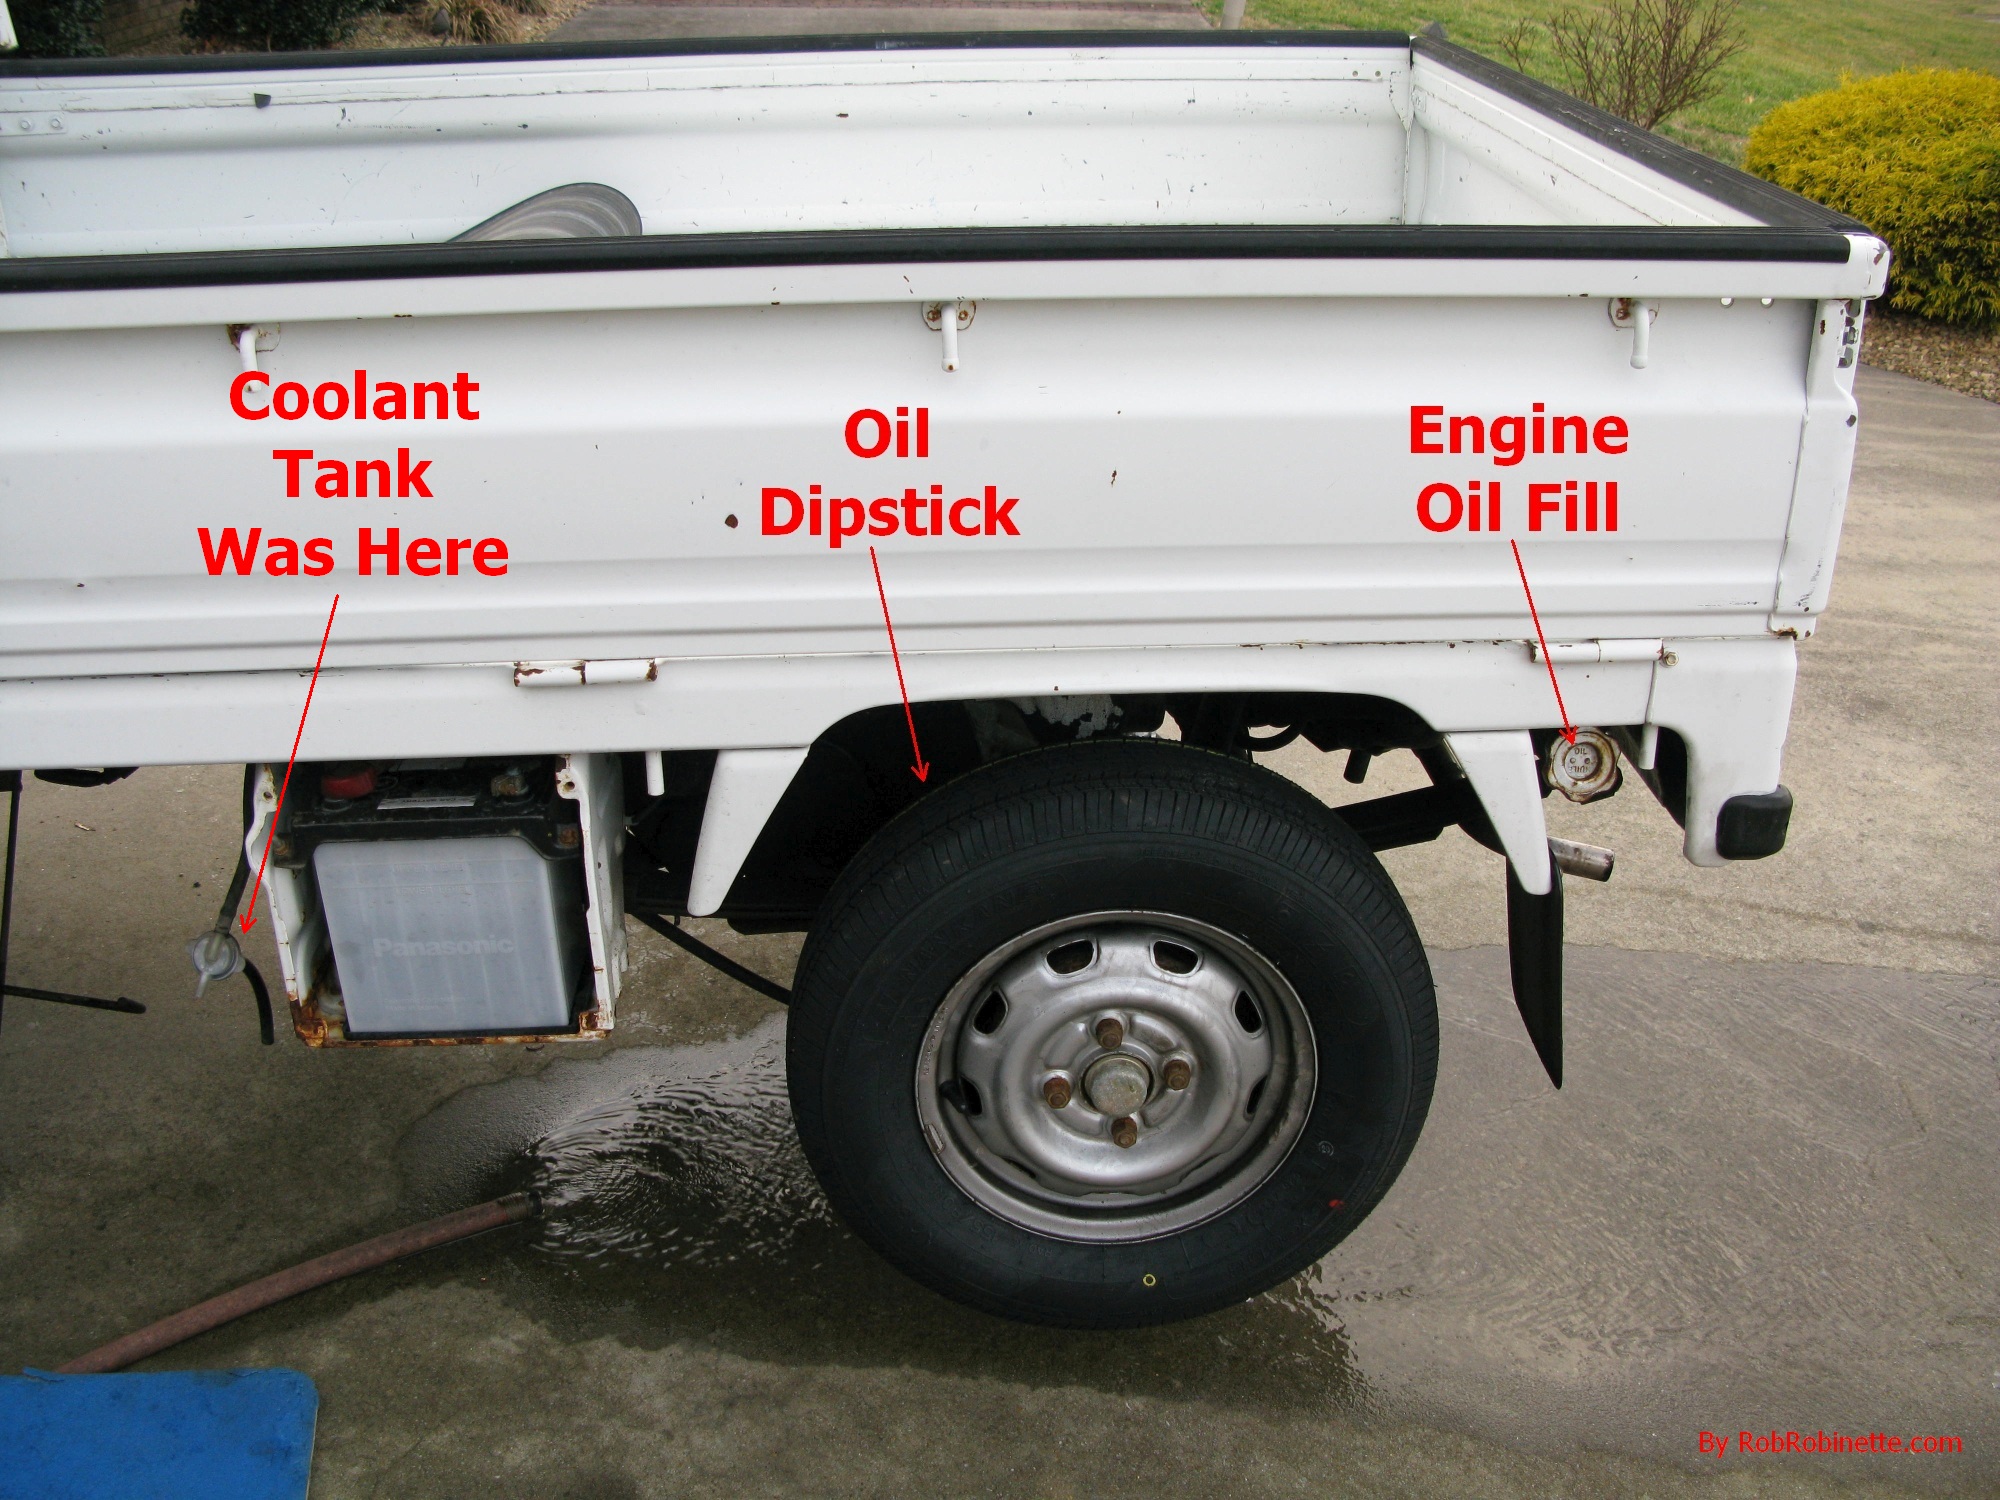
The dipstick is behind the tire. The coolant reservoir has been removed for cleaning but it hangs on the left side of the battery box. If you loan your truck to anyone make sure and show them the fuel and oil fill locations so they don't fill your crankcase with gas. The fuel fill is just behind the driver door. Note these are new Nanking CX668 155/80R12 tires.
5 Speed Manual Transmission: MTF (manual transmission fluid) or API SE 10w30 oil 1.3 quart (1.2L). I recommend the Honda brand MTF (manual transmission fluid). I like to put a little fresh oil in with the drain bolt still out to flush out the bottom of the transmission case. Replace the drain bolt and put a nozzle on the oil bottle and squeeze it into the fill hole until it starts to run out of the fill hole. Oil bottle nozzles are available at auto parts stores.
Manual Transmission Fill & Drain Bolts
![]()
Manual Transmission fill and drain bolts. A 3/8 inch ratchet wrench fits into the square hole in the transmission drain bolt. Do not drain the transmission until you get the fill bolt loose. I had to use a large breaker bar to get the transmission and front differential drain and fill bolts loose. I could not find torque specs for the manual transmission and front differential fill and drain bolts but 7kgm is a good guess.
Front Differential: API GL-4 75w85 gear oil 0.48 quart. I use Lucas GL-4 GL-5 full synthetic 75w90 gear oil. GL-5 meets or exceeds GL-4 specs. I like to put a little fresh oil in with the drain bolt still out to flush out the bottom of the differential case. Replace the drain bolt and put a nozzle on the oil bottle and squeeze it into the fill hole until it starts to run out of the fill hole.
Front Differential
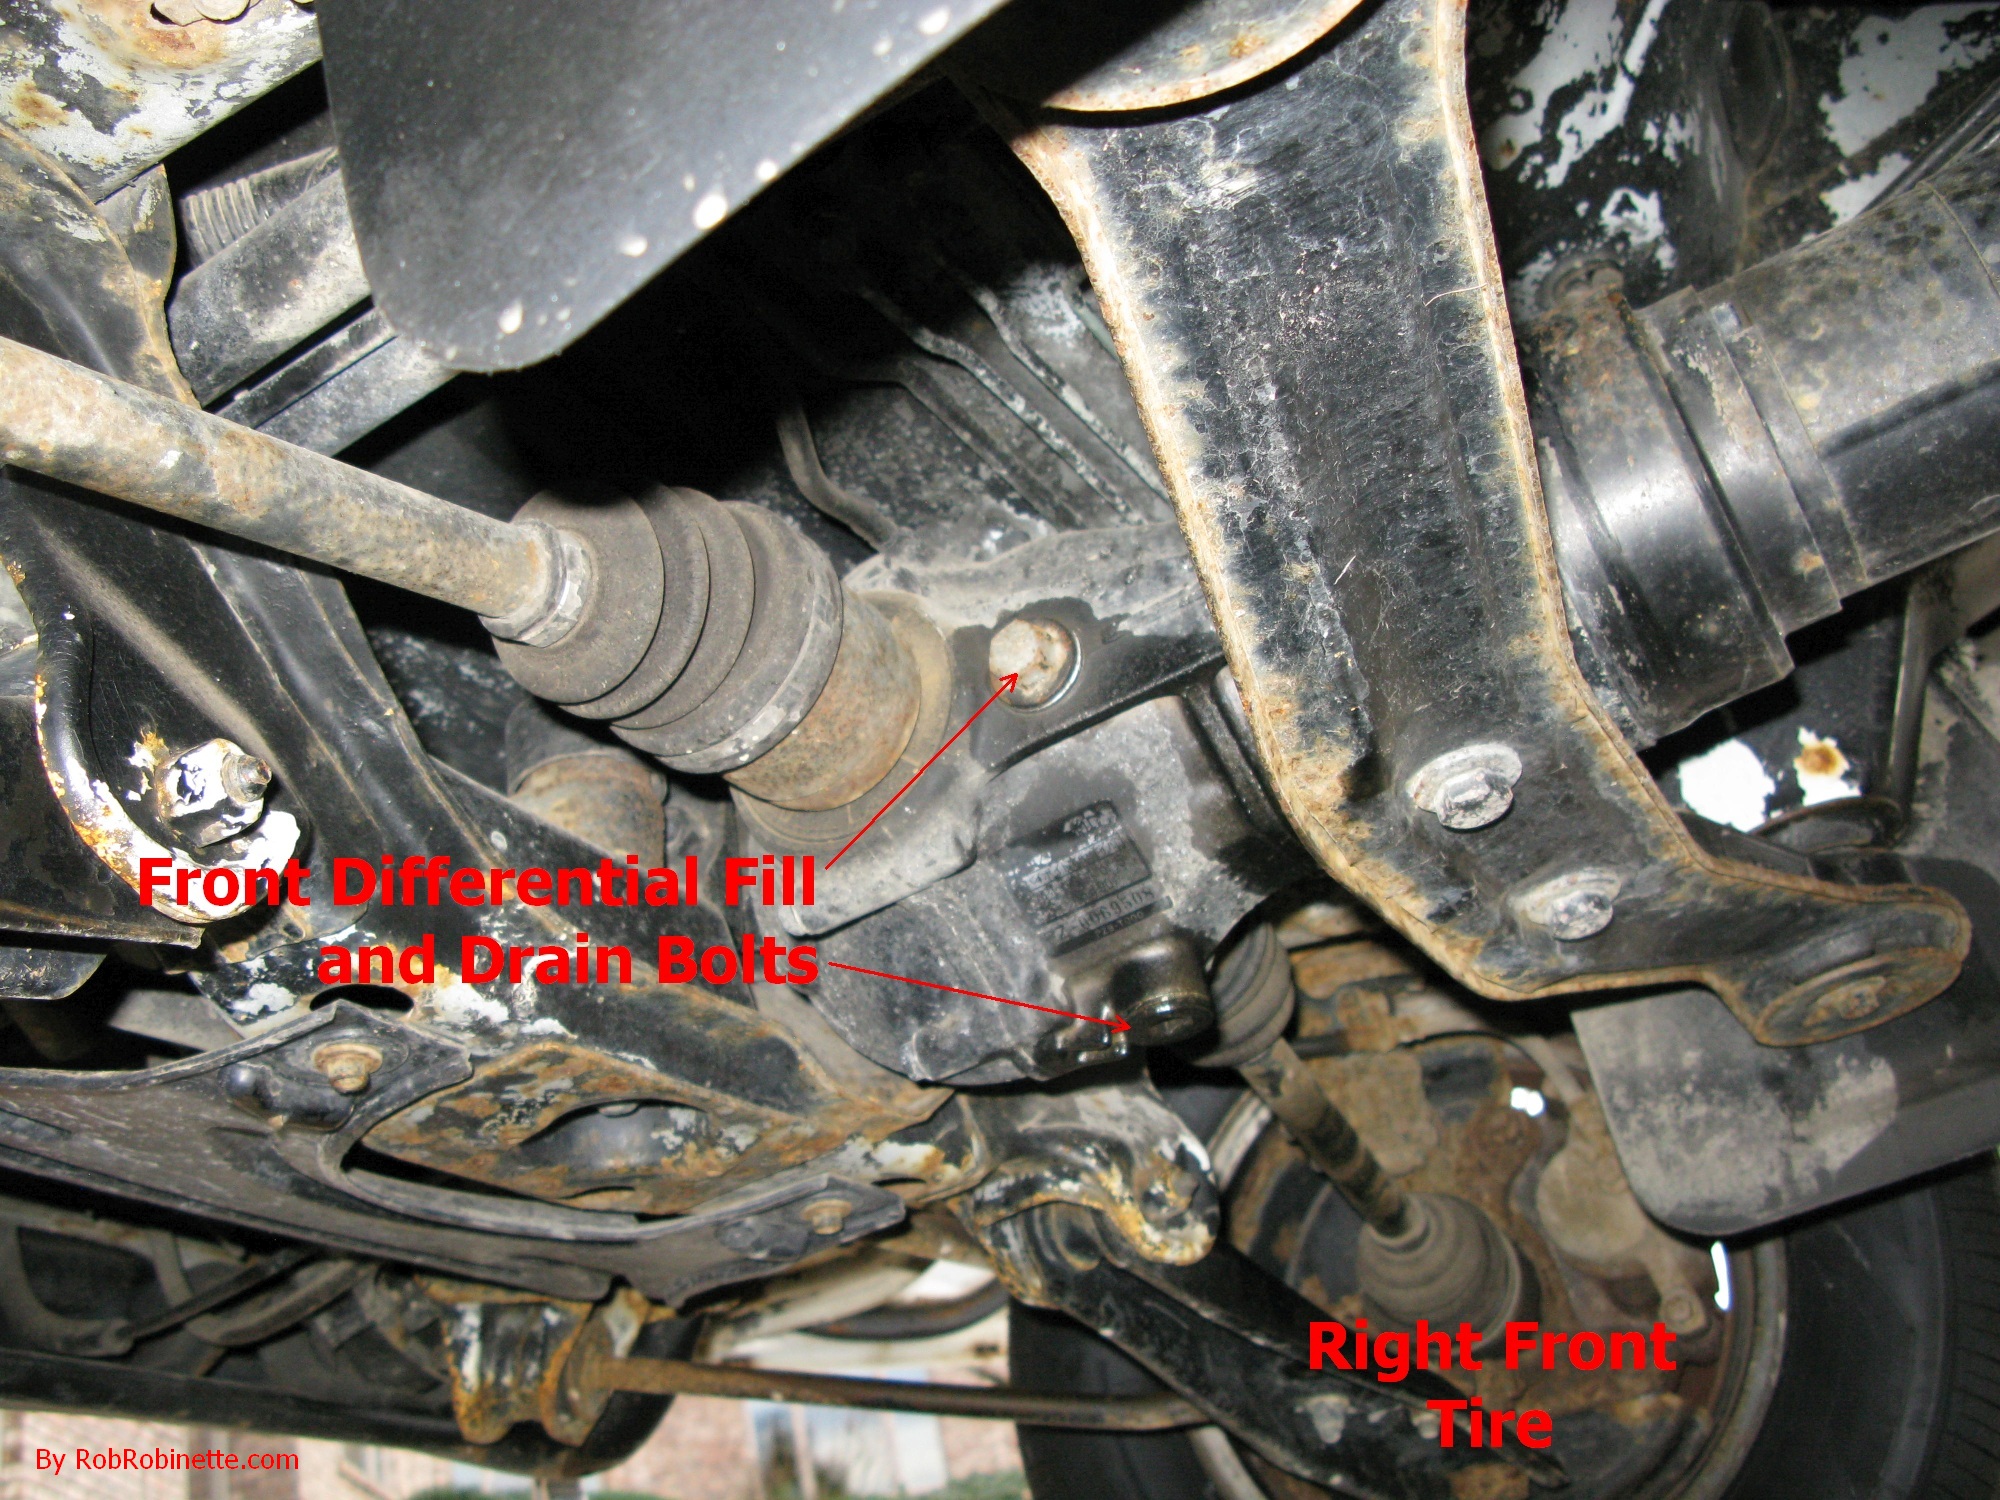
Front differential fill and drain bolts. A 3/8 ratchet wrench fits into the square hole in the differential drain bolt. Do not drain the differential until you get the fill bolt loose. I had to use a large breaker bar to get the transmission and front differential drain and fill bolts loose. I could not find torque specs for the manual transmission and front differential fill and drain bolts but 7kgm is a good guess.
Battery Many people use a U1 size generic lawn and garden tractor battery from Walmart and Tractor Supply, the U1-340 for around $40. It has 340 CCA (cold cranking amps) so it's plenty powerful. The terminals are on the correct side and the stock hold down bar fits. You will need to slightly spread the ACTY battery terminals using a pair of pliers (see photo below) and the battery hold-down j-bolts will need to be moved to their lower set of holes for the shorter than stock battery.
U1 Size Lawn & Garden Battery
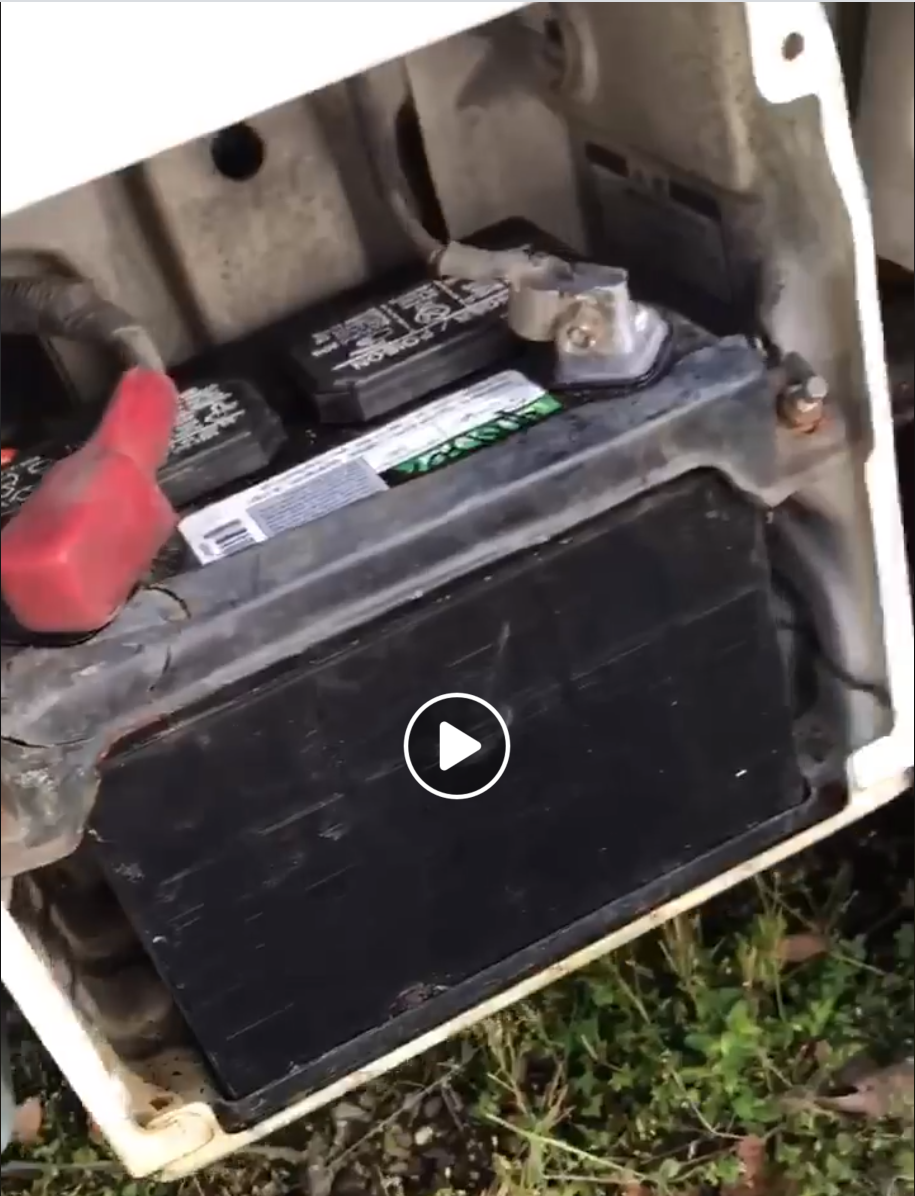
The 36B24R battery from Allibaba is an exact fit with factory size terminals.
Tires: Stock tires are LT145/80R12 6 ply radial (Light Truck 21.2" diameter, 145mm section width, 80 profile, 12 inch diameter wheel rim) and optional 155/70R13 (21.5")
Nankang CX668 155/80R12 (21.8" diameter), wear rating 440, M+S (mud & snow rated) $35 each on Amazon, $259 for 4 at Discount Tire installed, fit and drive great on the stock 12" wheels. I put these on my truck and I really like them for highway use.
Bridgestone 604V RD-604 145R12 6PR fit the stock 12 inch wheels are $369 for four delivered from ebay.
Bridgestone 604V
Sun F All 22x7x12 off road tires fit stock wheels Amazon $61 each shipped.
Tractor Style Tires: 6x12 Carlisle Tru Power and Farm Specialist R1 23x6x12 (my favorite off-road tire) fit the stock 12" wheels Amazon $65 each.
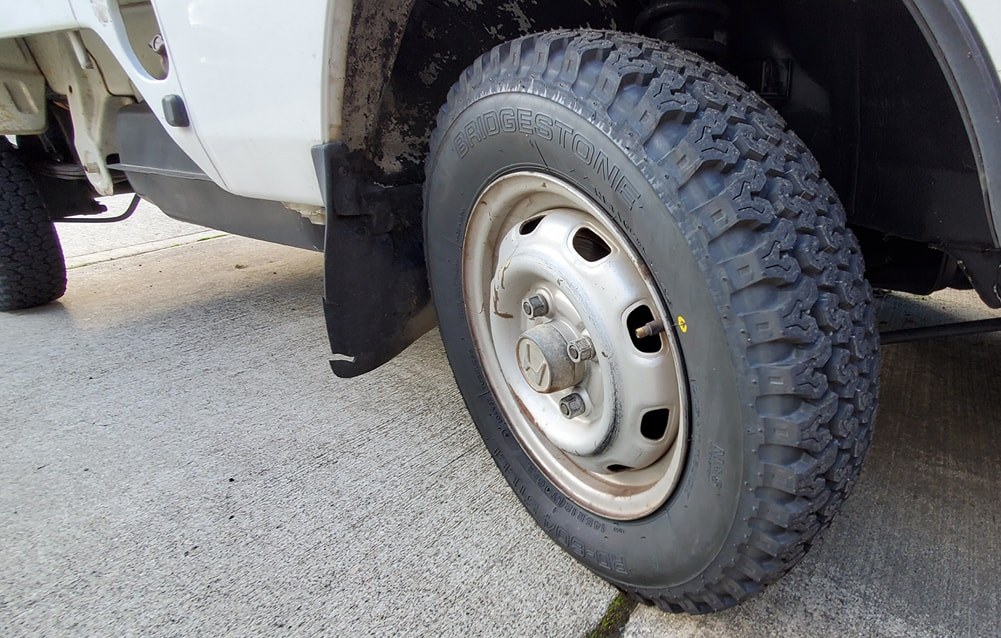
Wheels: Stock are 4x100 lug pattern, 12x3.5" (12 inch wheel diameter and 3.5 inch width) or 13x4", 56.1mm center bore hole
The stock wheels have 100mm (3.9") of backspacing and with stock tires have about 1" clearance to the coil springs.
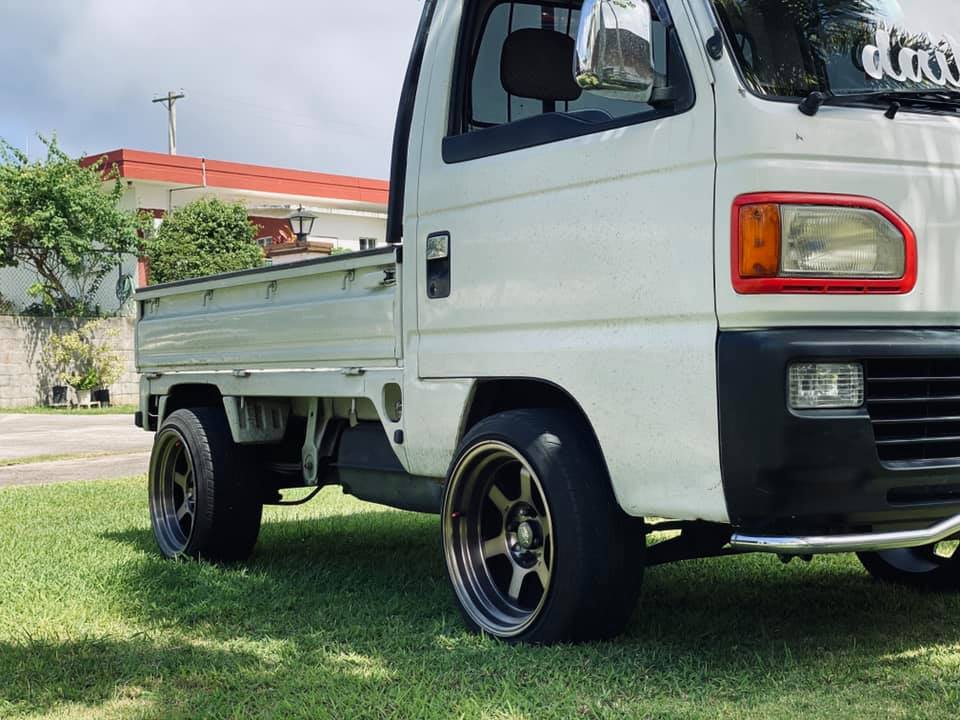
These wheels sold by Harley Rose on the ACTY Facebook group, fit the stock suspension but if your struts and shocks are weak you will rub when hitting bumps while turning. New springs will solve that problem.
14x5.5 wheels and 185/60/14 tires sold by Harley Rose. The suspension is completely stock.
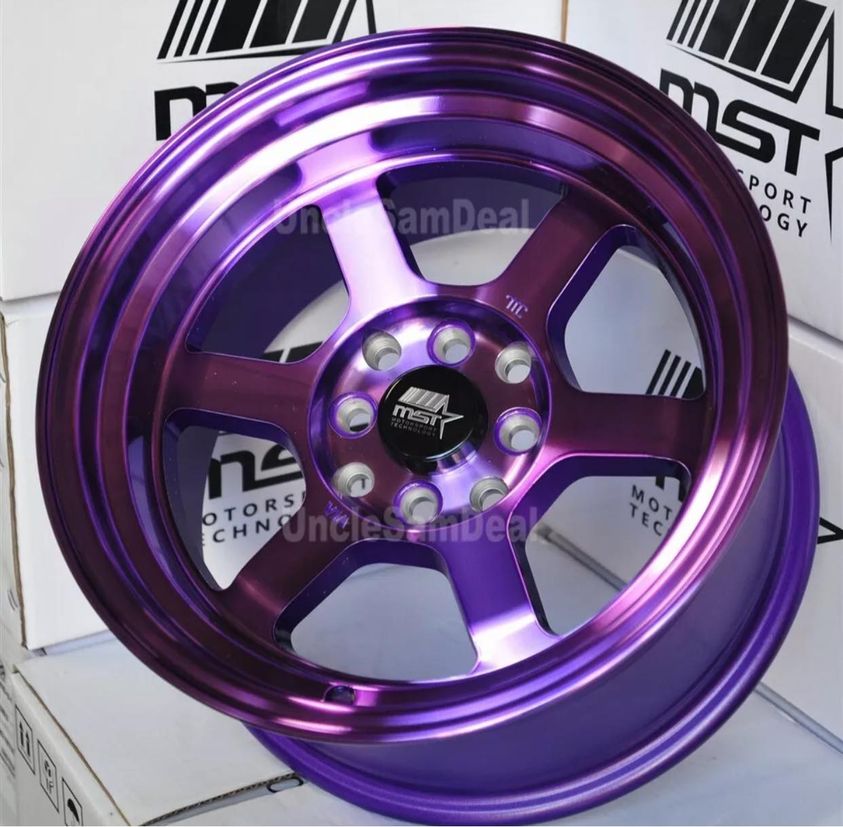
These MST wheels in 15x8 and 0 offset using 185/45 R15 tires seem to fit with no rubbing on the stock suspension. They come in different colors.
Wheel Adapter: Allows more common 4x114.3 wheels to be fitted. Four 1" (25mm) thick Wheel Adapter Spacers 4x100 to 4x114.3 with M12x1.5 lugs, Amazon $58. These adapters add 1 inch of positive offset and 1" backspacing.
With 1" 4x114.3 adapter, 14x7 +13 offset Fuel Maverik wheels and 23x9.5x14 inch tires fit.
14x6 +30 offset with 175/65/14 tires fit with no lift and no rubbing.
Lug Nuts: M12x1.5 (12mm at 1.5 threads per mm) available from Amazon (search: M12x1.5 lug nuts)
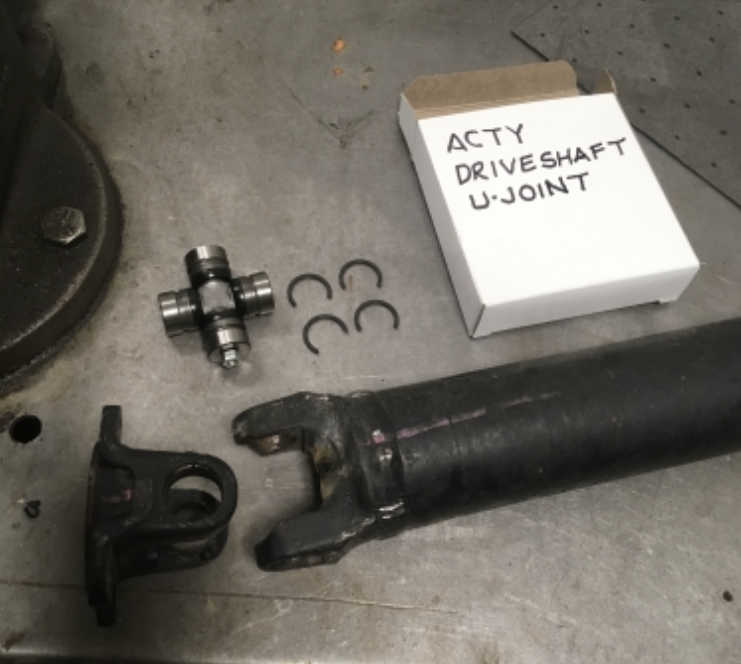
Drive Shaft U-Joint Replacement
Jules Cutter wrote, "My 1998 ACTY drive shaft u-joint was failing so my GM mechanic son-in-law and I pulled the driveshaft, removed the original u-joint. It had no numbers or markings so we carefully measured the yoke. We were able to source a replacement of the correct size and retainer clips. Paid $42." Got the u-joint here:
ujointstores.com TUS-403 u-joint
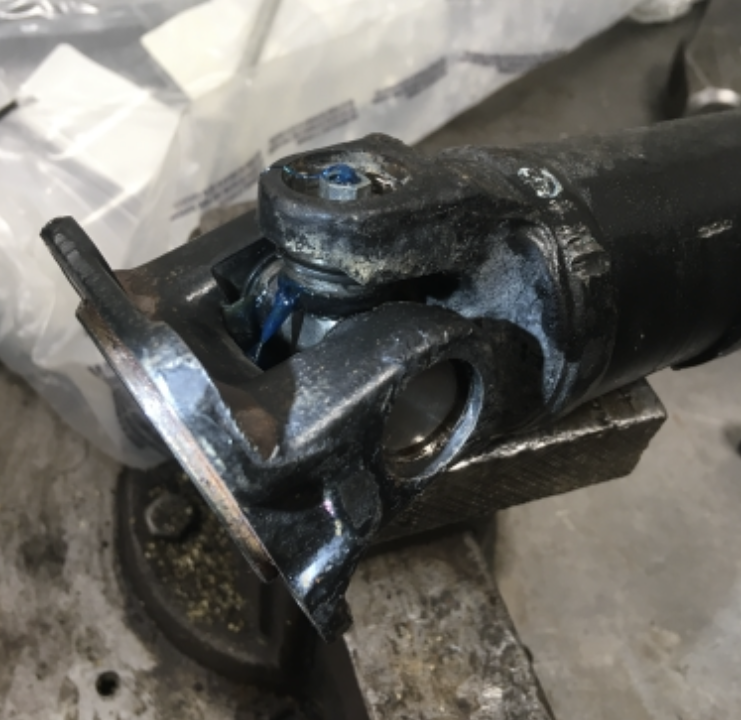
U-Joint and Retaining Clips
New TUS-403 U-Joint Installed
2 Inch Lift Kit: Available for $200 on ebay. The kit allows the use of larger diameter wheels and tires but also raises the vehicle's center of gravity making it even more prone to roll over. Lifting the ACTY will also put more stress and wear on the CV (constant velocity) joints so I don't recommend lifting the ACTY. The kit has 2 inch spacers to lower the front struts. In the rear a 4 inch longer spring leaf mount is used on one end of the leaf springs for 2 inches of lift.
A 3 inch lift kit is available but extensive modifications must be done to make it fit and it is not recommended.
Installing a 2 Inch Lift Kit
Start by removing the front seats to get access to the strut tower nuts.
Jack the front of the ACTY using the front center brace. This will bring both wheels off the ground. Use jack stands to hold the front up.
Remove a wheel.
Disconnect the bracket that holds the brake line to the strut. This will allow you to move the suspension around.
Remove the three strut top hat nuts. They are under the driver and passenger seats. An ACTY van will have insulation and/or carpet covering the top hat nuts. When the last nut is off the strut will be able to fall free so be ready to control it. Do not remove the center strut shaft nut.
Be careful not to put too much strain on the brake line. You will need to use tie-wraps, a bungee cord, or wire to hold the wheel hub up to prevent brake line damage while you work on the strut.
Install the lift spacers.
Reinstall the struts by pushing the three spacer studs up through their holes and install the top hat nuts.
Reconnect the brake line bracket to the strut. DO NOT FORGET THIS
Do the other side.
Inspect your work and verify the brake lines and brackets are secure. Put the wheels back on.
Jack up the rear of the truck by putting your jack pad on the big suspension tube that runs from wheel to wheel. Get the tires off the ground then lower them until they make contact with the ground. This will take tension off the leaf spring supports.
Remove a leaf spring support bracket from both sides of the truck then raise the truck until you can install the longer brackets.
You will need to get a front end alignment because your toe-in will change a lot with a 2 inch ride height change. Without a new alignment your front tires will wear out quicker. The rear wheels are not adjustable.
Front Spring Replacement: The front struts tend to wear out and stop damping bumps so the front end can bottom out on big bumps. Replacement Honda struts must be sourced from Japanese parts suppliers and are very expensive. GAZ makes aftermarket coilover struts for the ACTY but they are also very expensive. The cheapest way to "fix" your ACTY's bottoming on big bumps is to replace the front springs. The specs on the front springs are: 10" long, 2.5" inside diameter and weight of your choice. 275 lbs and up are popular. I went with Summit Racing part # QA1 10HT225/475 These are 225 lb to 475 lb progressive. They were $130 shipped for the pair.
You will need a spring compressor to install the new springs.
To replace the springs start by removing the front seats to get access to the strut tower nuts.
Jack the front of the ACTY using the front center brace. This will bring both wheels off the ground. Use jack stands to hold the front up. You need both wheels off the ground because you need to disconnect the front sway bar and both wheels need to be in the same position to take pressure off the sway bar.
Remove a wheel.
Spray penetrating oil on the sway bar end link nut (cleaning the end link threads with a wire brush will help get the nut off too), strut tower nuts, strut shaft nut (fourth, center nut under the seats), and the strut clamp bolt at the bottom of the strut (only if you plan to remove and replace the struts).
Disconnect the sway bar end link. This will allow you to move the suspension around to make the spring swap easy. You only have to do this to one end of the sway bar.
Disconnect the bracket that holds the brake line to the strut. This will allow you to move the suspension around.
[If you are replacing the struts then loosen the clamp bolt at the bottom of the strut. Spraying the clamp & strut with penetrating oil may help get the strut out of the clamp.]
Remove the three strut top hat nuts. They are under the driver and passenger seats. An ACTY van will have insulation and/or carpet covering the top hat nuts. When the last nut is off the strut will be able to fall free so be ready to control it. Do not remove the center strut shaft nut at this time.
Be careful not to put too much strain on the brake line. You will need to use tie-wraps, a bungee cord, or wire to hold the wheel hub up to prevent brake line damage while you work on the strut.
With stock springs you can remove the strut top hat nut without using a spring compressor. Just be ready for the top hat to pop out a little when the strut shaft nut is removed. Aftermarket springs usually put too much pressure on the top hat so you must use a spring compressor to remove spring tension when removing the top hat nut. An impact gun works well for taking the top hat nut off but you can use a socket and wrench. Putting some penetrating oil on the nut and shaft threads can also help with removal.
Remove the top hat, and spring from the strut. When you disassemble the strut pay attention to how the parts go together and their order. I like to lay them out on the floor in the correct order to aid assembly.
I use a ViceGrip tool with several layers of duct tape on the jaws to hold the strut shaft and keep it from pushing into the strut or rotating. Pull the shaft fully outward then install the new spring on the strut. Insert the ViceGrip between the spring coils and lightly clamp it on the strut shaft. You don't want to scratch or dent the shaft.
Install the spring guide that fits into the spring and then install your spring compressors and tighten them up to compress the spring until you can fit the top hat and hardware back together.
Tighten the strut shaft nut.
Shove the top hat studs up through their holes and install the three top hat nuts.
Reconnect the brake line bracket but leave the sway bar end link disconnected.
Do the other side.
Inspect your work and verify the brake lines and brackets are secure and don't forget to reattach the sway bar end link when you finish both sides. Put the wheels back on and go for a test drive.
If your ride height has changed more than about an inch you should get a front end alignment because your toe-in will change with a ride height change.
Brakes: I had to order my brake parts from a Japanese parts supplier. I tried but the front brake pads and discs for the 89 and 92 Honda Civic did not fit my 91 HA4 ACTY. They were much too large. See this video for detailed info on replacing the rotors and/or the calipers.
Front Brakes
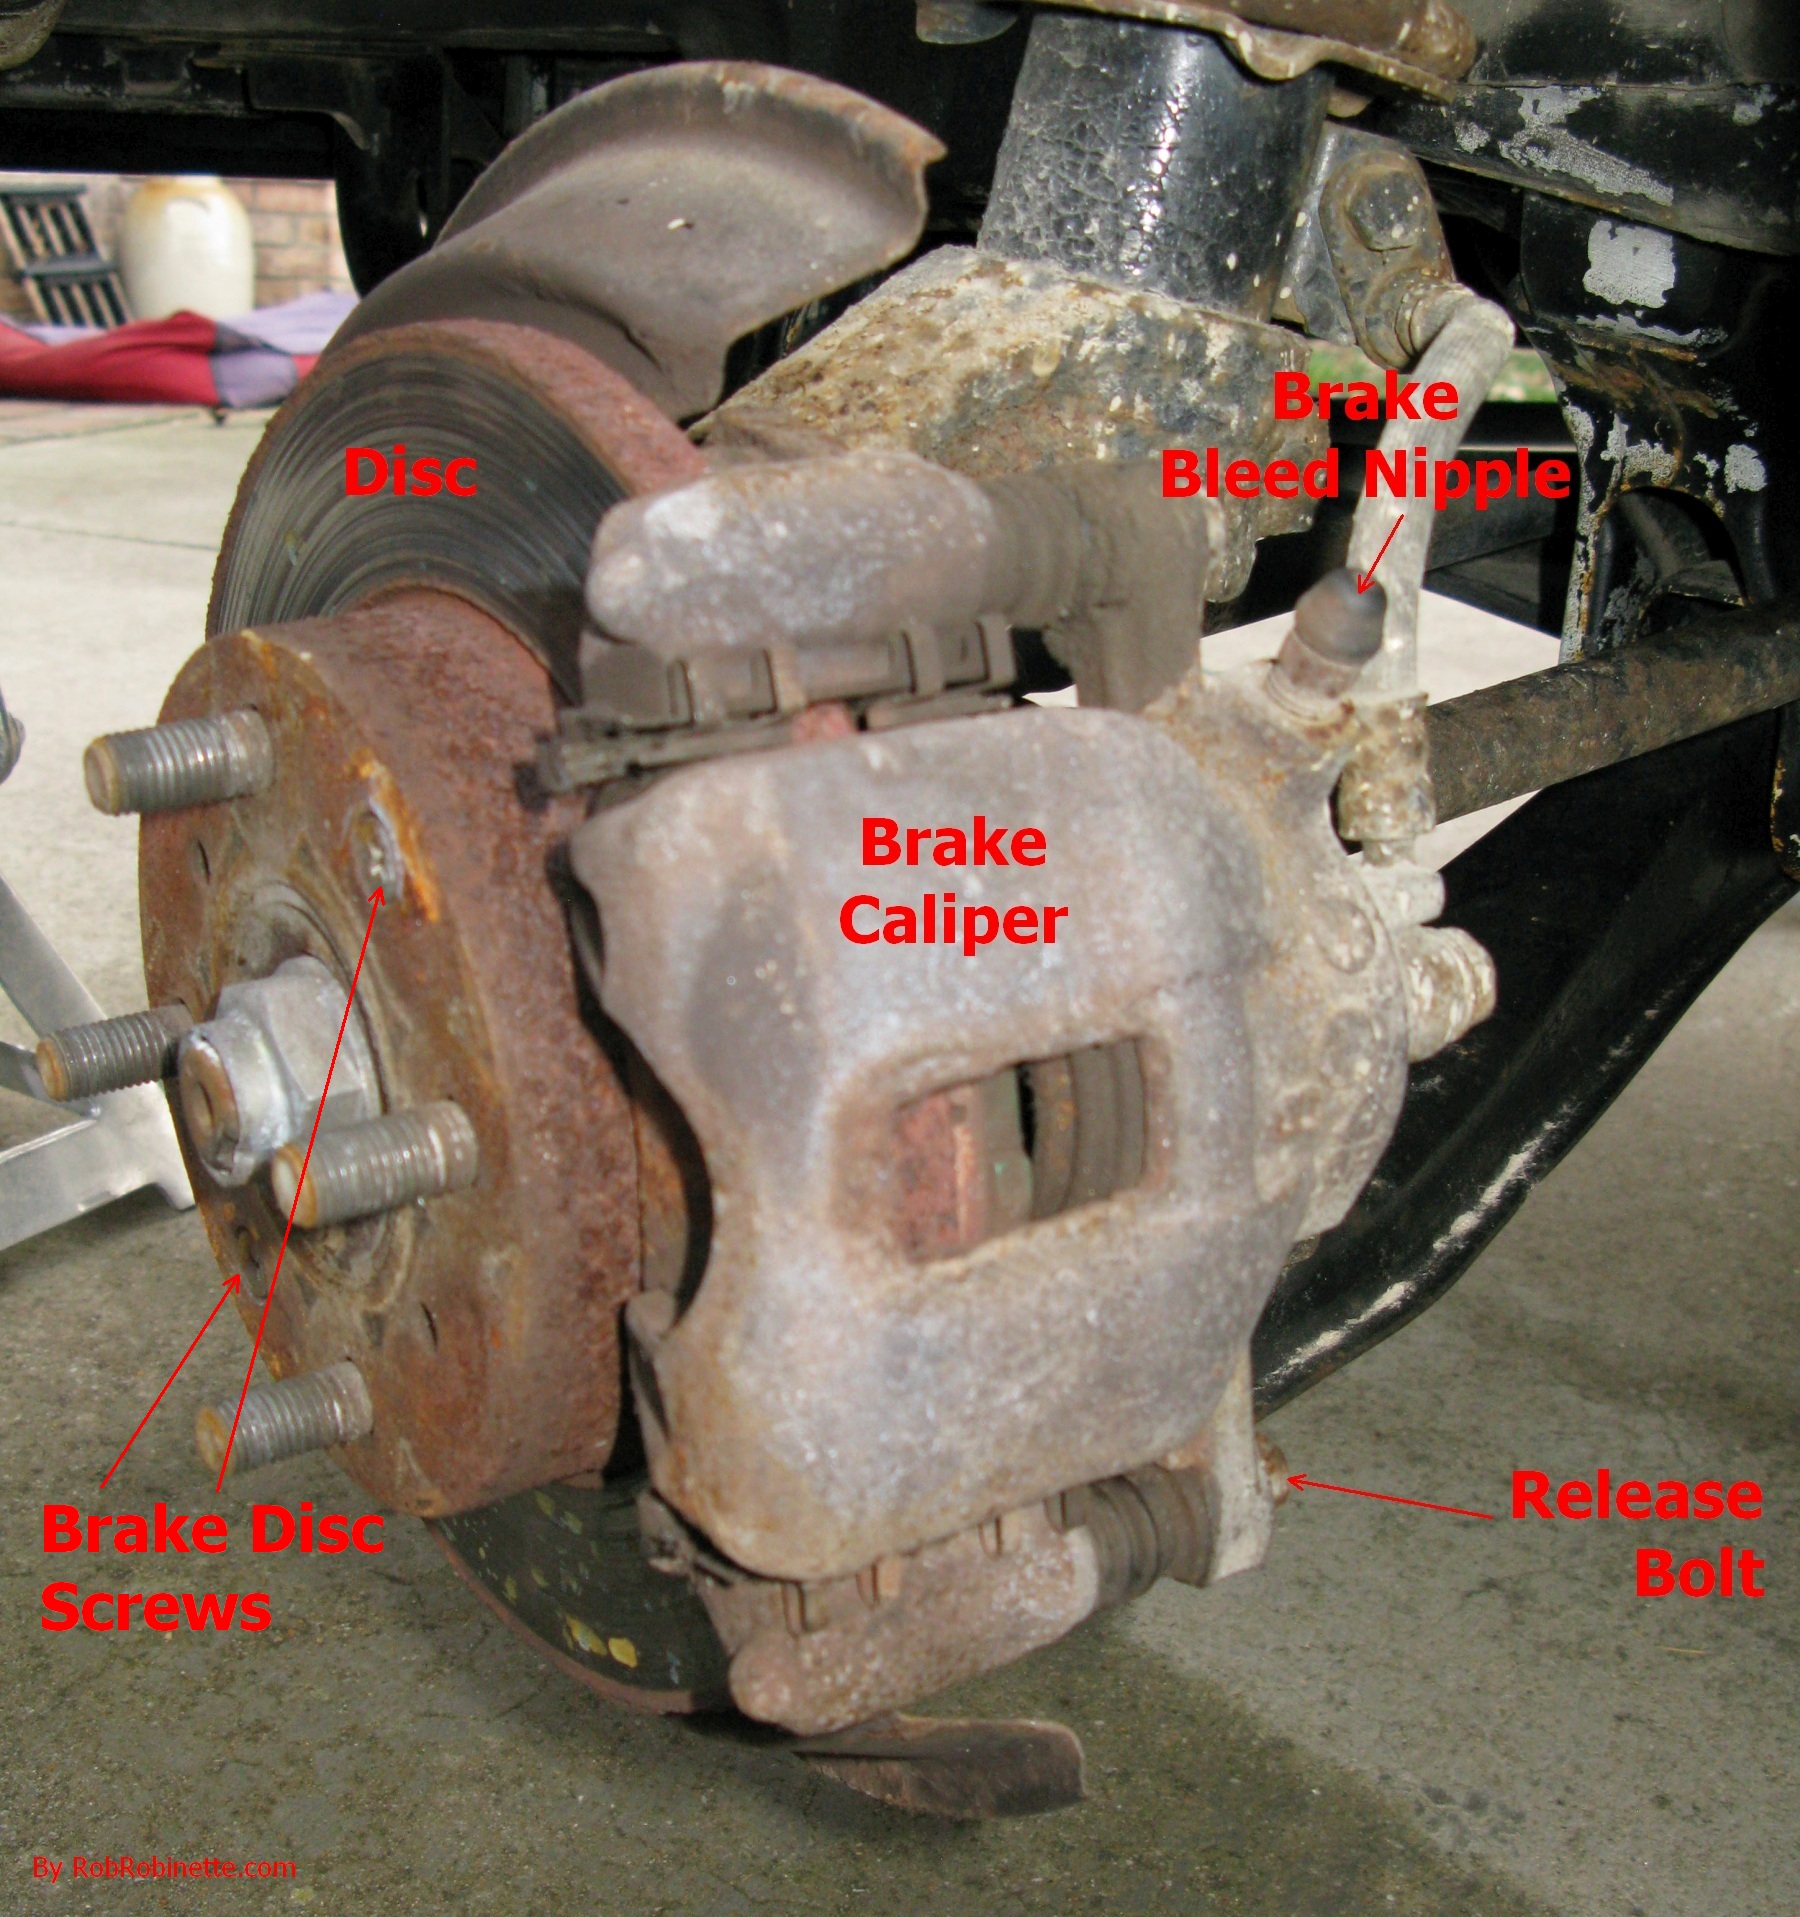
Front brake caliper and disk. To replace the front brake pads remove the 12mm caliper release bolt (above, bottom right) and swing the caliper up and slide out the old brake pads. You will need to use a c-clamp or brake piston compressor to push the brake piston in to make room for the new, thicker pads and allow the caliper to swing down over the new pads. You may have to remove some brake fluid from the brake fluid reservoir after you push the brake caliper piston. The reservoir can overflow so check its level after you do the first piston. I had to remove quite a bit of fluid after replacing the front brake pads.
To remove the brake disk you must remove the caliper and caliper bracket by removing the two large 17mm caliper bracket bolts that hold the bracket to the knuckle. The brake disk is held in place with two Phillips head screws. The two brake disc screws can be easily removed by using an impact driver (hammer screwdriver). The screws are made of soft metal so you can easily drill them out to get the discs off. You may need to use a rubber mallet to knock the discs loose and get them off.
Brake & Clutch Replacement Rubber Pad
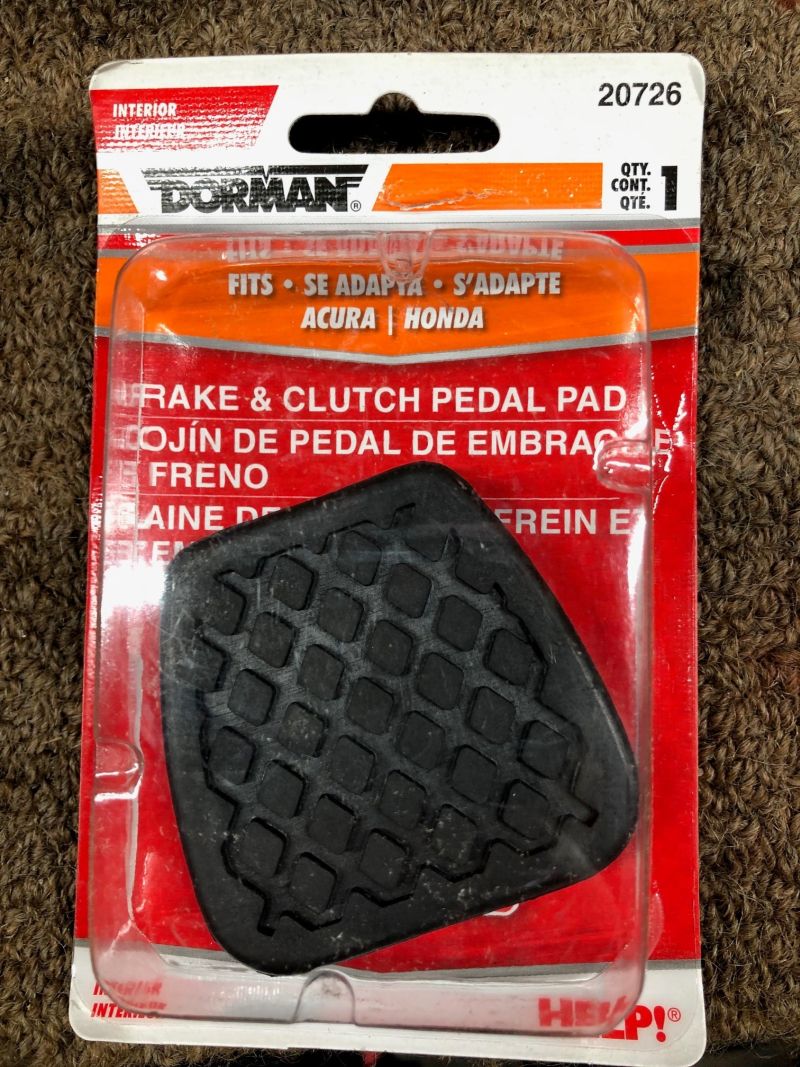
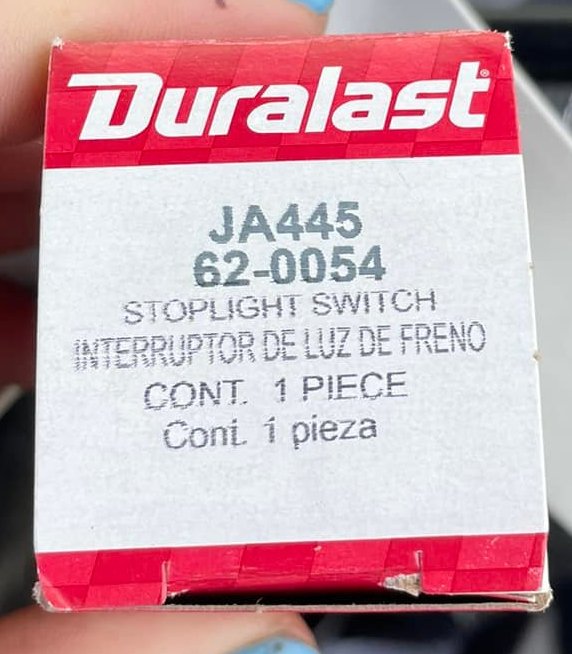
Brake Pedal Brake Light Switch
This AutoZone part fits the ACTY.
Rear Brake Drum and Wheel Bearings: I highly recommend the Timken 6206-2RS double rubber sealed wheel bearings. They fit the front and rear of the ACTY truck and van.
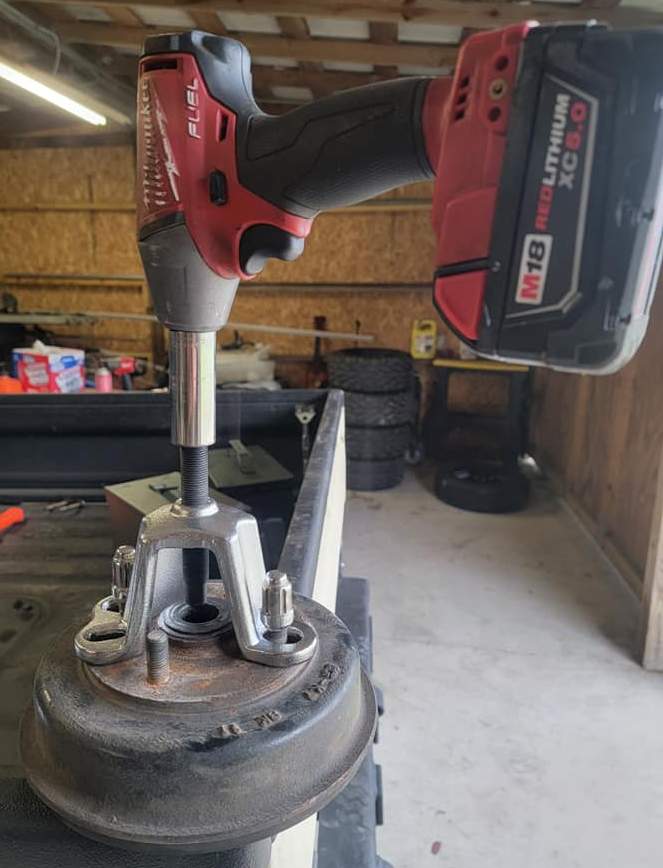
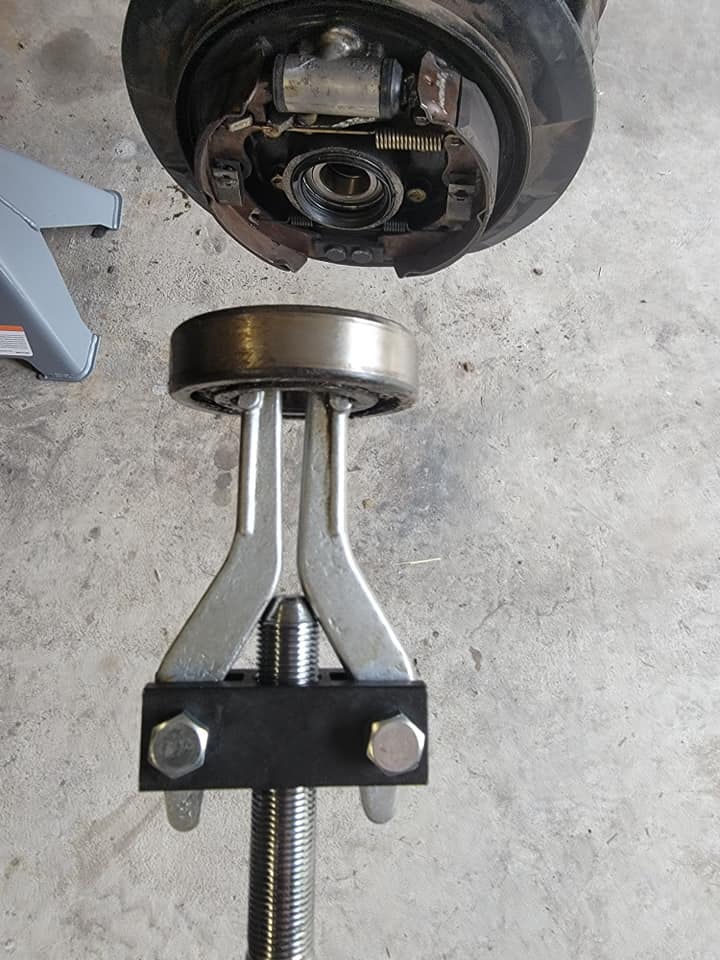
Start by removing the rear wheel and the axle nut cover (covers center of brake drum). Loosening the axle nut is easier with the tire on the ground so put the wheel back on and lower the ACTY to the ground. Remove the axle nut cotter key. You'll need a large, long breaker bar to get the axle nut off and you'll need a large torque wrench to reinstall it. Remove the rear wheel and use a puller to pull the brake drum free (see pics below).
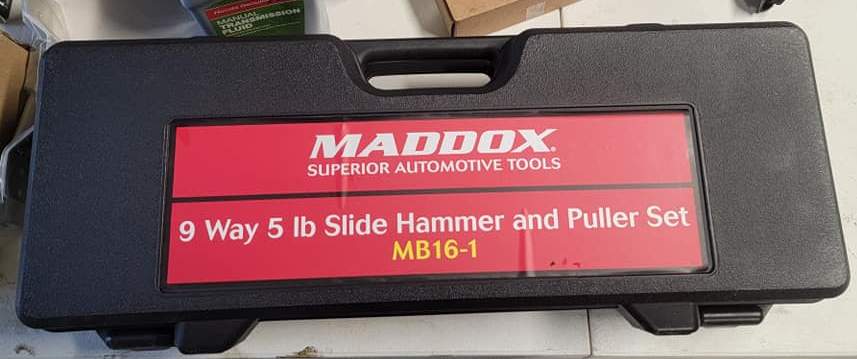
Maddox $90 Slide Hammer & Puller Set will pull the rear drum brake/hub and pull and replace the wheel bearings. This and the following bearing photos are by Bruce Martin.
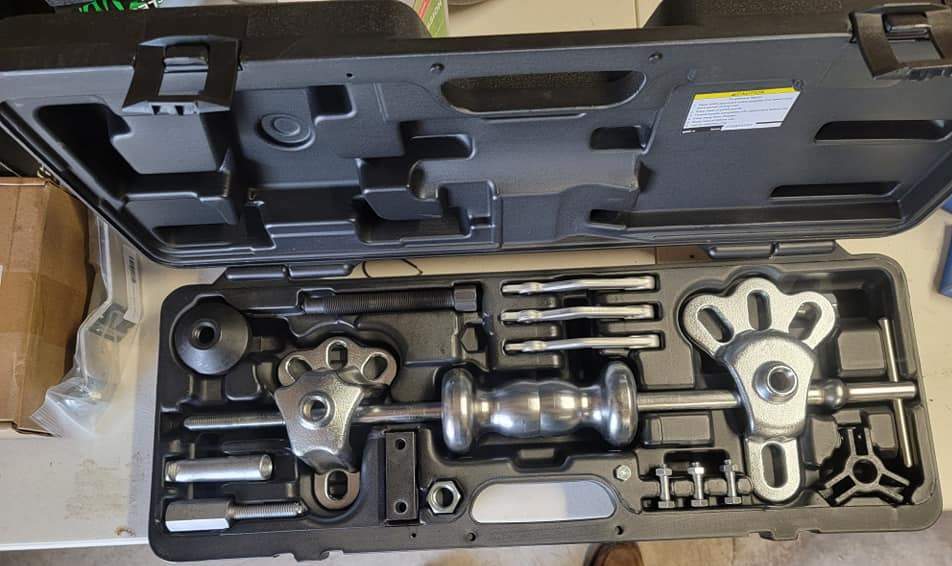
The slide hammer kit includes pullers and a slide hammer.
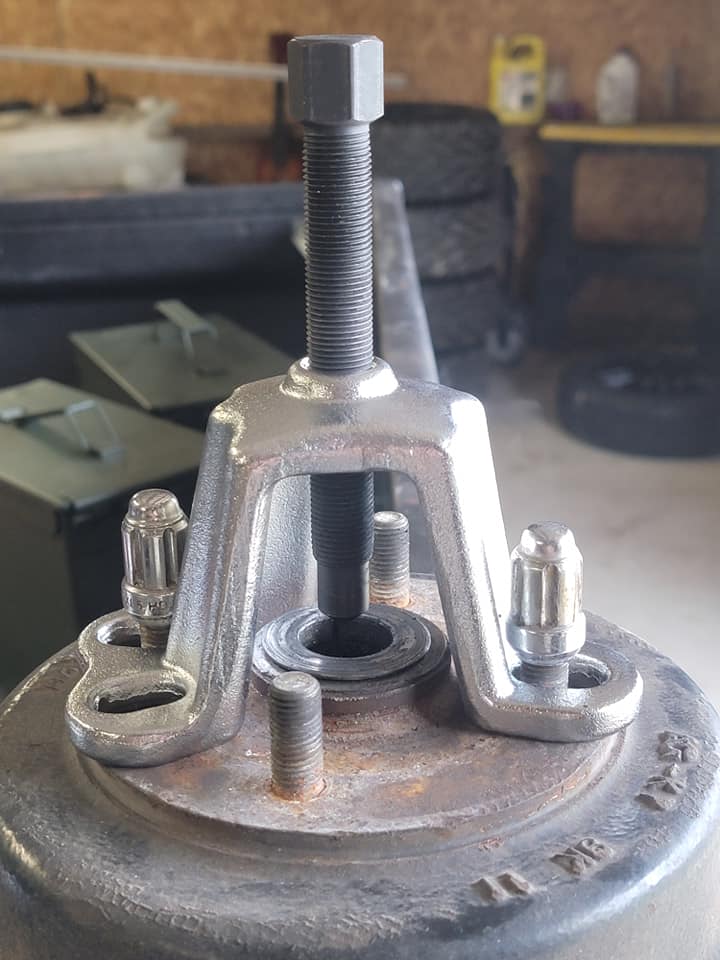
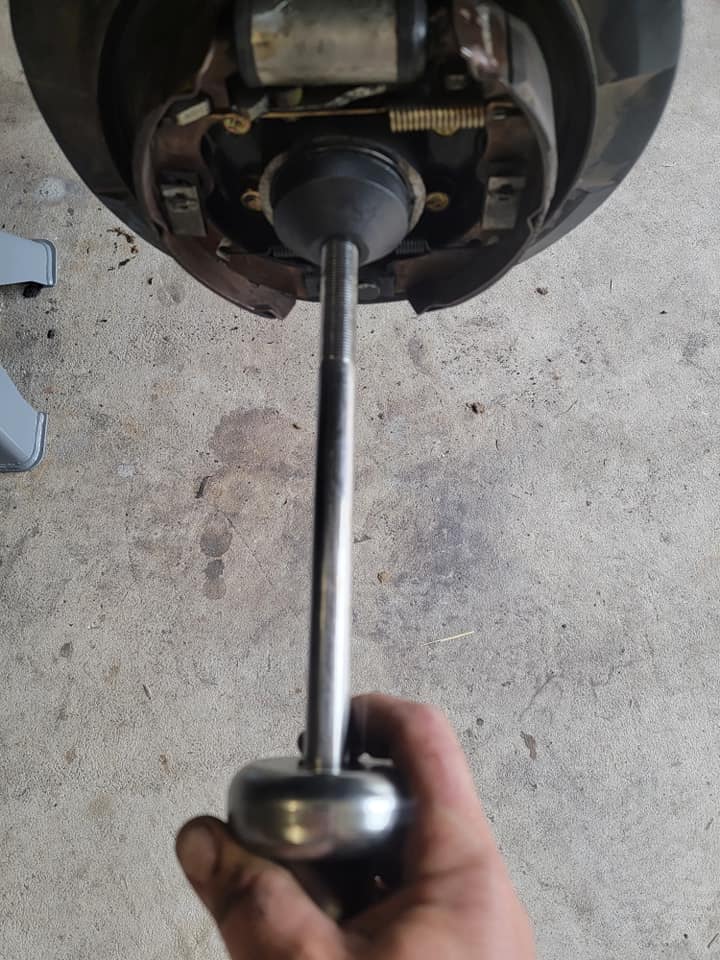
With the axle nut and cotter pin removed, bolt the puller to the rear hub/drum as shown above. As you screw the center shaft in it will push against the drive shaft and pull the hub off the drive shaft (photo shows hub already removed). With the hub off you can now access the brake shoes and wheel bearings.
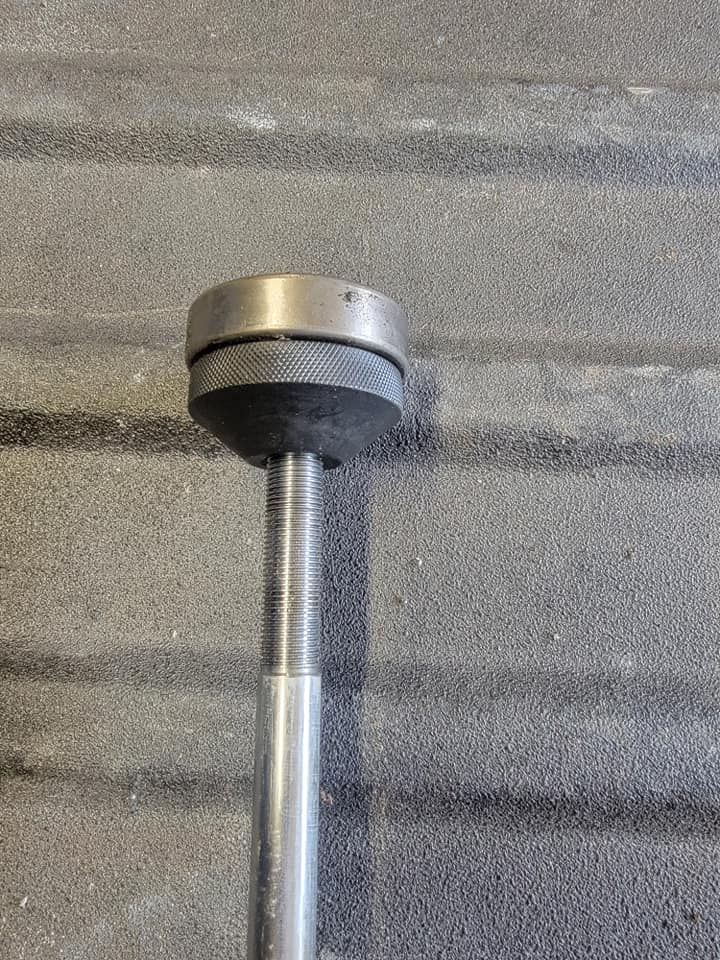
The easy way to turn the puller shaft.
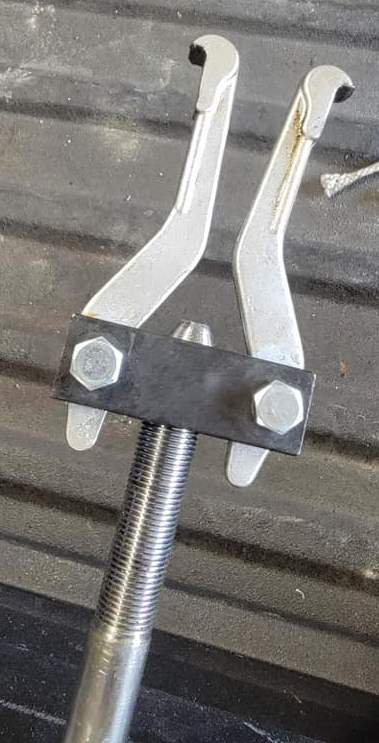
Bearing puller claw installed on slide hammer shaft.
Shows how the bearing claw grips bearing.
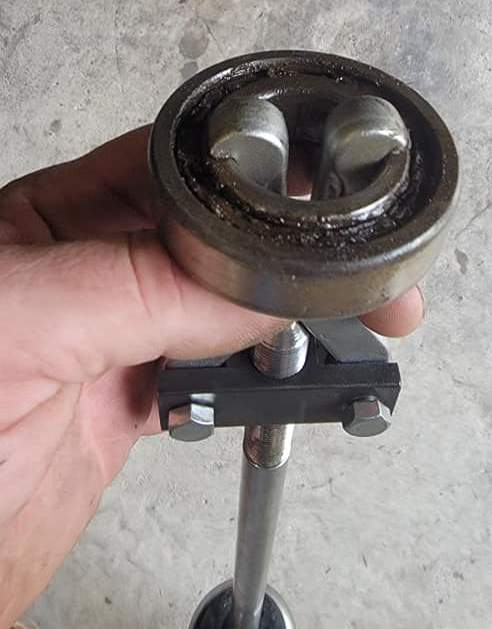
I'm not sure how the axle has been pushed back or removed to allow the bearing claw inside the bearing. In the picture above the bearing claw is gripping the wheel bearing. Quickly pull the slide away from the truck and smack it against the shaft stop to pull the bearing out. Keep smacking it until it comes out.
Bearing pulled free.
Bearing pusher installed on slide hammer shaft. Shown with bearing for size comparison. The pusher must push on the outside race of the bearing as shown above. Using a small pusher and pushing on the inside bearing race will damage the bearing.
Slide the slide toward the truck to pound the new bearing into place.
Recommended high quality Timken 6206-2RS (double rubber seal) wheel bearings fit front and rear of the ACTY truck and van. The TimKen 6206-2ZZ (double metal seal) will also work. They are pre-greased so no packing required.
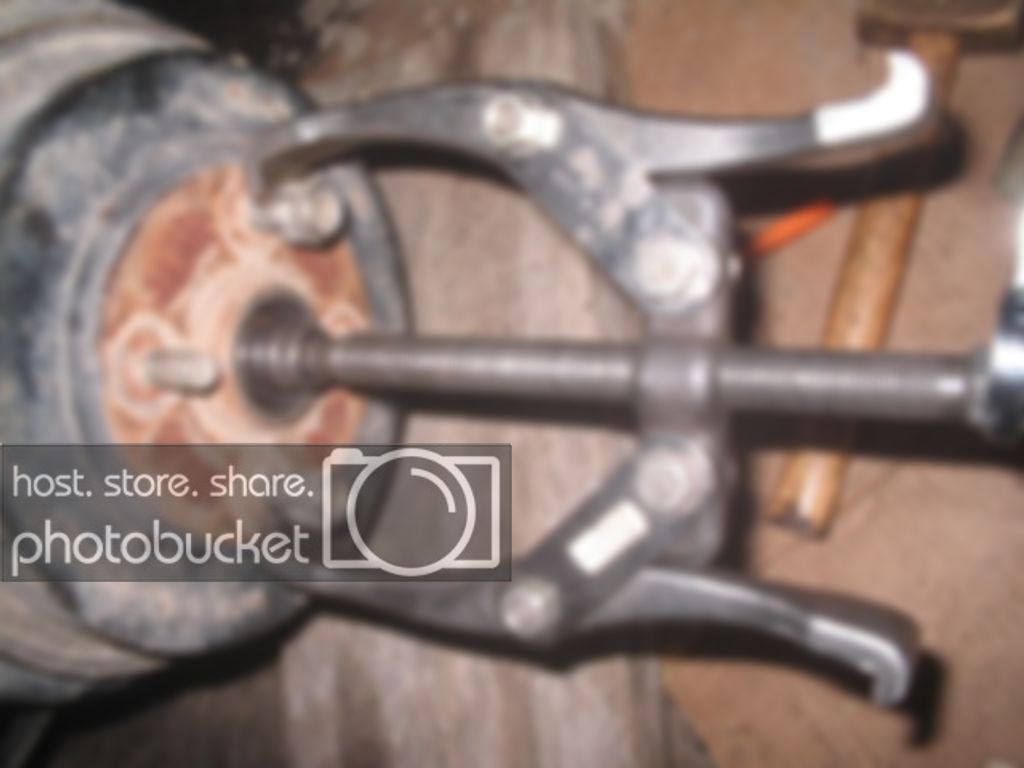
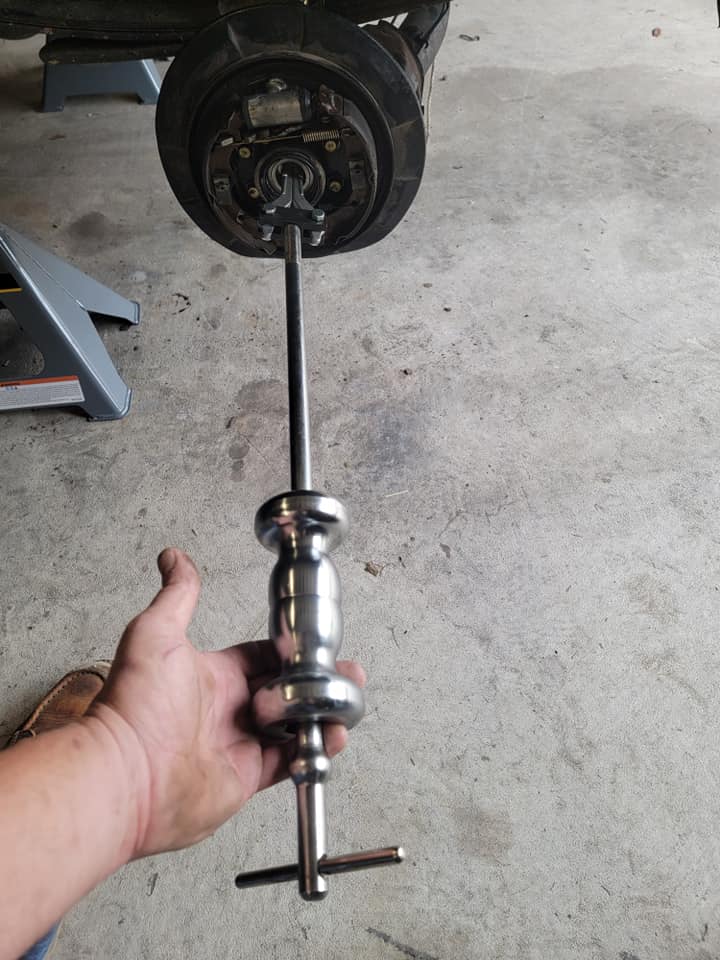
You can also use a two-jaw puller grabbing two lug nuts to pull the brake drum free. The large axle nut has already been removed. As you screw in the center shaft against the axle it pulls the brake drum off.
When you get everything back together torque the axle nut to 20kg/m or 145 lb-ft. Reinstall the cotter pin.
Big Brake Install by WillPowered
Will also shows how to remove the front brake discs, remove and replace the brake calipers and replace the front wheel studs without removing the hub.
Brake Fluid: The brake master cylinder is located behind a pop-off access panel on the right end of the dashboard. Open the driver door and you'll see the panel on the side of the dash board. The manual says to use DOT 3 or 4 brake fluid. I prefer DOT 4. The brake bleed order is right rear, left rear, right front, left front. If you do a complete flush use a mechanic's syringe to suck out as much of the old fluid from the reservoir as possible, then fill it with fresh brake fluid and bleed the brakes. Do not allow the reservoir to get low and suck air into the brake system during bleeding.
Bleed the brakes by removing the brake bleed nipple rubber cover. Put a clear plastic hose on the nipple and run the hose into an empty bottle. Have an assistant push on the brake pedal. Open the brake bleed nipple and the brake pedal will go to the floor and push brake fluid through the clear tube. Tell your assistant to keep the pedal on the floor until you close the brake bleed nipple. Tell your assistant to raise the pedal and apply pressure then open the brake bleed nipple again. Repeat until new, clean brake fluid comes out the brake bleed nipple. Check the brake fluid reservoir after every three or four pumps to make sure air isn't sucked into the brake system. Add fluid as needed. When new, clear fluid comes out of the bleeder, tighten the nipple, install the rubber nipple cover and move to the next brake.
Brake Master Cylinder/Reservoir Access
The brake master cylinder and reservoir are just behind the access panel. It pops off with a pull.
Air Filter: A840J $37 ebay. Also Toyo TO-3670 and NKK 4HM-1046. Located at the rear of the truck above the exhaust. There are three spring clips that hold the air filter cover in place. After removing the cover remove the wing nut holding the filter in place.
Air Filter
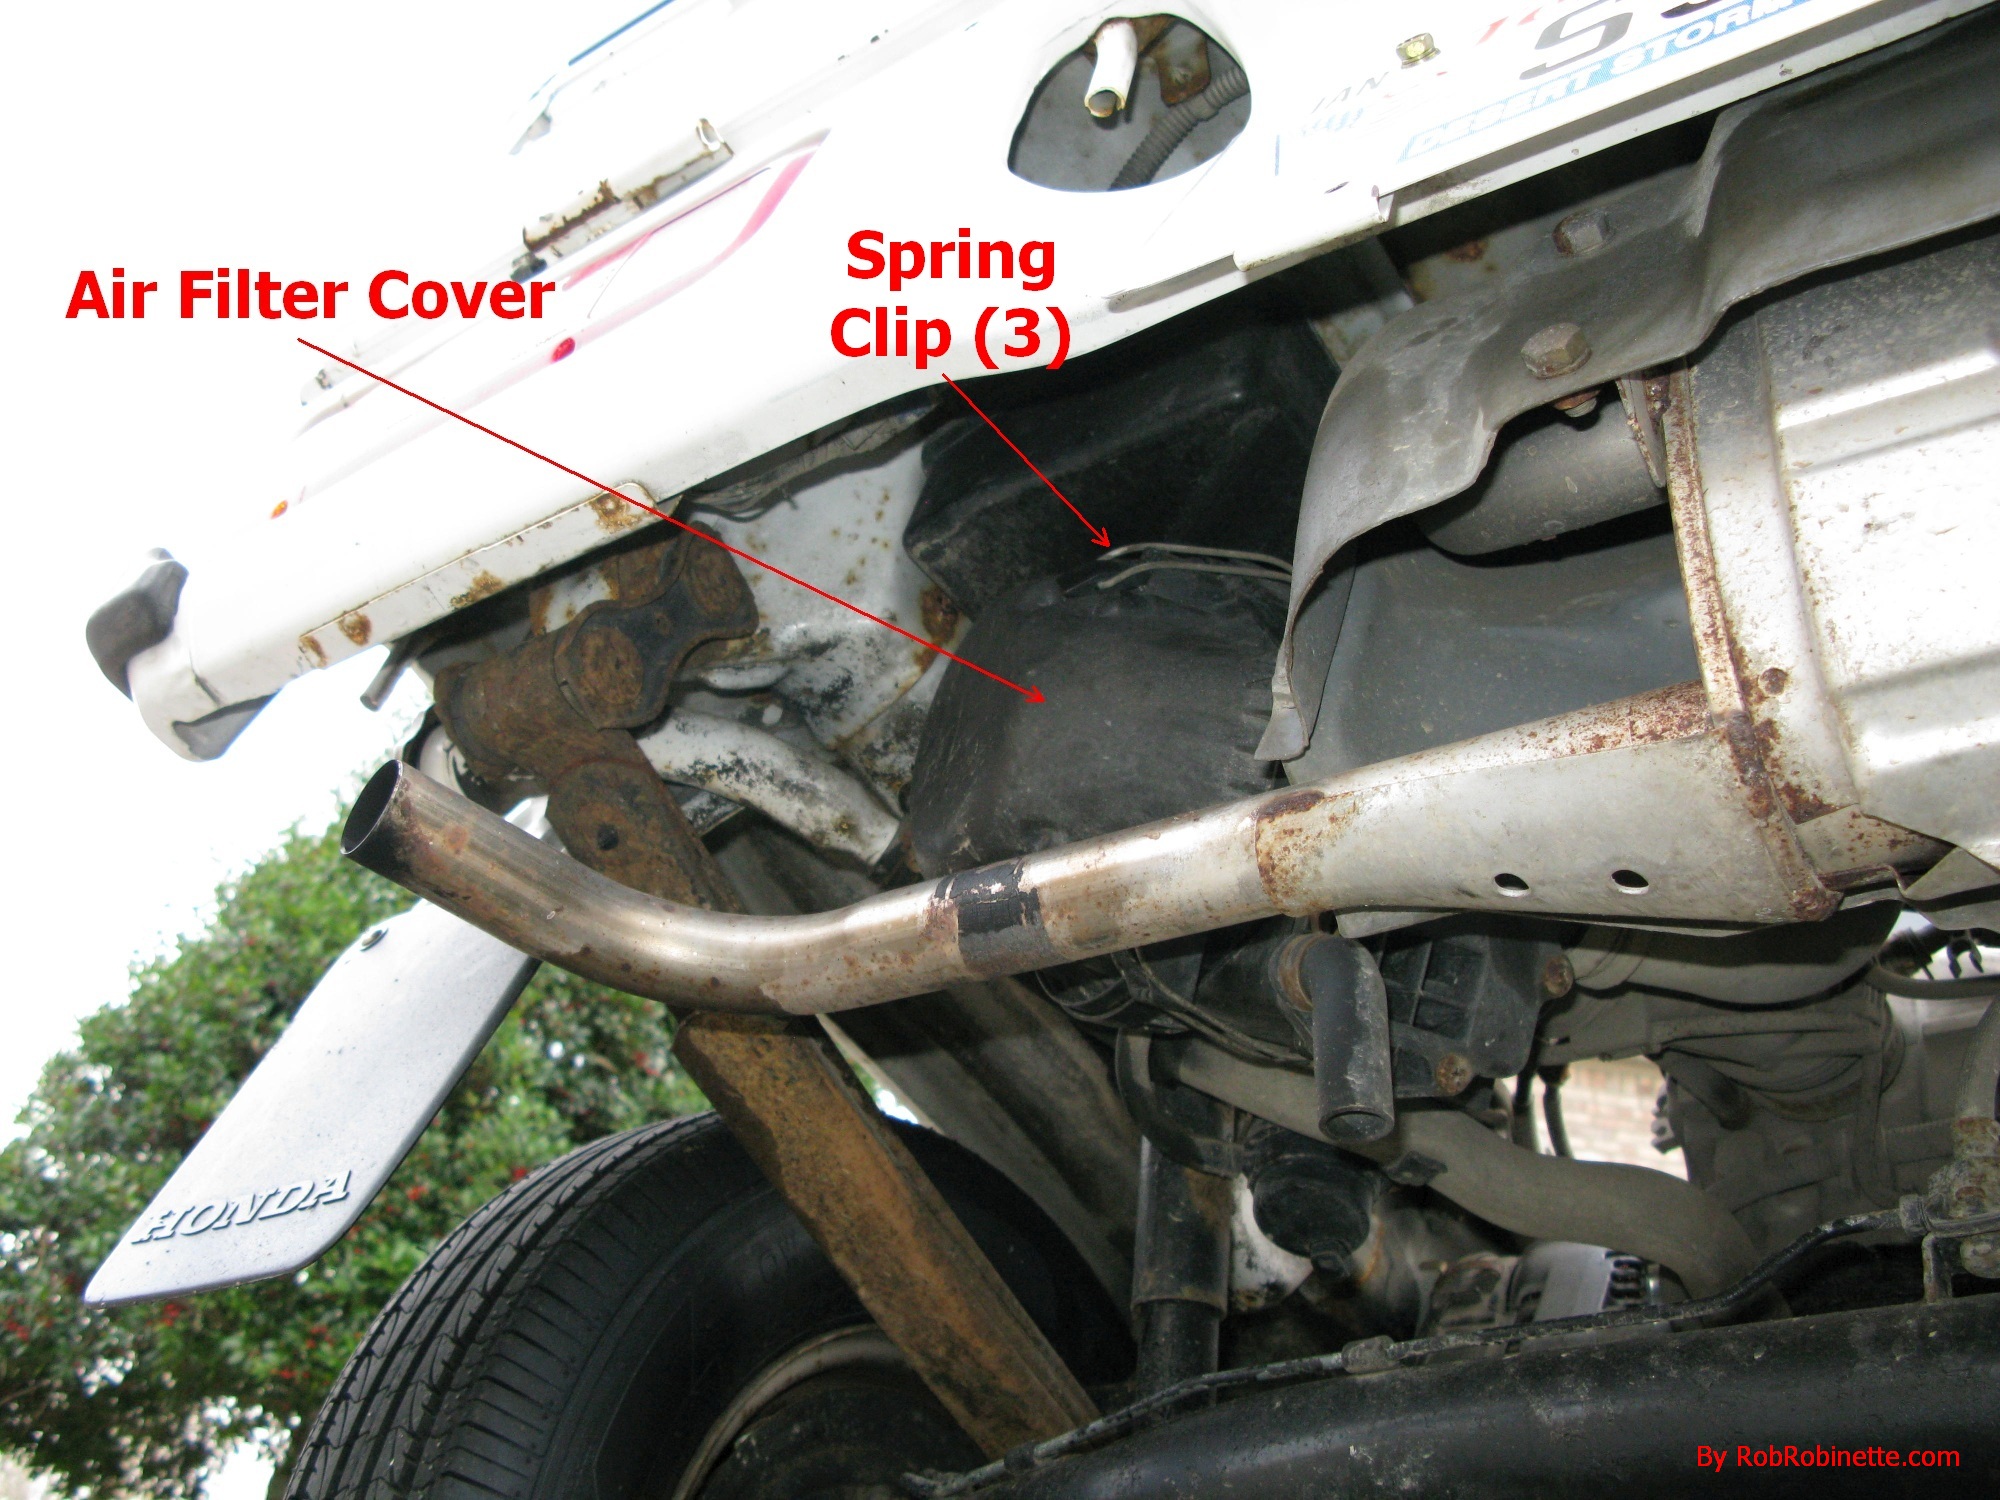
Air Filter at the back of the truck.
Fuel Filter: Service manual says change every 24,855 miles (40,000km). Use pliers to move the fuel line clamps away from the filter and remove both fuel lines. A wide flat-blade screwdriver can be used to carefully push the fuel lines off the filter but be careful not to damage the lines. Push the filter up and out of its retainer and install the new filter. The $10 WIX 33203 fuel filter is a drop-in replacement that is available at Amazon and in many auto parts stores.
Factory Fuel Filter
Fuel System Components
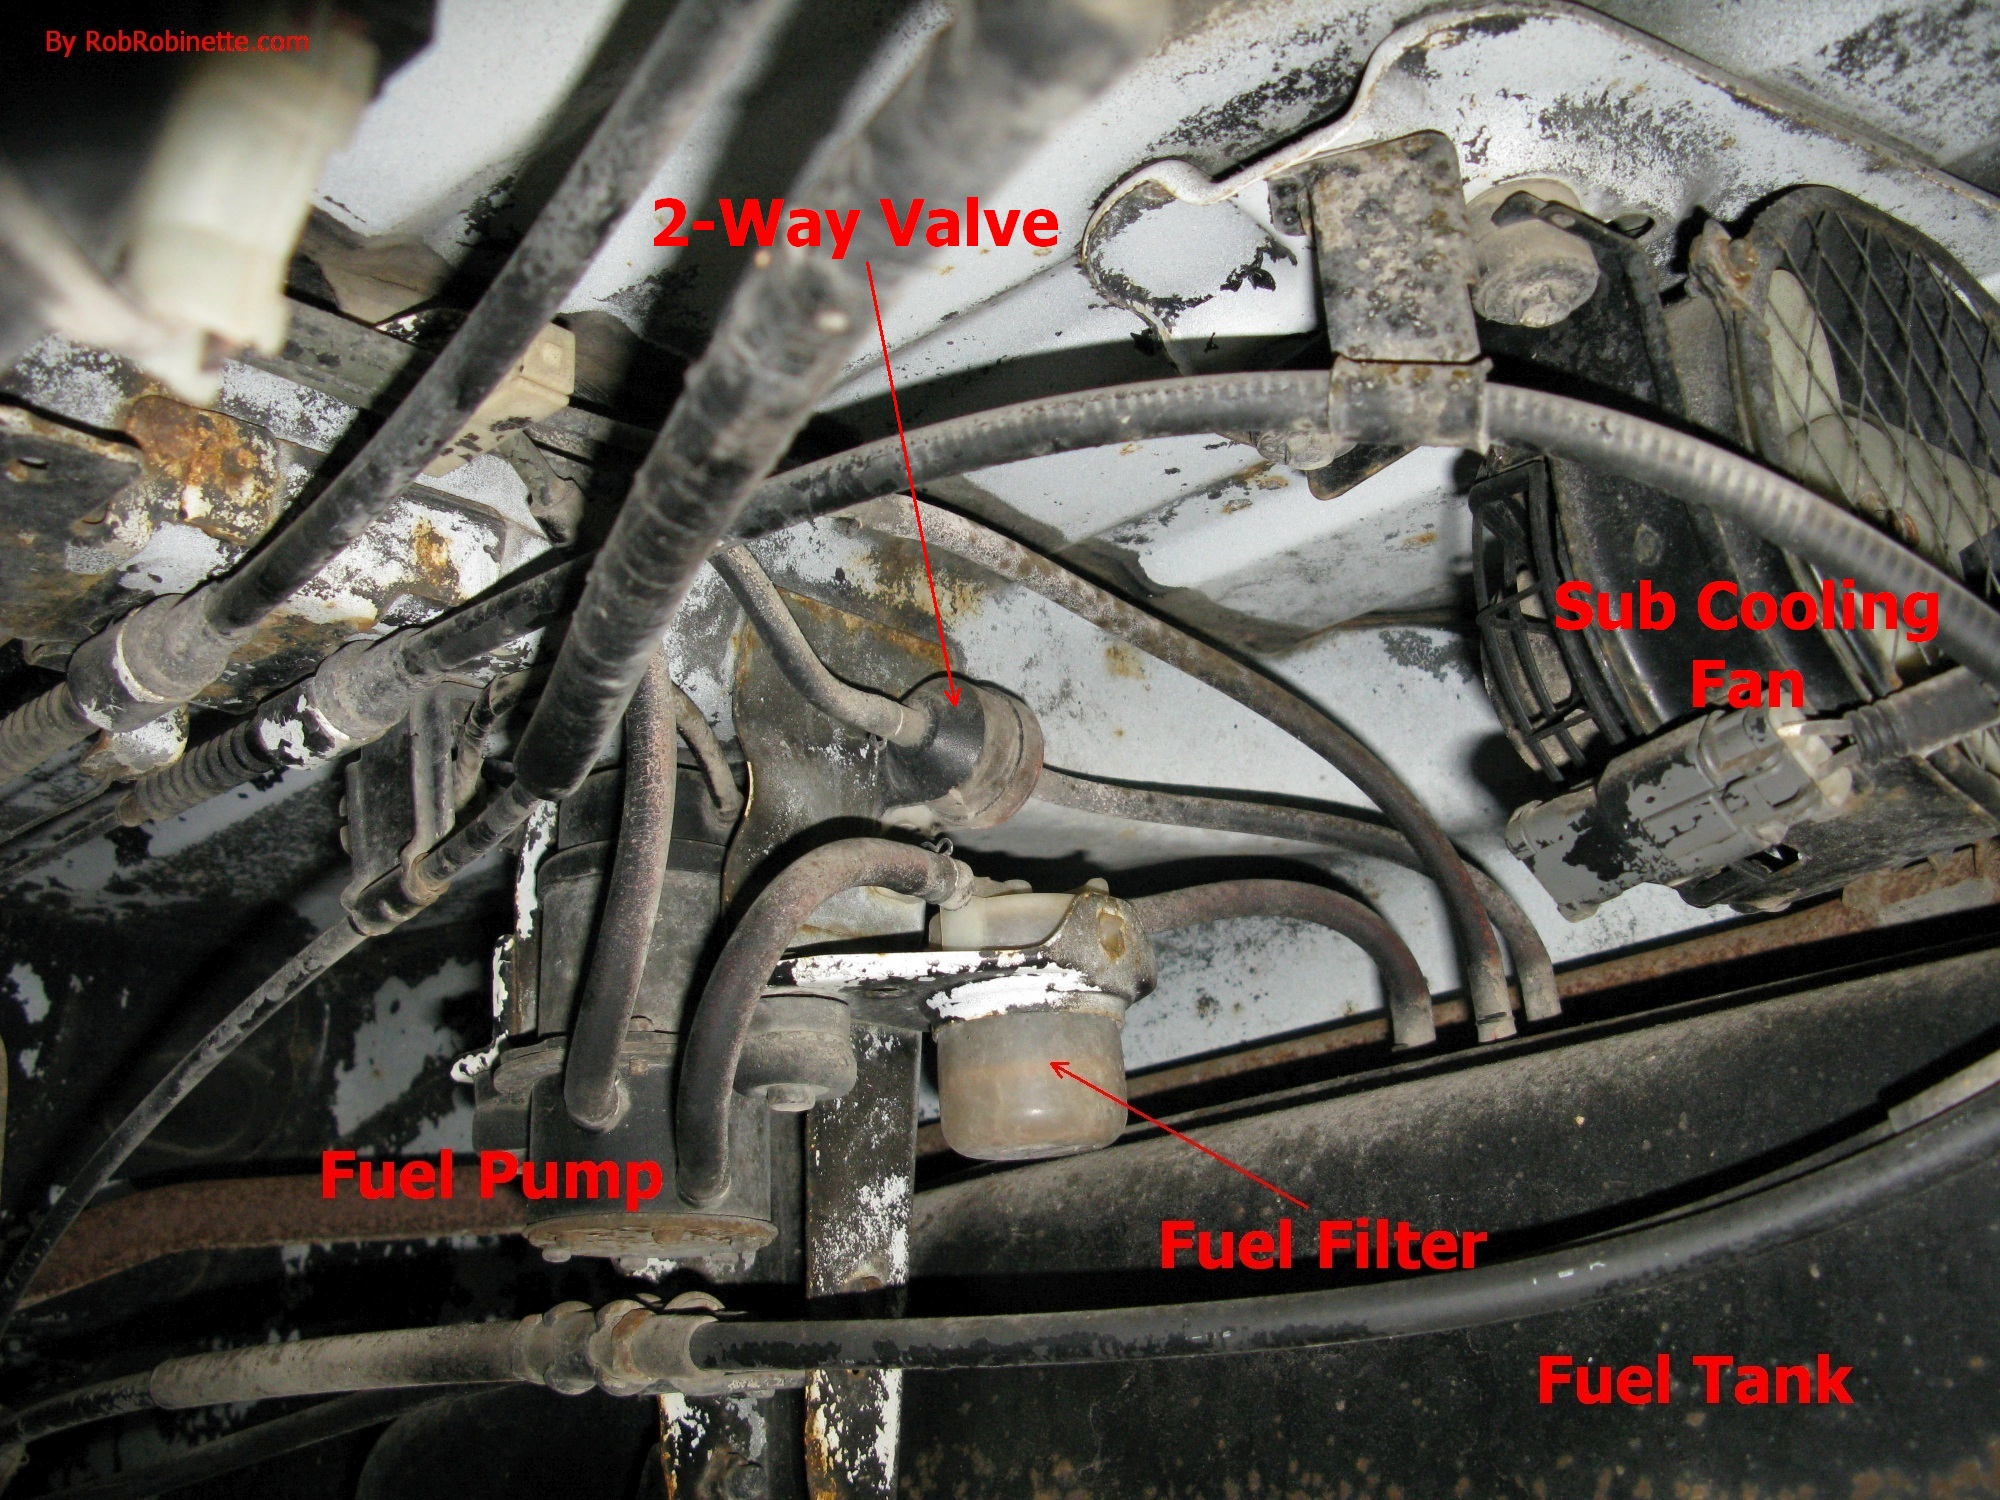
Fuel pump and fuel filter under the truck bed. Note the fuel tank at bottom right. The small fuel 2-way valve above the filter may have to be moved to get the filter up and out of its retainer.
Idle Adjustment
To get to the idle speed, idle mixture and AC idle speed screws you have to remove the white plastic carb cover located on top of the engine (access through the truck bed engine cover). Be sure and note the starting position of the screws so you can go back to where they were because it's easy to screw this up.
The idle screw simply opens and closes the carb butterfly.
Typically, the best mixture screw setting will give you the highest idle rpm.
If your ACTY stalls or sputters when the air conditioning kicks on then try bumping up the AC idle.
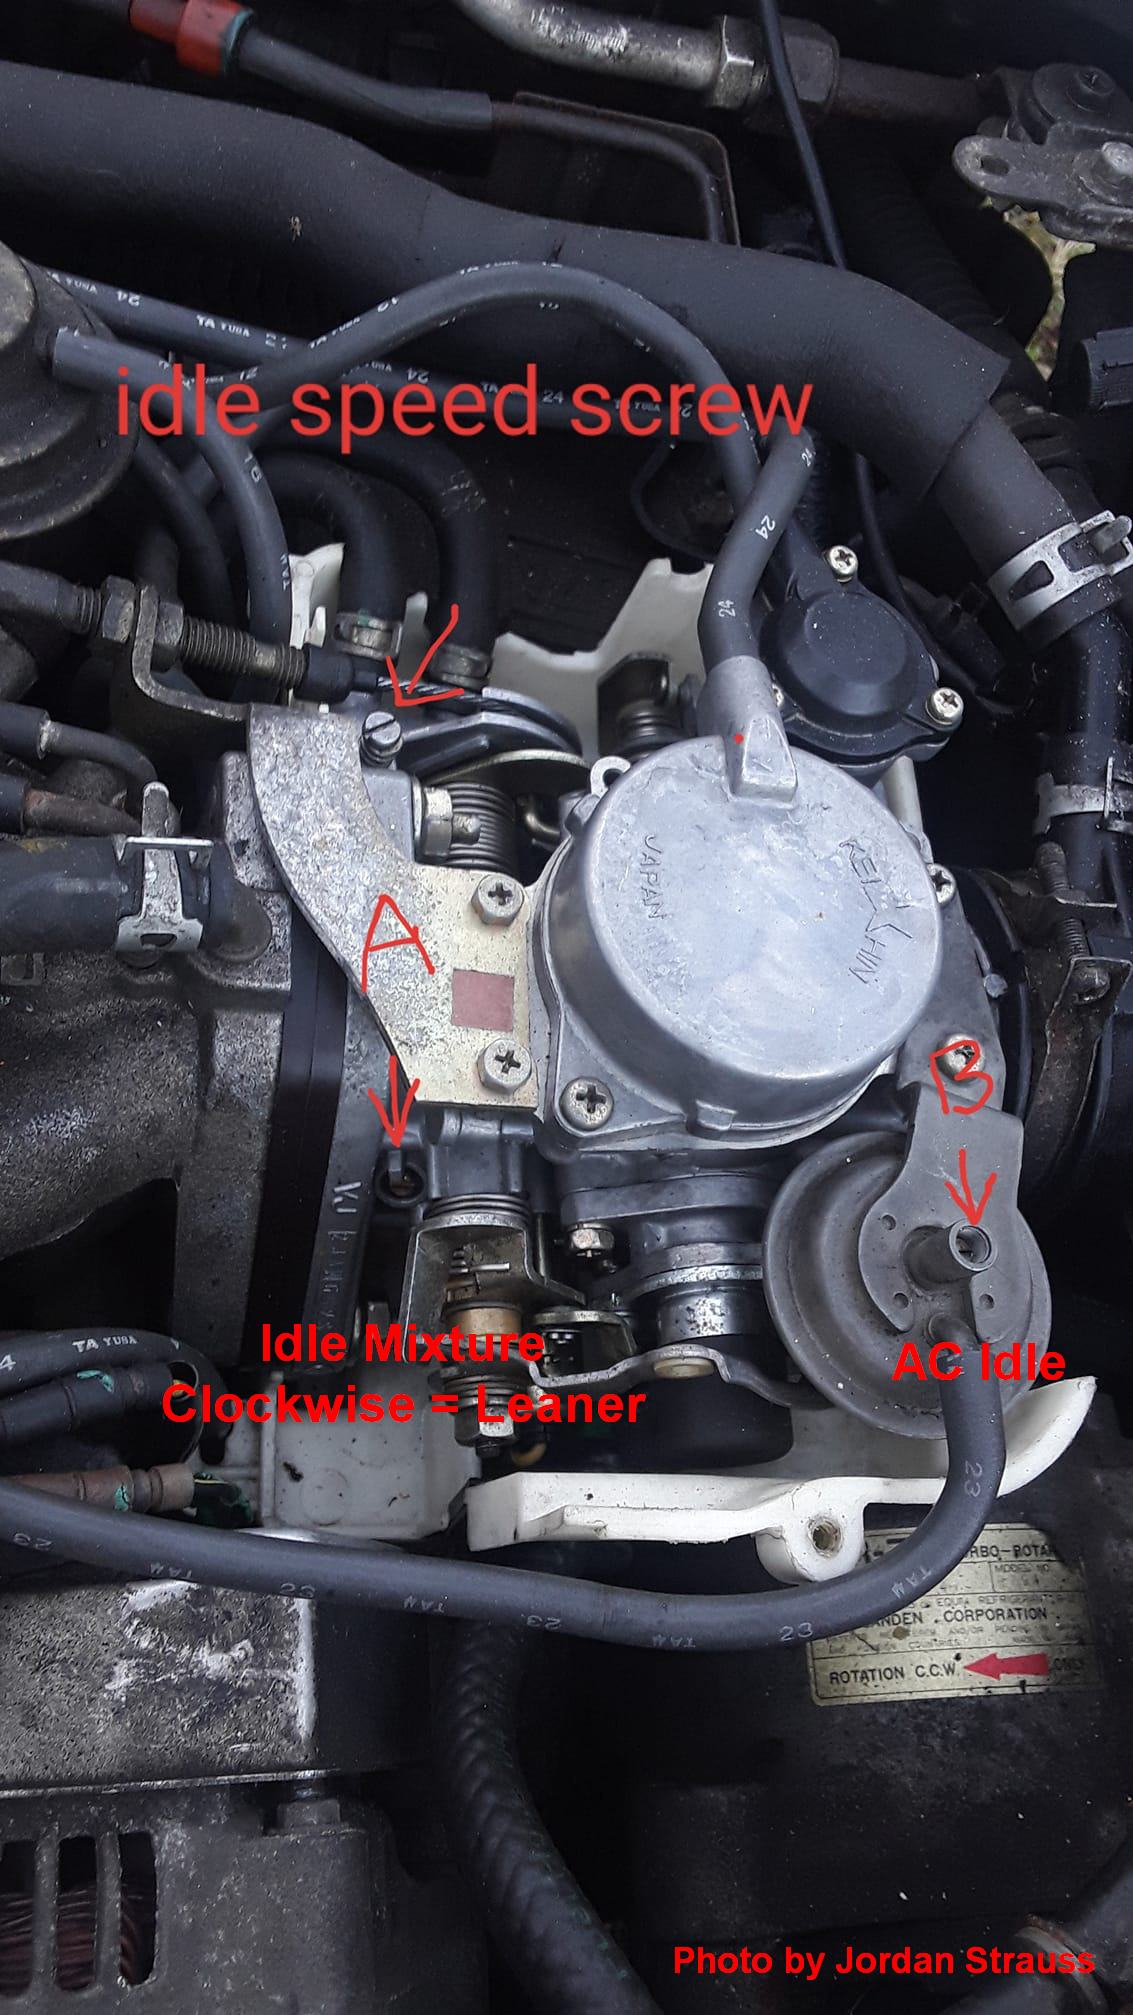
Idle speed adjustment at top left, idle mixture below that and AC idle on the right. Shout out to Jordan Strauss for sharing his photo.
Flushing the Cooling System
Coolant: 5.3 quarts (1 gallon and 1.3 quarts or 5 liters) total. With automatic transmission 7.1 liters. Van with rear heater 6.7 liters. Van with rear heater and automatic transmission 7.4 liters. Manual says to use 30% coolant (1.6 quarts, 1.5 liters) and 70% distilled water (3.7 quarts, 3.6 liters). Use Honda Type 2 or standard auto parts store coolant (ethylene glycol). For very cold climates I recommend 50% coolant.
Turn the cab heater control to full hot so the coolant in the heater will be flushed. The radiator is at the front of the truck, down low behind the front bumper. The radiator cap is in the cab, on the passenger side, on the firewall. It has a cover that's held in place by a wing nut (see photo below). Remove the nut and remove the cover to gain access to the cap. The radiator drain cock is on the bottom of the radiator, driver side, pointing rearward. The drain cock is just above a small square drain hole in the lower bumper. It has two "wings" to help you turn it. The manual says to replace its o-ring anytime the drain cock is opened. There is also an engine block drain bolt just above the oil filter. Remove it to drain the coolant from the engine.
Engine Block Coolant Drain Bolt
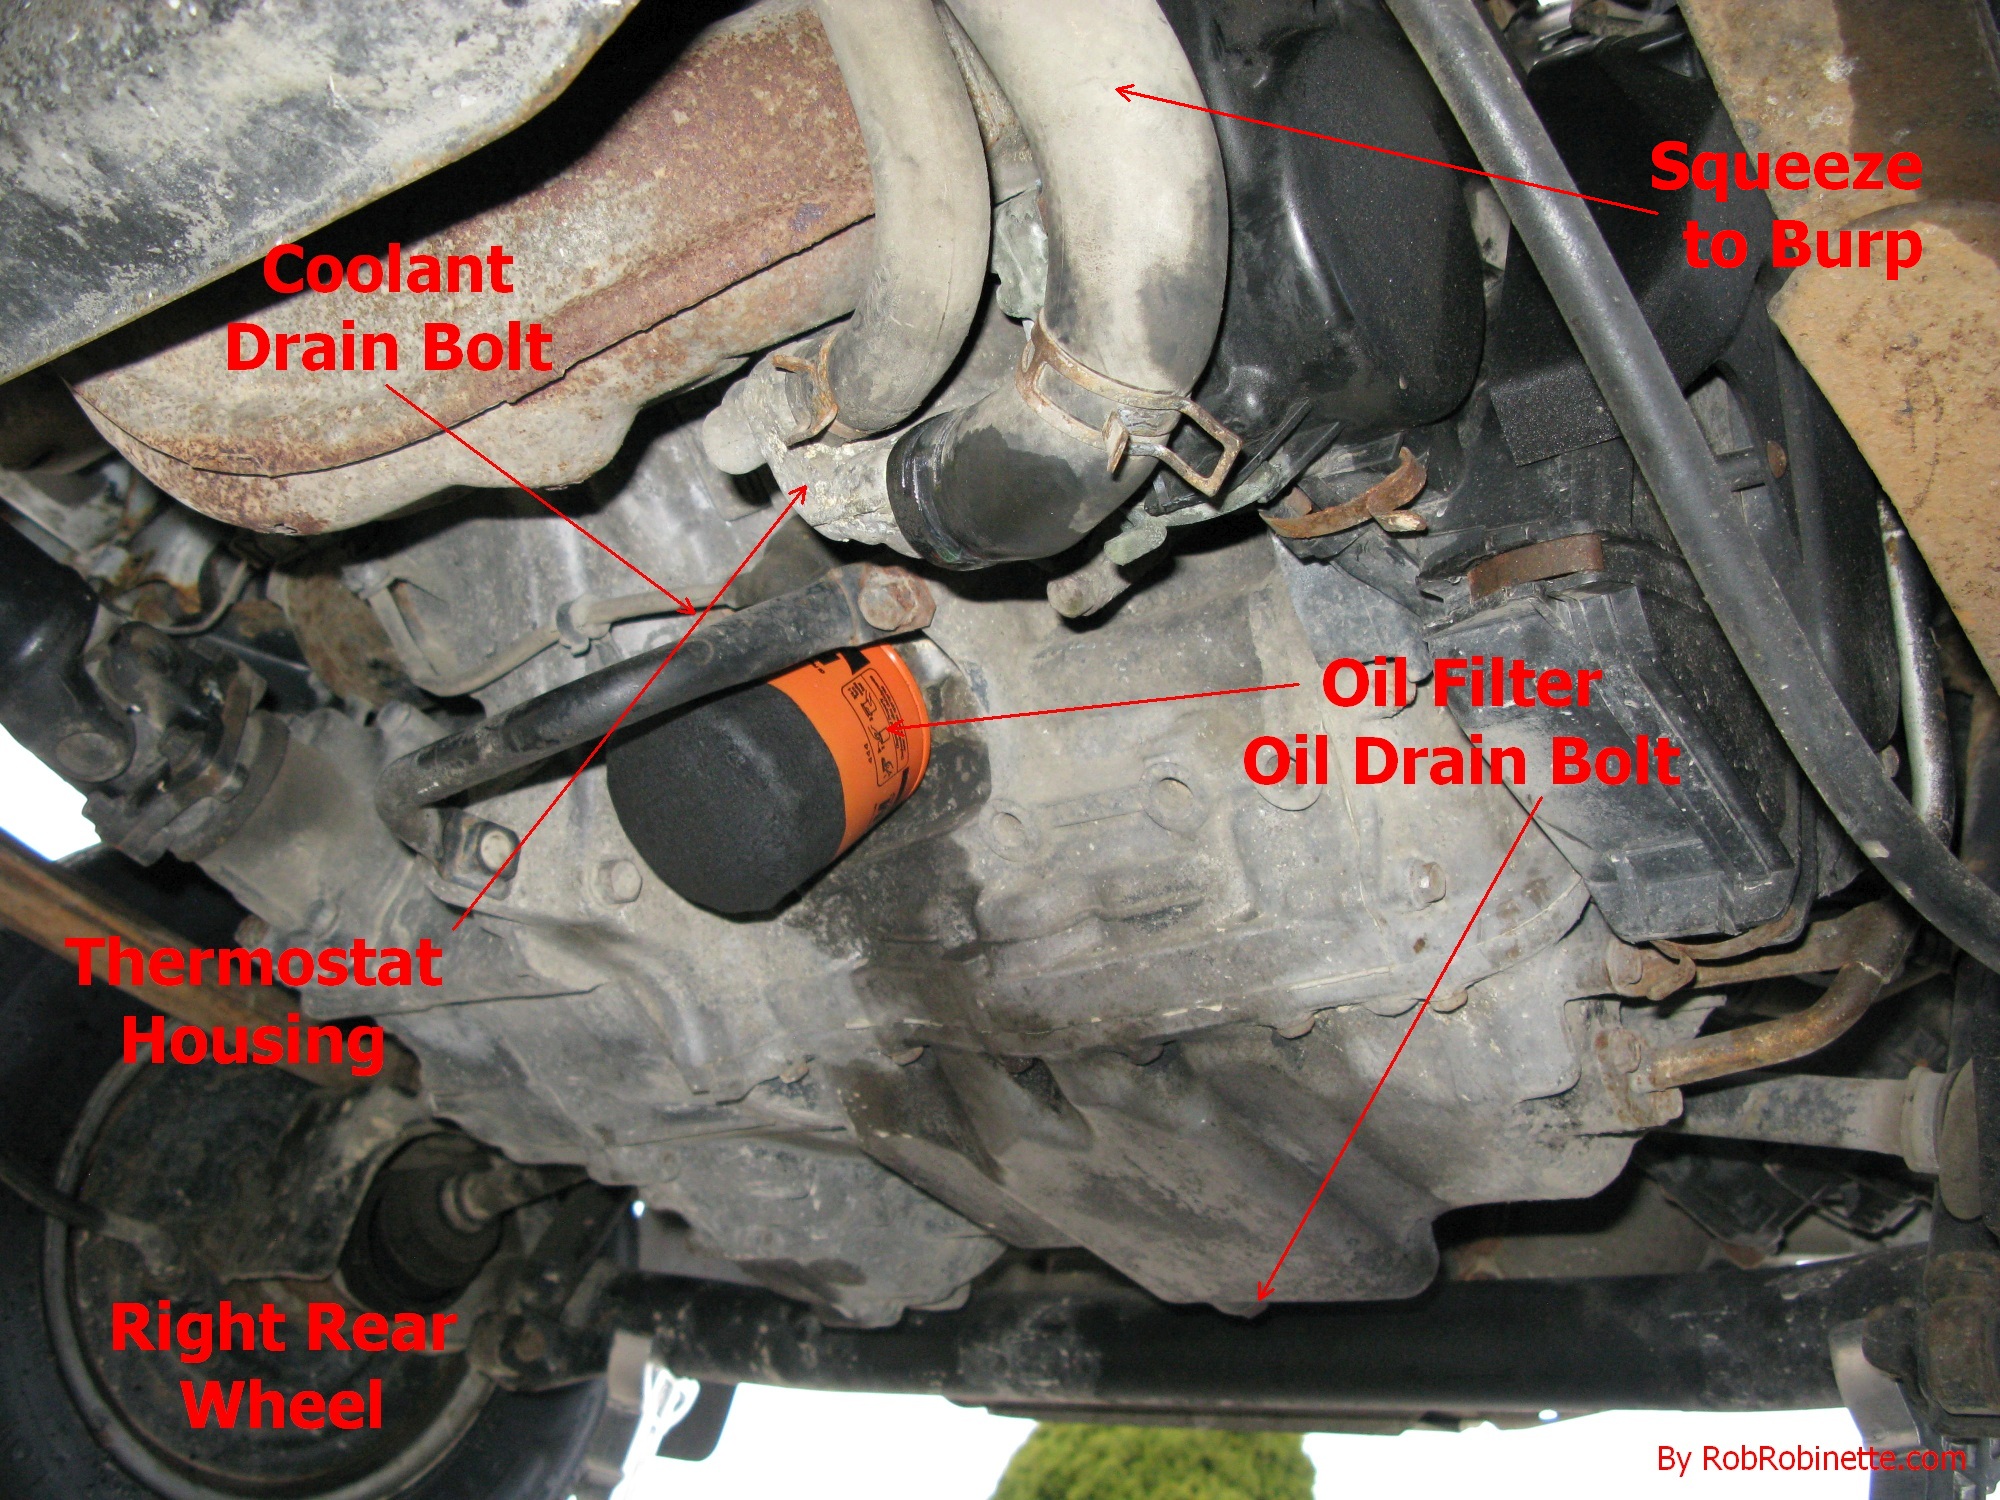
Engine block coolant drain bolt is just above the oil filter. Replace the crush washer and torque to 4-5kgm. Squeeze the large coolant hoses to help "burp" air out of the cooling system.
The coolant reservoir is next to the battery. It can be lifted out of its mounting slot. In the ACTY van the coolant reservoir slides out for access. Remove the cap by popping it off (it does not screw off) and flush out the reservoir with water then empty it. Fill it to the "MAX" line with coolant, replace the cap and slide it into its mounting bracket.
Filling the Radiator
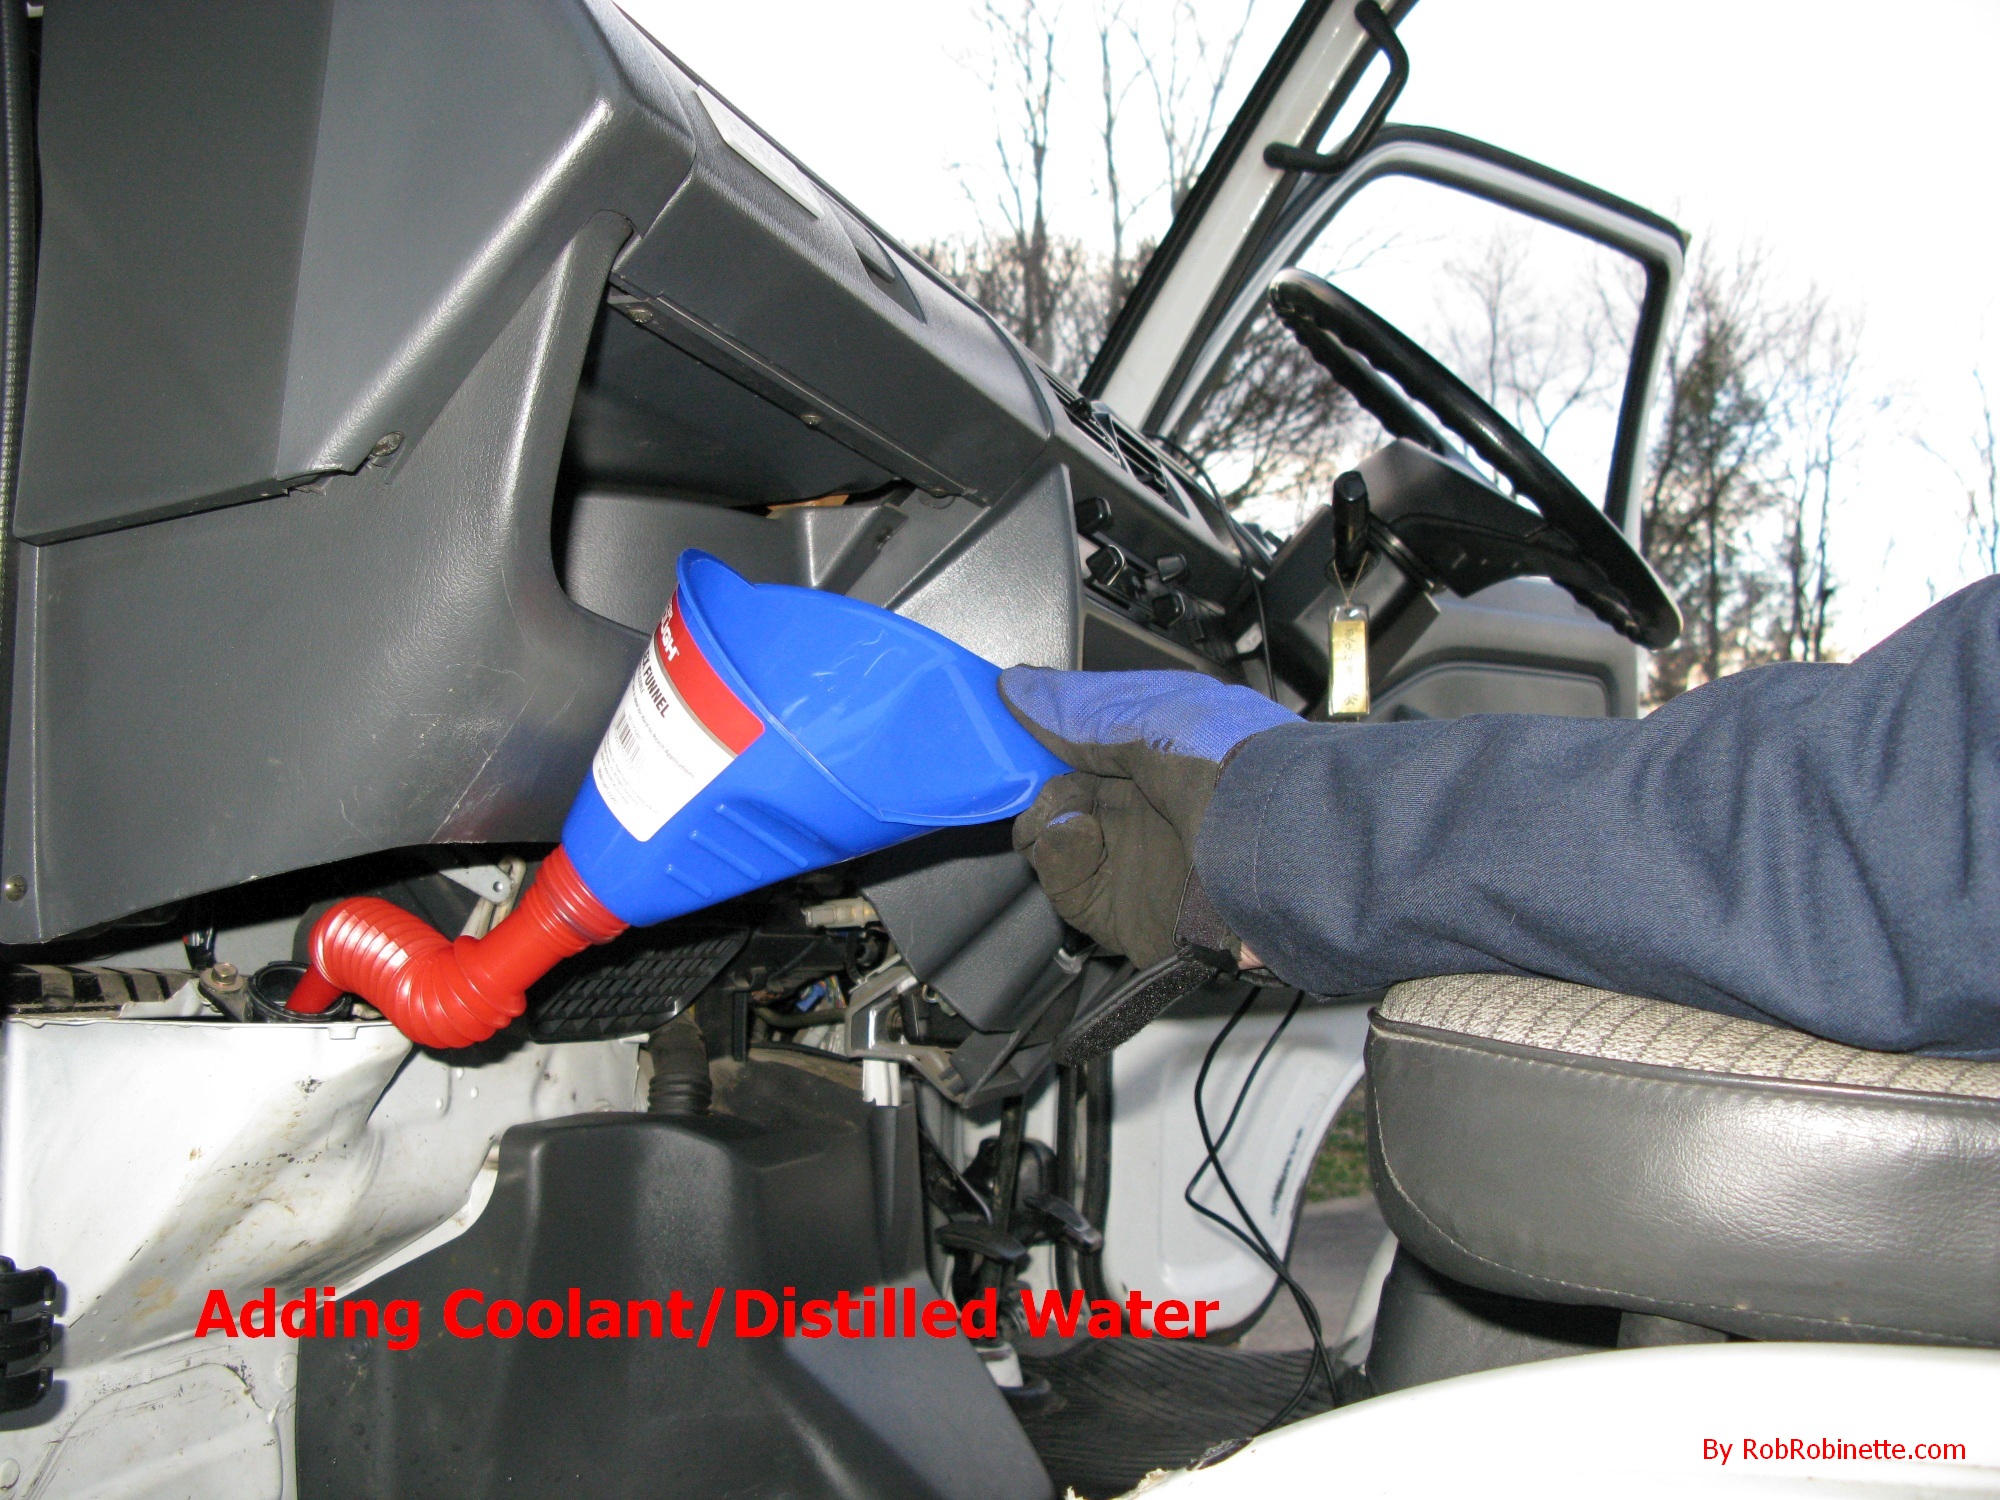
Use a flexible funnel or you'll make a huge mess.
After draining the old coolant, replace the engine block drain bolt (torque to 4-5kgm) and tighten the radiator drain cock finger-tight. Use a long neck flexible funnel to add 1.6 to 2 quarts of undiluted coolant then fill the radiator with distilled water. If you use pre-diluted 50/50 coolant then fill the radiator and reservoir with that--do not add any distilled water. Put the radiator cap on, turn the cab heater control to full hot and run the engine until the low idle kicks in which means the engine is warm and the thermostat is open flowing coolant through the radiator and heater.
Radiator
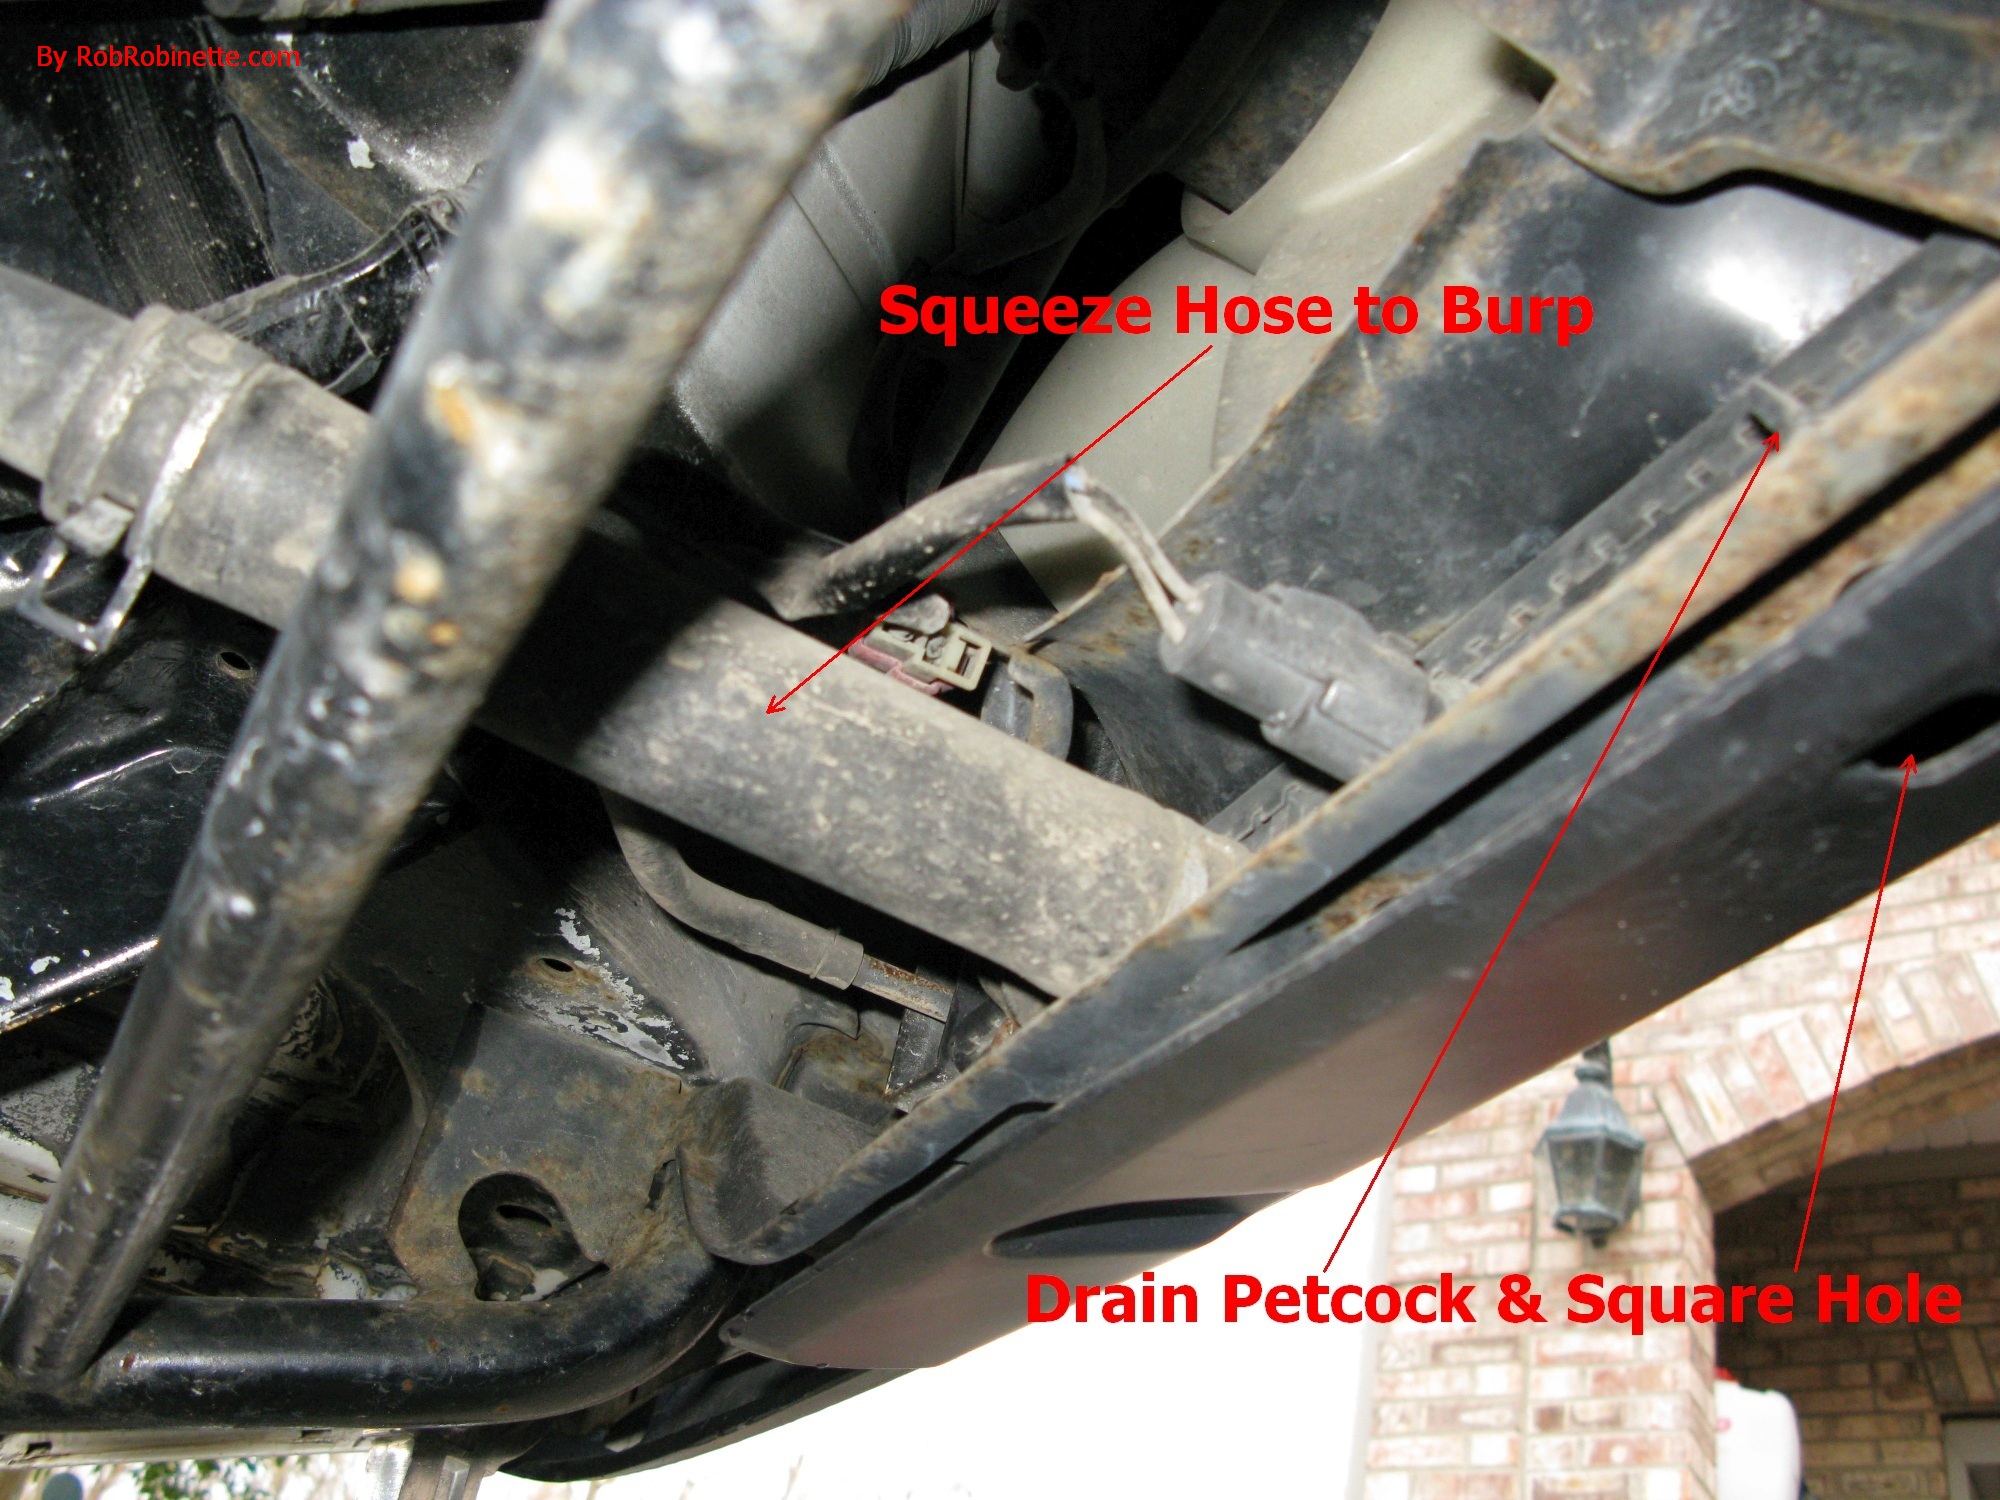
Drain petcock is just above the square drain hole in the front bumper. Rapidly squeeze and release the large coolant hose to burp the cooling system.
Bleeding the Cooling System: It is important to remove air bubbles in the cooling system to prevent engine hot spots. With the truck running, rapidly squeeze and release the large coolant hoses at the bottom of the engine (near the battery box) and at the bottom of the radiator to "burp" the system and move air bubbles to the reservoir and to the top of the radiator. Shut off the engine and allow it to cool, then top off the radiator with pre-mix coolant or distilled water. The Factory Manual also says to "Shut off the engine and shake the vehicle to release air bubbles." Run the engine and repeat the burping and shaking one more time then with the engine still running, open the four bleeder bolts, one at a time, until coolant comes out then close them immediately (see next two photos below).
Coolant Line Bleeder Bolts
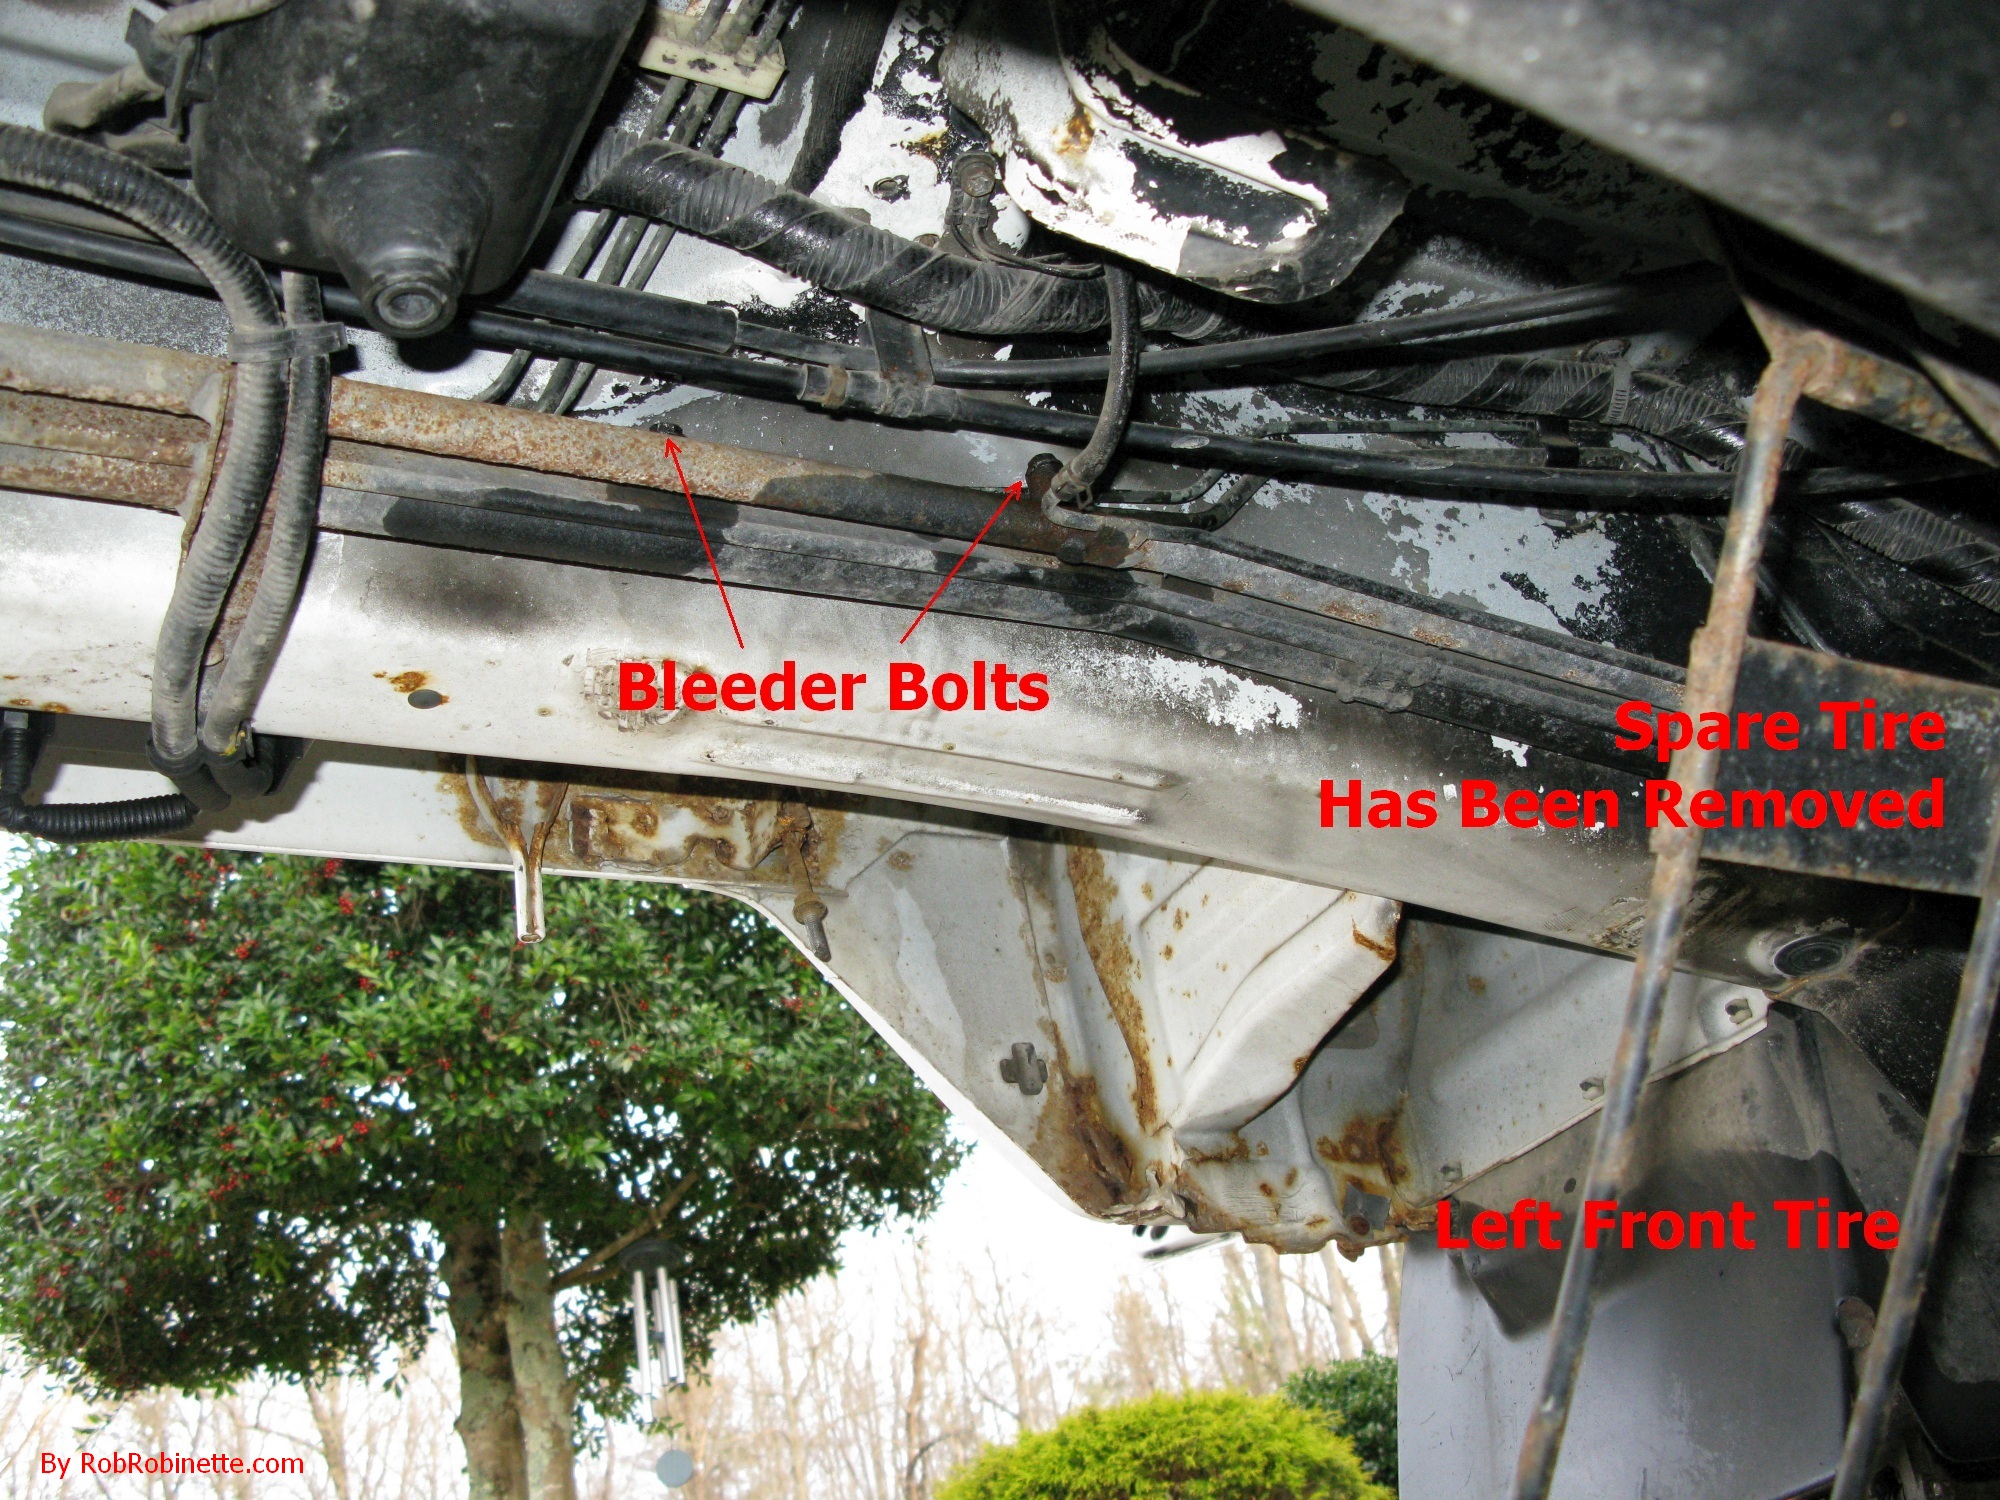
Bleeder bolts (10mm) in the rigid coolant lines above the spare tire (remove spare tire for access). Open them to allow air bubbles to escape. Torque them to 1.8kgm.
The four bleed bolts allow us to remove air bubbles high in the coolant system. There are two or three bleeder bolts on top of the engine (12mm) which must be accessed by removing the access panel in the center of the truck bed (four 14mm bolts, see photo below). There are also two bleeders on the rigid coolant lines just above the spare tire (see photo above). Remove the spare tire and use a 10mm wrench to open them until coolant comes out then close them. Check the radiator drain cock and engine block drain bolts for leaks.
Engine Access Panel Removed For Coolant Bleeders
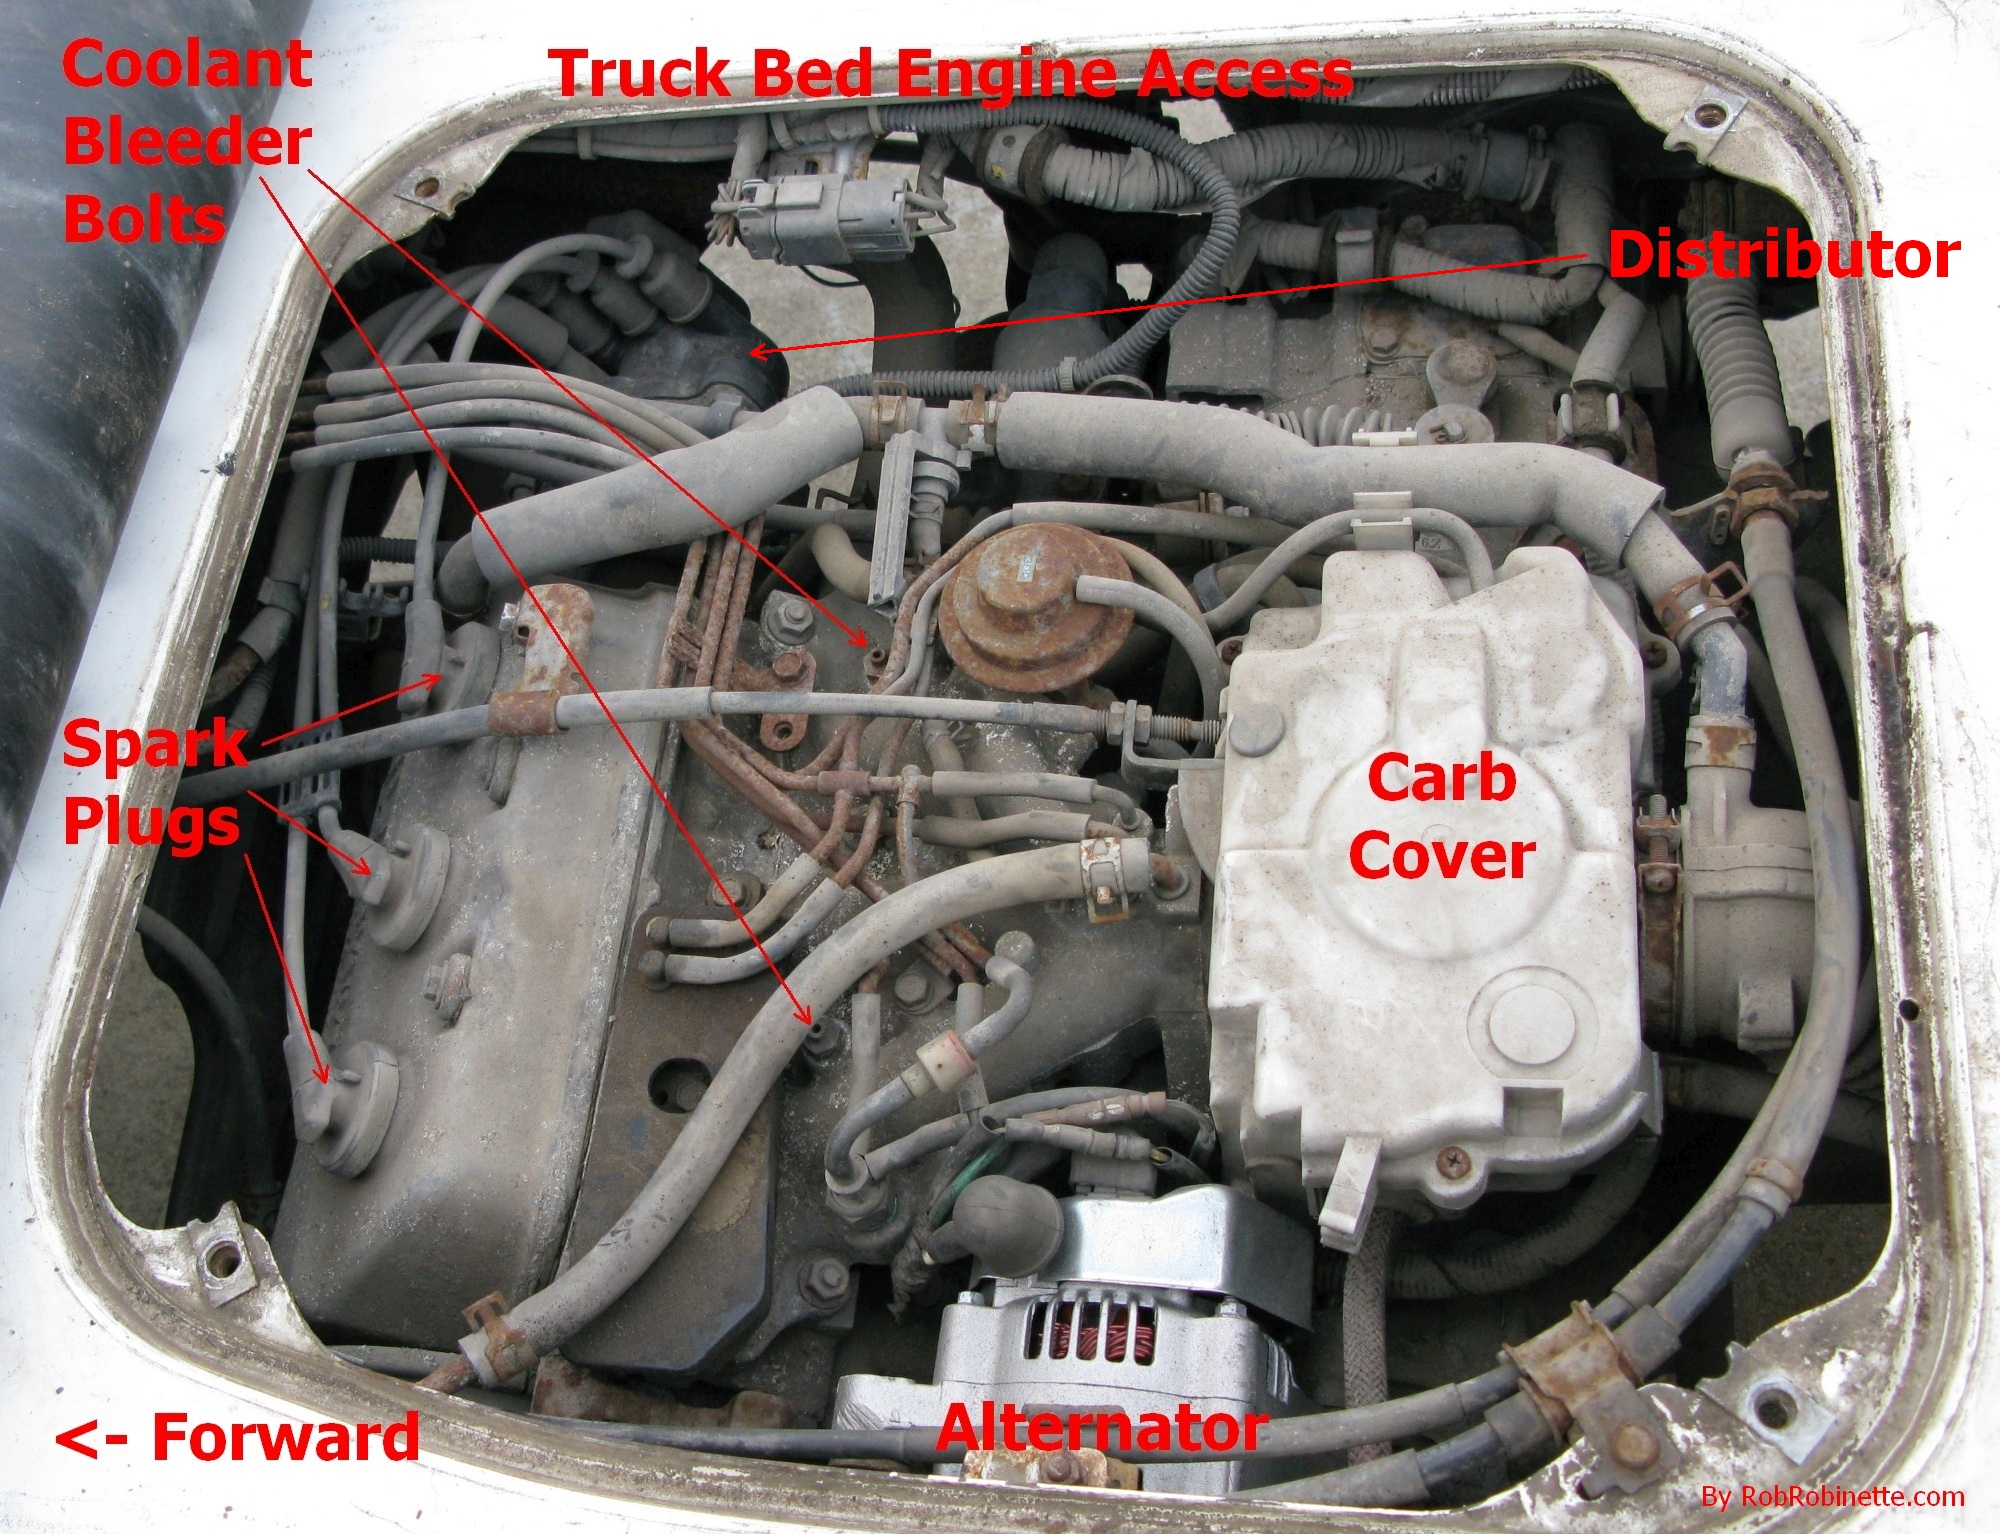
Bleeder bolts in the engine bay take a 12mm wrench or socket. Coolant will come out of the bolt center hole when air is bled. Open them to allow air bubbles to escape. If your ACTY has an automatic transmission there will be a third bleeder bolt on the transmission fluid cooler above the engine.
Check the coolant reservoir and add coolant if it is below the "MIN" line. Before your next drive with the engine cold, top off the radiator once again with distilled water. With the engine cold, check the coolant reservoir and add or remove coolant to get the level between "MIN" and "MAX" lines.
Thermostat: The thermostat is inside the thermostat housing on the bottom of the engine block where two large coolant hoses connect to the engine (see photo below). The thermostat cover is held in place with three bolts (torque to 1kgm). Always replace the thermostat housing o-ring when the housing is removed. Top off the coolant after the thermostat replacement and run through the cooling system bleed procedure in the coolant flush section above. Also check for leaks after the engine is warm. After the engine cools top off the radiator again. Honda ACTY thermostats can be purchased at O'reilly Auto Parts. The part number is 3758 and costs about $6 for a 1990 ACTY.
Water Pump: The water pump is located at the bottom of the engine under the timing belt cover (it is driven by the timing belt). There are two small weep holes in the timing belt cover. If any coolant comes out of the weep holes the water pump is leaking and must be replaced. It should also be replaced when the timing belt is replaced at 100,000km. Always replace the water pump o-ring when replacing the pump. You must remove the timing belt, timing belt idler and lower cover to gain access to the pump so you might as well replace the timing belt, timing belt tensioner and idler at the same time. Torque the idler bolt to 4.5kgm. There are four bolts holding the pump cover in place. Torque them to 1kgm.
Thermostat Housing
Timing Belt: Manual says to replace no later than 100,000km (62,000 miles) or every 7 years. If the timing belt breaks it will cause the pistons and valves to make contact and destroy the head and pistons making complete engine replacement the cheapest option. If you replace the alternator belt at 68,000km then go ahead and do the timing belt too. Also replace the timing belt tensioner, idler pulley, water pump and water pump o-ring, alternator belt and air conditioning compressor belt at the same time. You will also need cam and crank seals. A kit with all these parts is available from RightDriveParts.com.
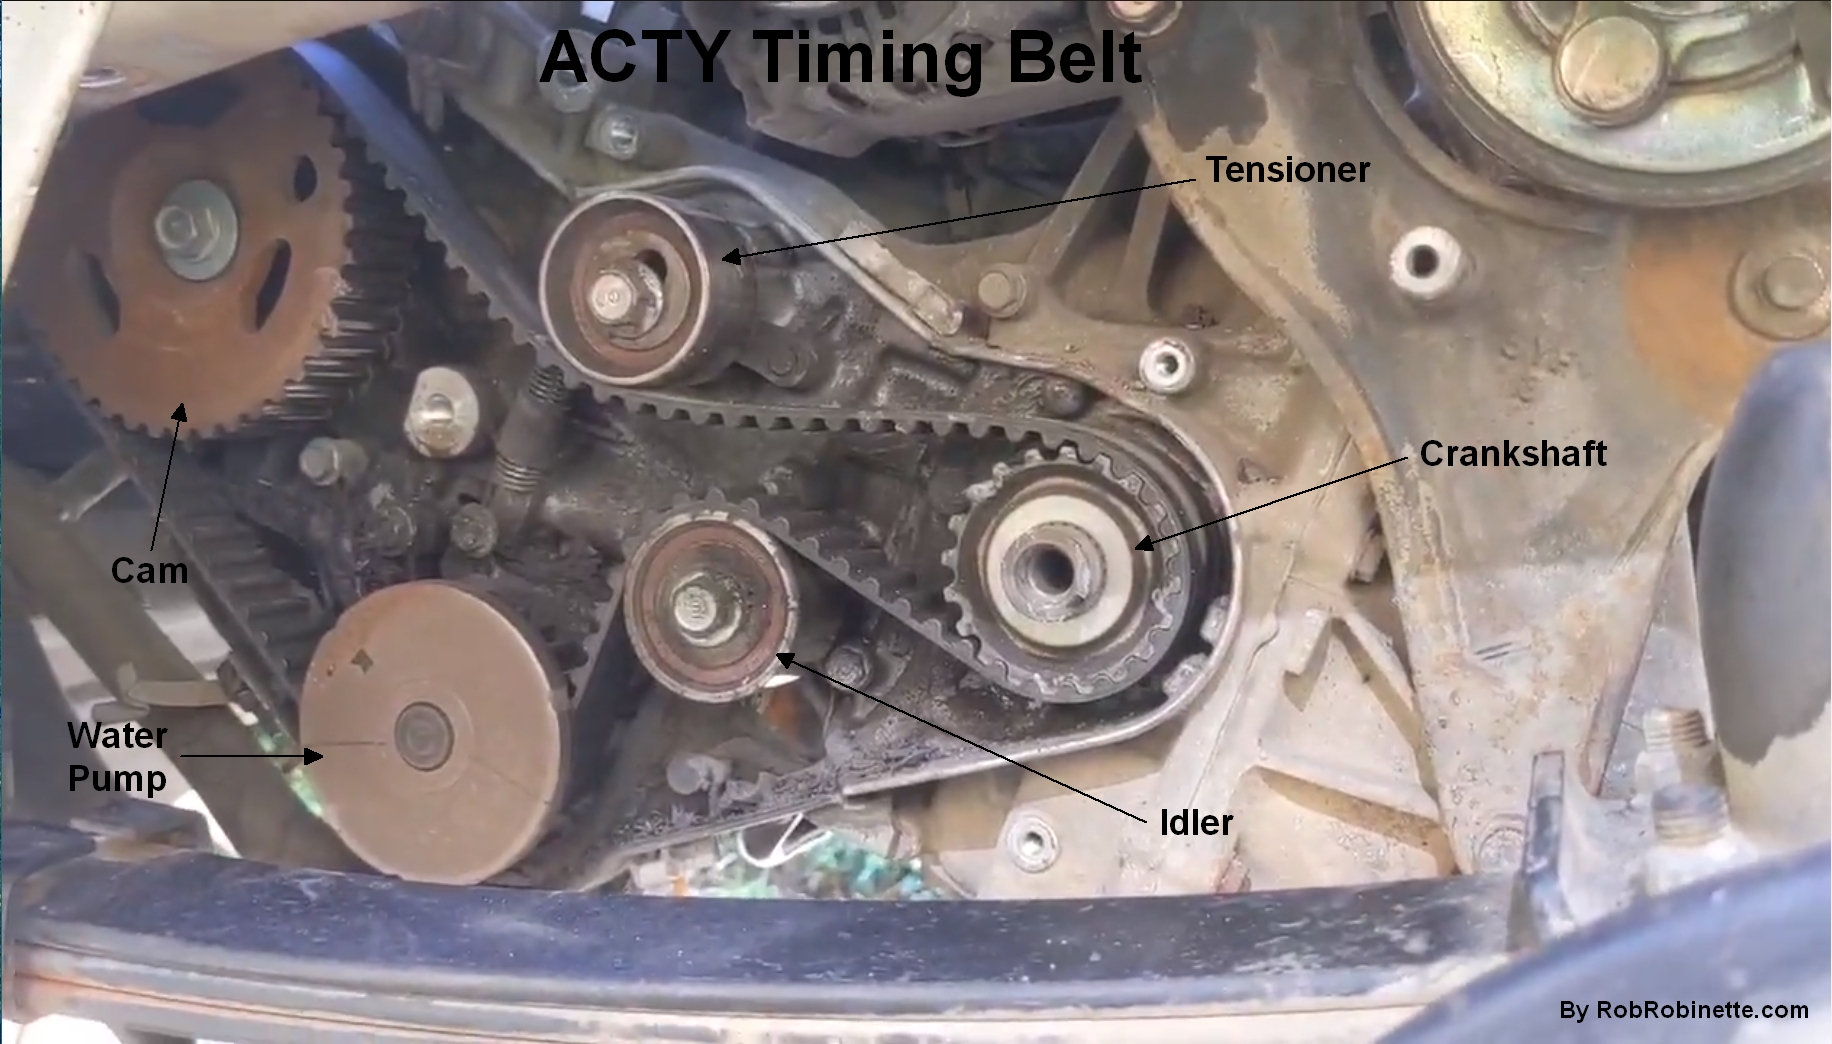
1992 ACTY timing belt. Note the rear suspension leaf spring at the bottom of the picture. I recommend you always replace the tensioner, idler, water pump, water pump o-ring, alternator belt, cam seal and crank seal when replacing the timing belt.
Timing Belt/Water Pump How-To by RHD Ron
To replace the belt you have to remove the cylinder head cover and all the belt covers on the passenger side of the engine. You also have to remove the passenger side engine mount. Raise the engine slightly with a jack (place rubber pad or rag on the jack to prevent oil pan damage) and remove the engine mount. Use a wrench on the crankshaft pulley bolt to turn the engine counter-clockwise to set the #1 cylinder at top-dead-center by aligning the TDC marks on the crankshaft pulley and engine block, and with the "UP" label on the cam sprocket up--keep turning the engine until all 3 marks are correct. Make note of this position so you can set it when you install the new timing belt.
#1 TDC Timing Marks
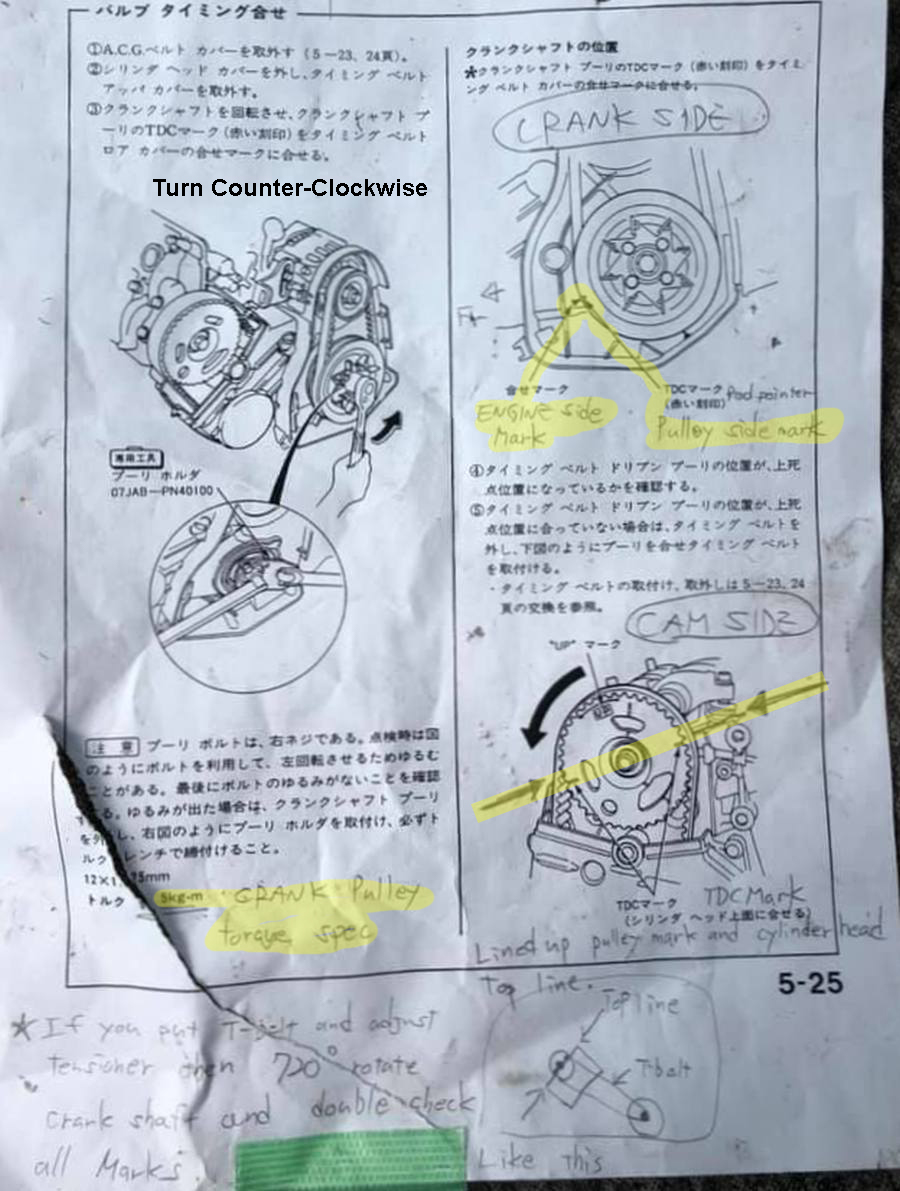
The crank pulley timing side mark is a very small notch cut into the rim of the pulley (upper right in diagram above). You might have to use your finger to find it. The two marks on the cam gear line up with the top line of the engine cylinder head. See the hand drawn diagram at bottom right. Use a wrench to turn the engine crank counter-clockwise (anti-clockwise) using the nut on the crank pulley (upper left). When the pulley and cam gear marks all line up you are at cylinder #1 Top Dead Center (TDC). With TDC set remove and replace the timing belt. Make sure all the marks are still lined up with the new belt on and tensioned. Turn the crank two full turns (720 degrees) with a wrench and verify all the timing marks line up again.
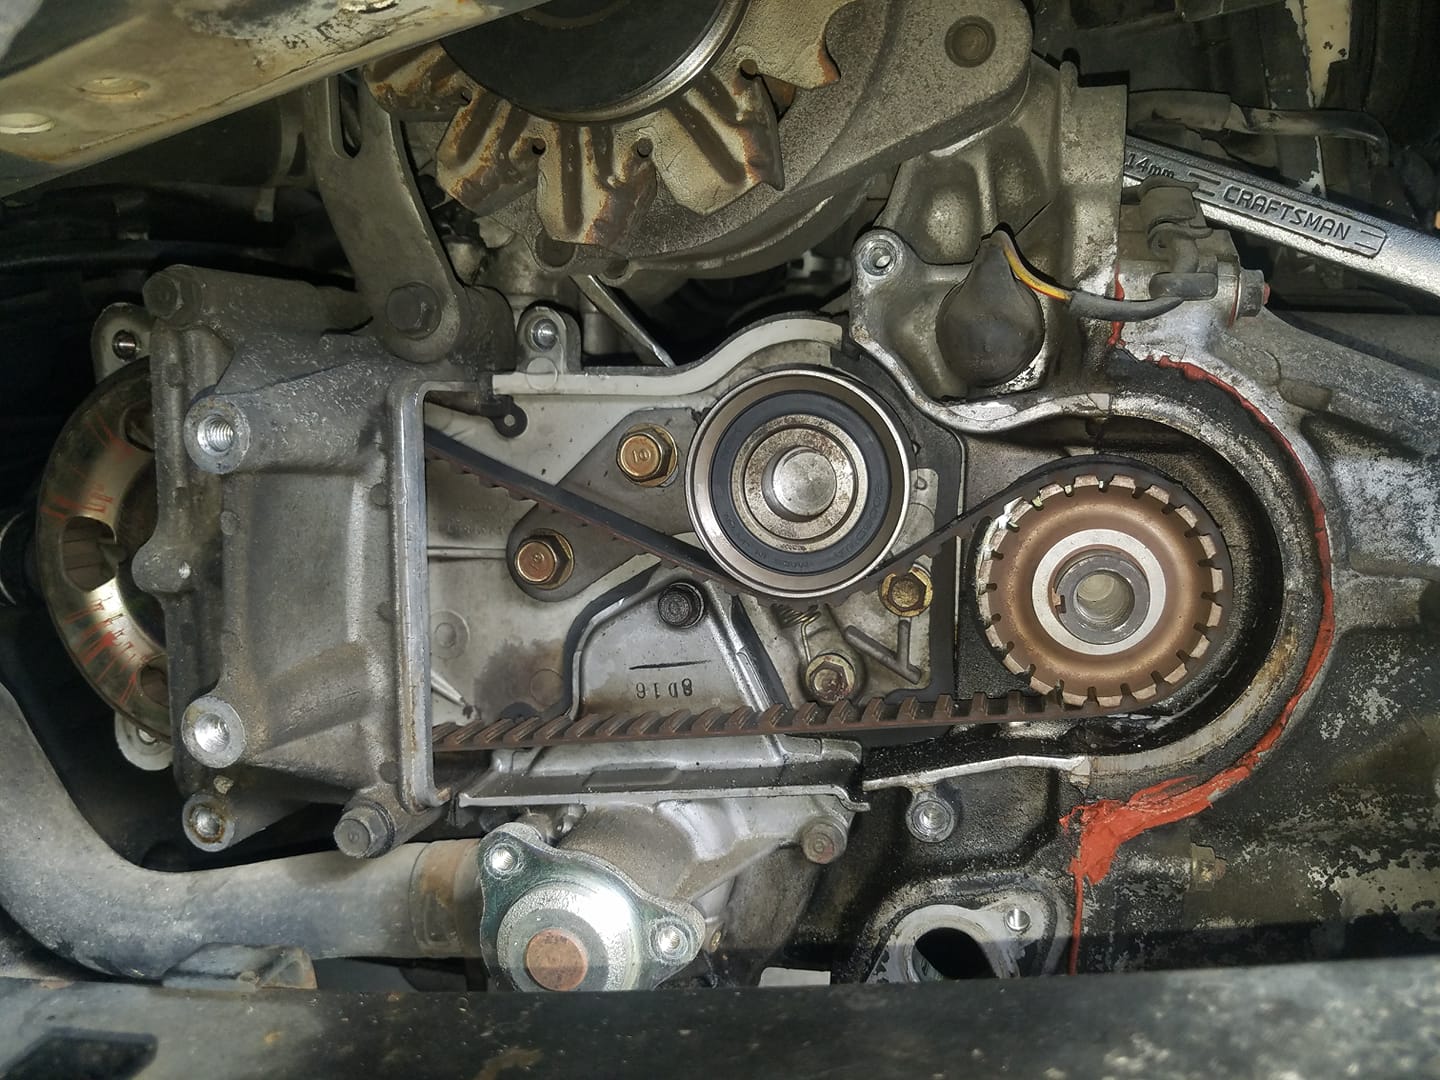
1985 ACTY timing belt. Note the timing belt does not turn the water pump in this generation ACTY.
Loosen the timing belt tensioner bolt 1/6th of a turn and slide the timing belt off. Remove and replace the timing belt tensioner and idler pulley. Remove and replace the water pump and water pump o-ring. You'll lose a bunch of coolant when you pop the water pump loose. Replace the timing belt and carefully verify the position of the crankshaft and camshaft pulleys match up to the TDC marks. Torque the idler pulley and tensioner bolts to 4.5kgm. If your ACTY won't start or runs rough after the timing belt replacement the belt may be out of position. Set the #1 cylinder to TDC and verify the timing marks on the crankshaft pulley and cam sprocket.
Alternator Belt: 10mm x 675mm long which is a standard size available at auto parts stores. Manual says to replace at 68,000km (42,000 miles). There is a large inspection grommet on the belt cover to check condition and tightness. Belt tightness should be checked with a gauge at 20-30kgf and 9-12mm of travel. Torque the alternator adjustment bolt to 2.5kgm and the alternator pivot bolt to 4.5kgm.
Air Conditioning Compressor Belt: Replace at 68,000km (42,000 miles, same as alternator belt). Check AC fluid when replacing the belt. New belt tension 35-60kgf, used belt 22-40kgf.
Air Conditioning Drier Replacement
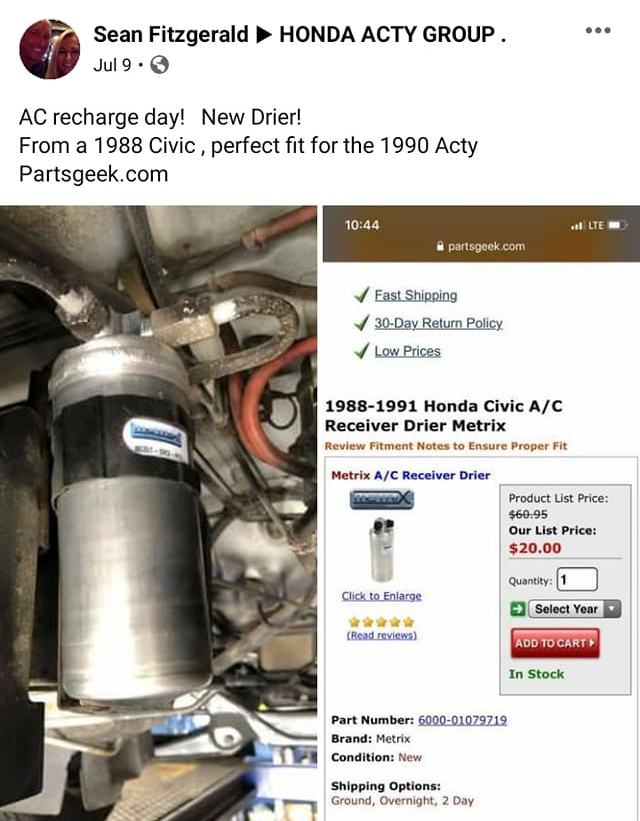
1988 Honda Civic drier fits perfectly.
Parts Suppliers who ship worldwide:
US based RightHandParts.com
https://honda.epc-data.com/acty_truck/
Another source but typically more expensive: http://jp-carparts.com/honda
Spark Plugs: Need 3, NGK BKR6E-11 (recommended), ND K20PR-U11 or Champion Iridium 9001, Spark Plug Gap: 1 - 1.1 mm. Access the spark plugs by removing the truck bed engine access panel by removing its four 14mm bolts (see engine photo above). Remove the throttle cable support bracket (one 10mm bolt) to give you room to get the #2 spark plug wire off.
Windshield Wipers: Standard auto parts store 15" wipers are perfect. A 16" will fit on the driver side which helps clear the top of the windshield for tall drivers. The van rear wiper uses a standard 13" blade.
Clutch Pedal: Stroke 130-135mm, Backlash 15-25mm, Gap to Floor not less than 79mm.
Fuse Box: Is mounted on the firewall under the dash to the left of the steering wheel.
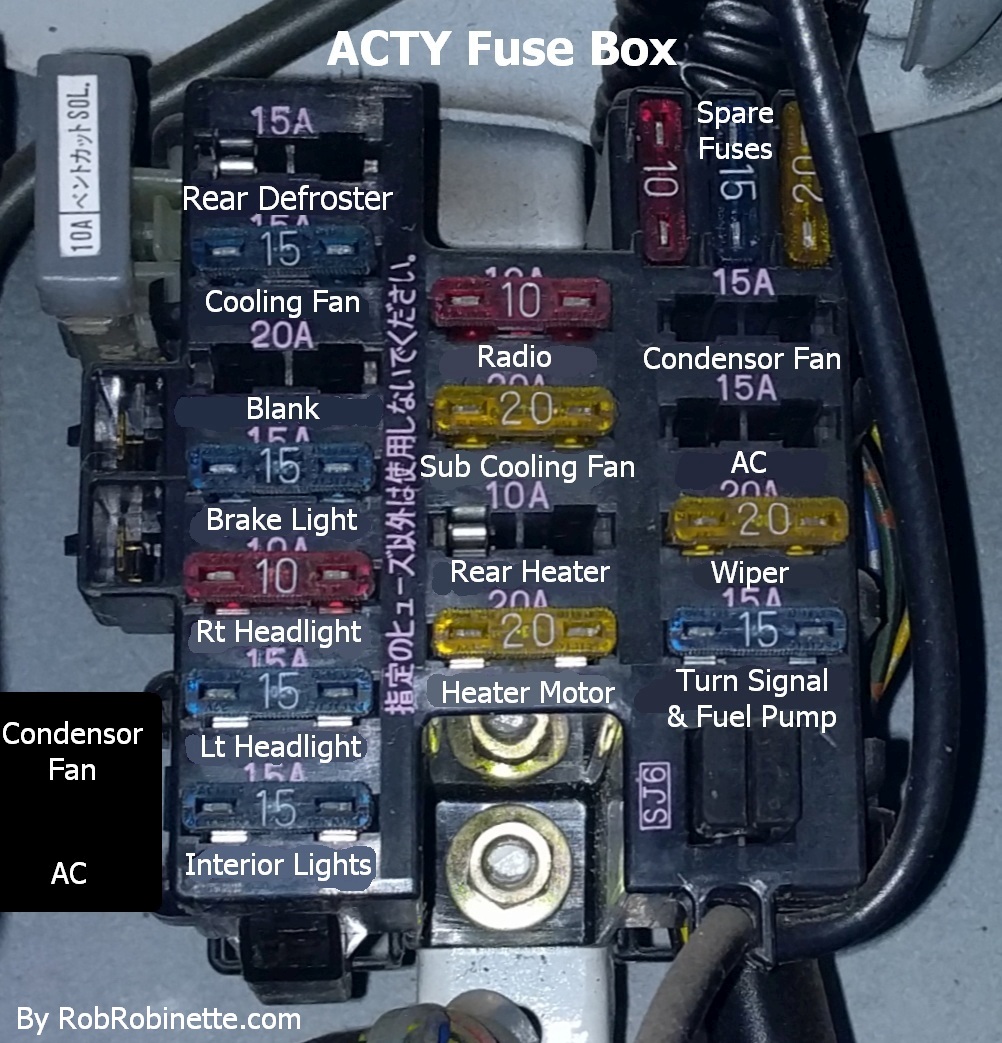
My 91 ACTY HA4 does not have air conditioning so the "Condenser Fan" and "AC" (top right) fuses are empty. These two fuses may be attached at lower left in some ACTY's. The "Rear Heater" fuse (center) and "Rear Defroster" (top left) are van only.
Radio: Standard 1 DIN replacement radio will slide right in. There are two 8mm bolts securing the radio bracket that you get to by removing the ashtray. They are in the top of the ashtray compartment and go up into the radio bracket. The 8mm bolts have a Phillips Head slot for a screwdriver but you'll probably need an 8mm socket wrench to remove them.
Removing Radio
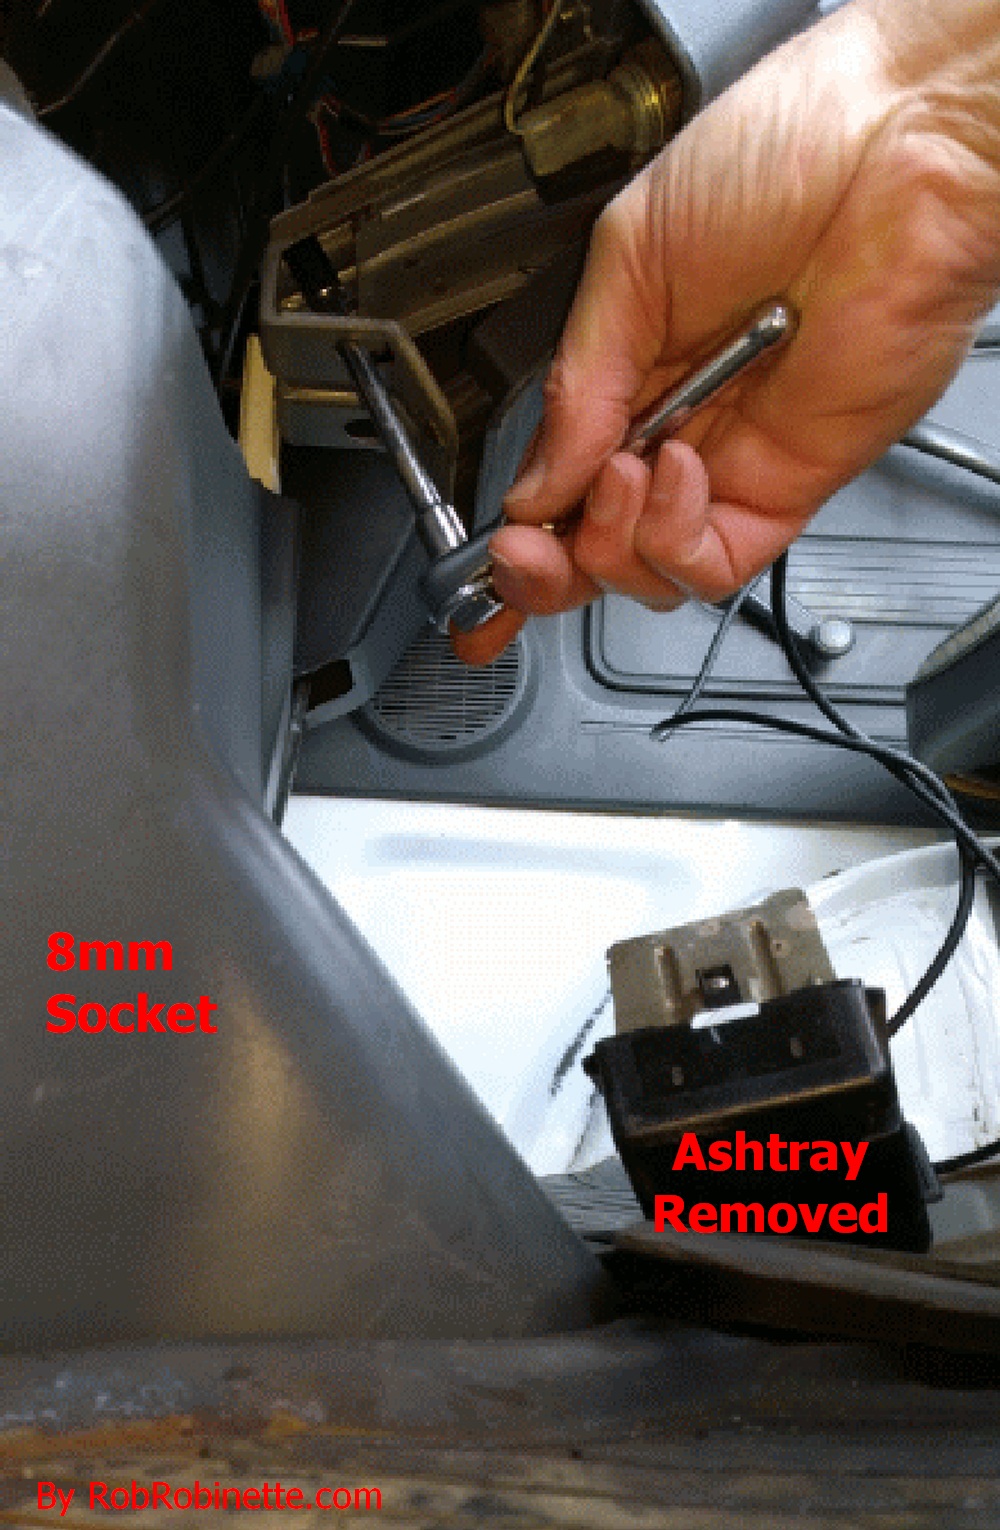
8mm socket on one of the radio bolts. The wrench goes through a hole in the ashtray bracket to access the bolts.
Radio Removed
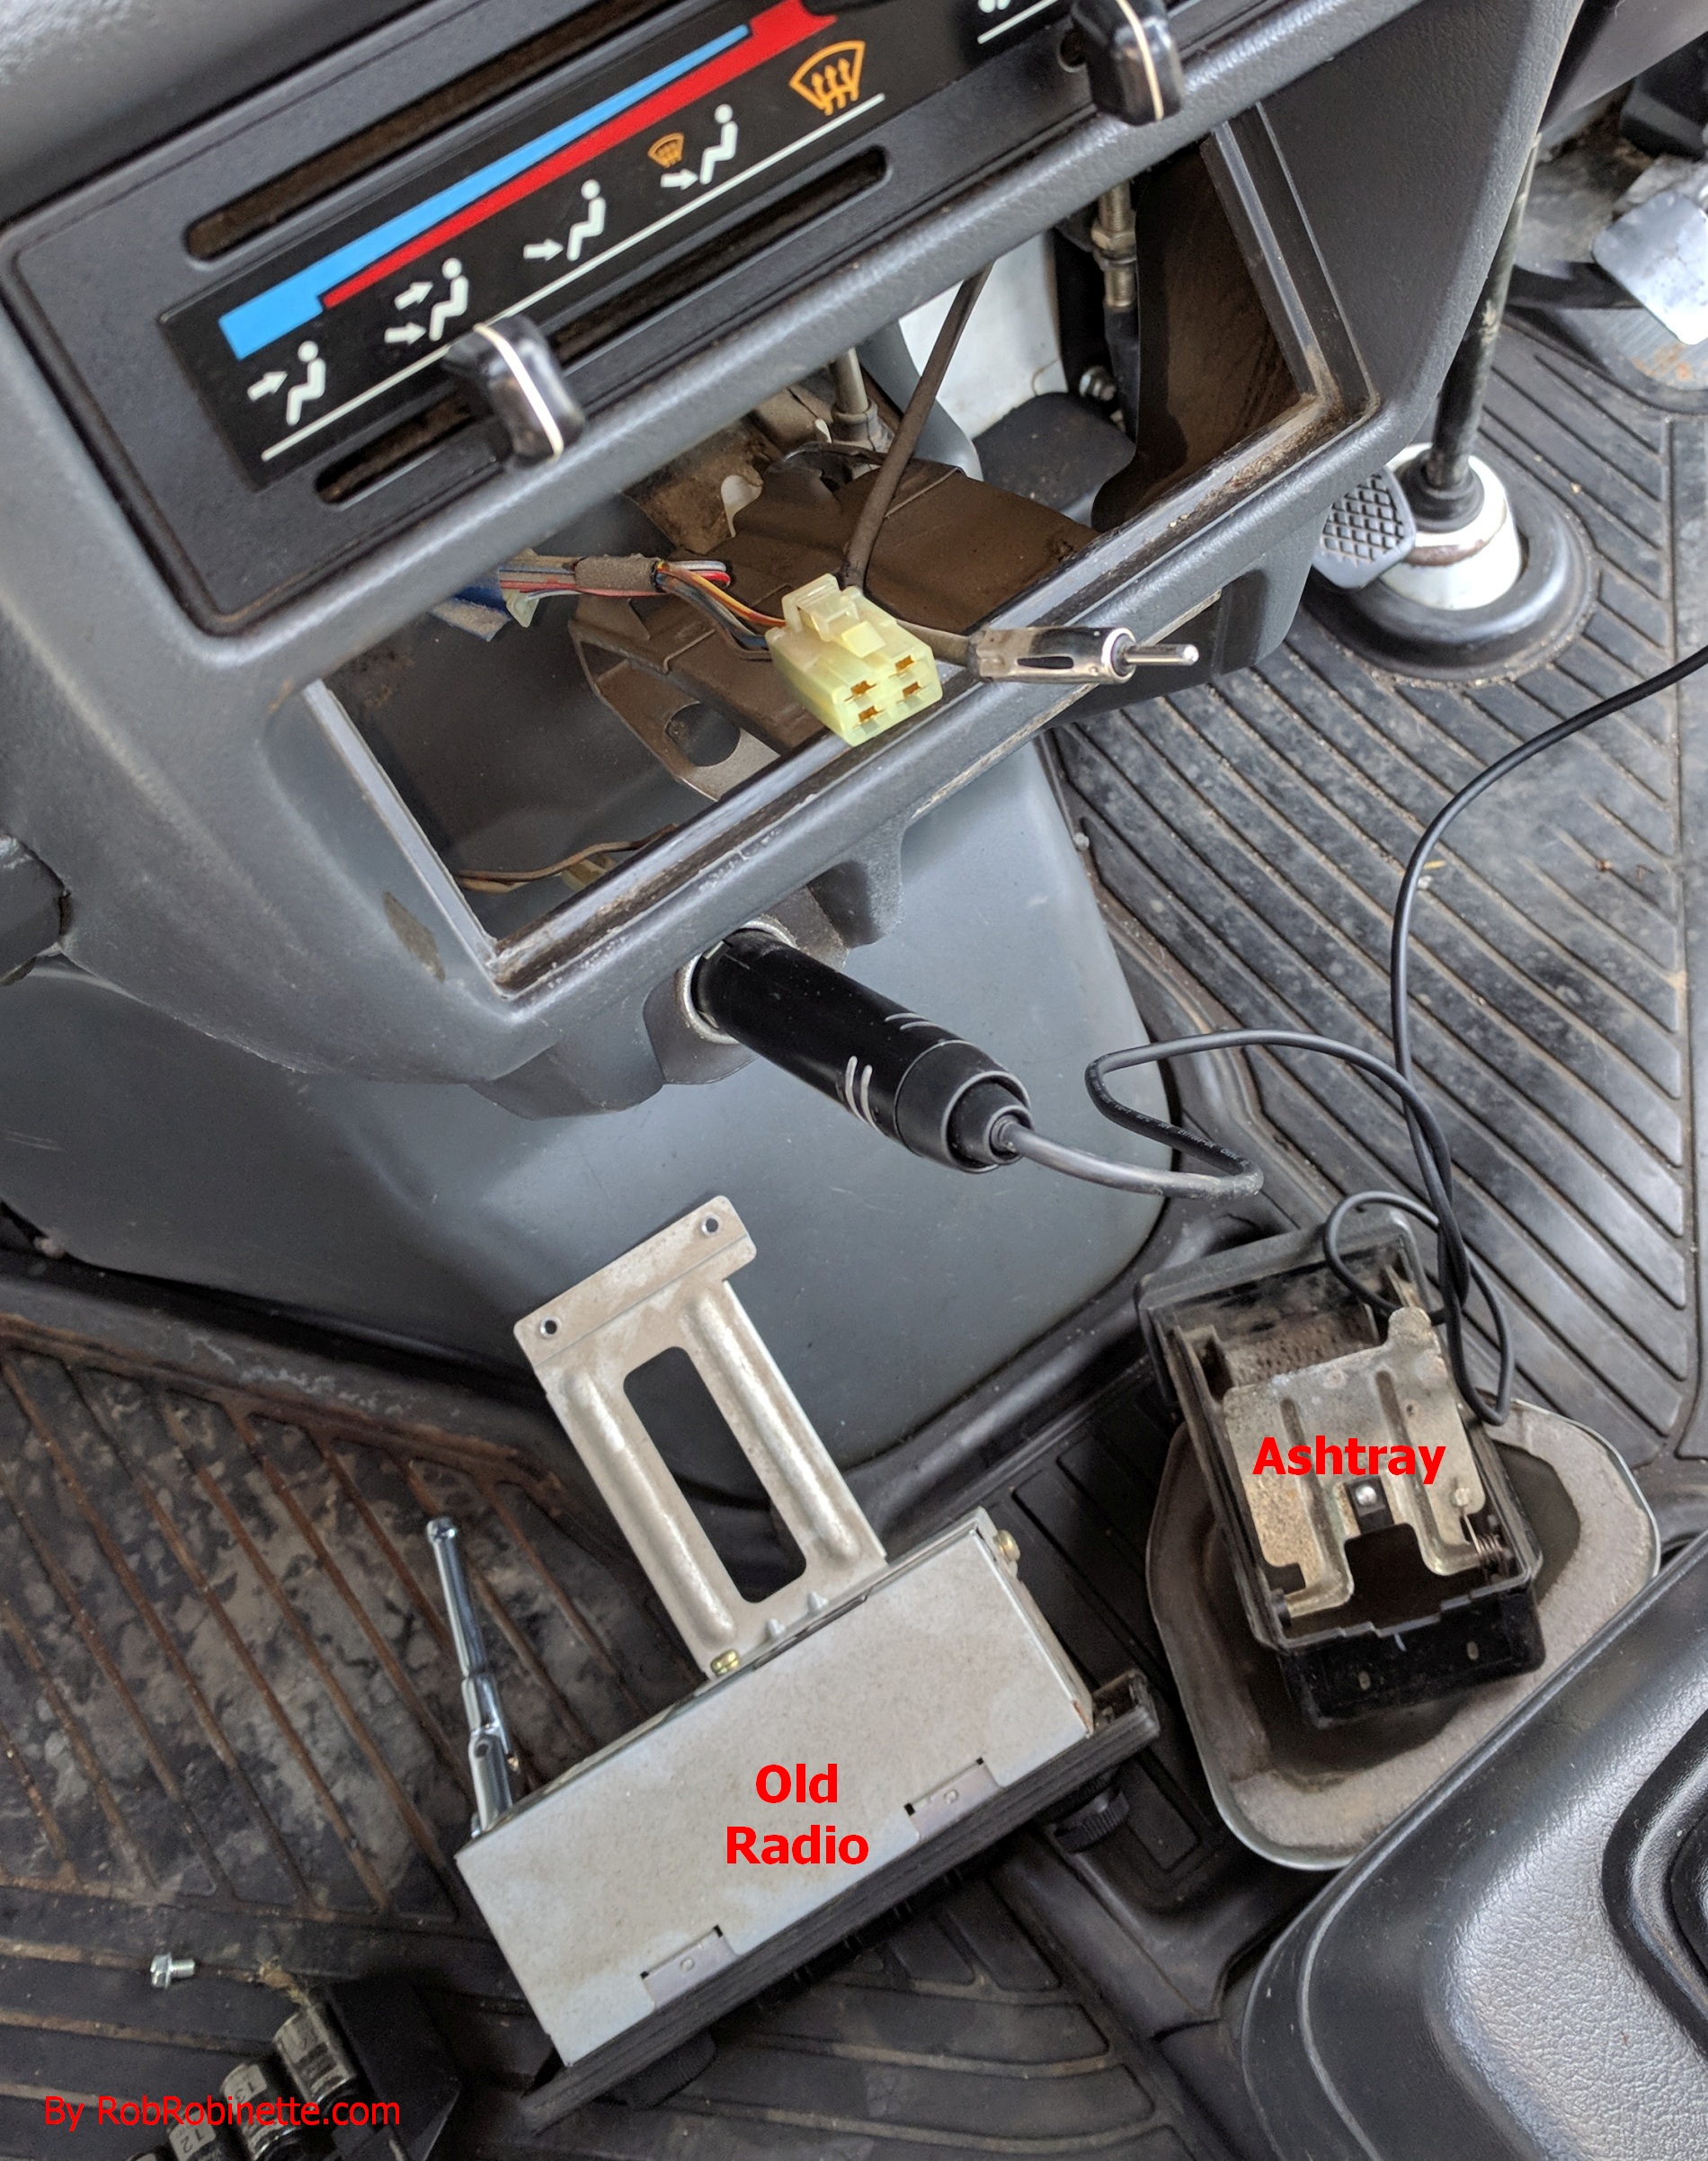
My ACTY's radio electrical plug has 4 conductors: switched 12v, ground and left speaker + & -. Some ACTY's come with a 6 conductor radio plug. The antenna connector is to the right of the electrical plug.
Radio Connector and Wires
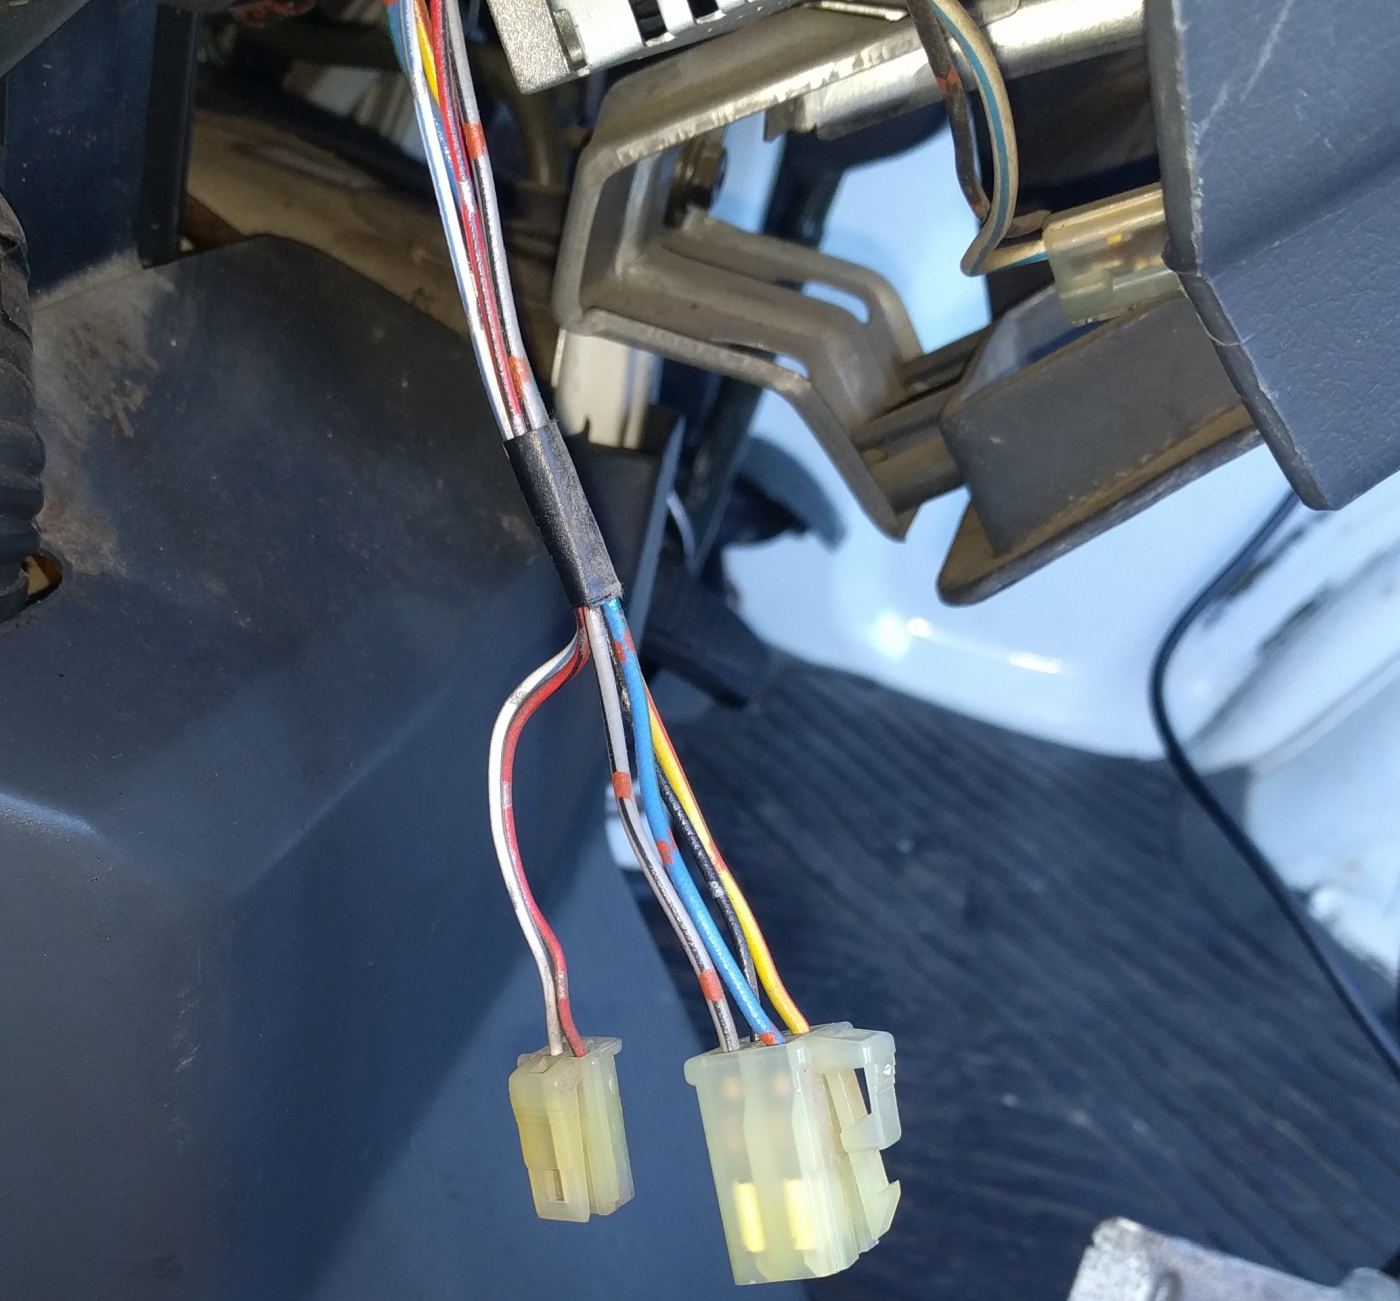
The large connector's yellow with red stripe wire is switched 12v, black is ground, the blue is left speaker +, gray with black stripe is left speaker -. The small connector's white wire with blue stripe is unswitched 12v and the red with black strip is 12v instrument panel lights. My 91 ACTY HA4 did not have the right door speaker wires present. If your ACTY has a 6 conductor radio plug then the small 2 conductor plug will have your right door speaker wires (red and brown).
You can get an ebay wiring harness that will plug into the ACTY radio connectors. Just search ebay for "ACTY wiring harness". My new radio required a constant, un-switched 12v source for memory retention so I used the small connector's white with blue stripe wire. On a related note, I wanted the cigarette lighter to switch off with the key so I changed its power supply to the radio's yellow-red wire. WARNING: The cigarette lighter will no longer be able to heat the actual cigarette lighter because it will pull more power than the radio wire can handle. I don't smoke so the lighter receptacle will only be used to power a GPS or a USB power converter which will power down when the key is turned off.
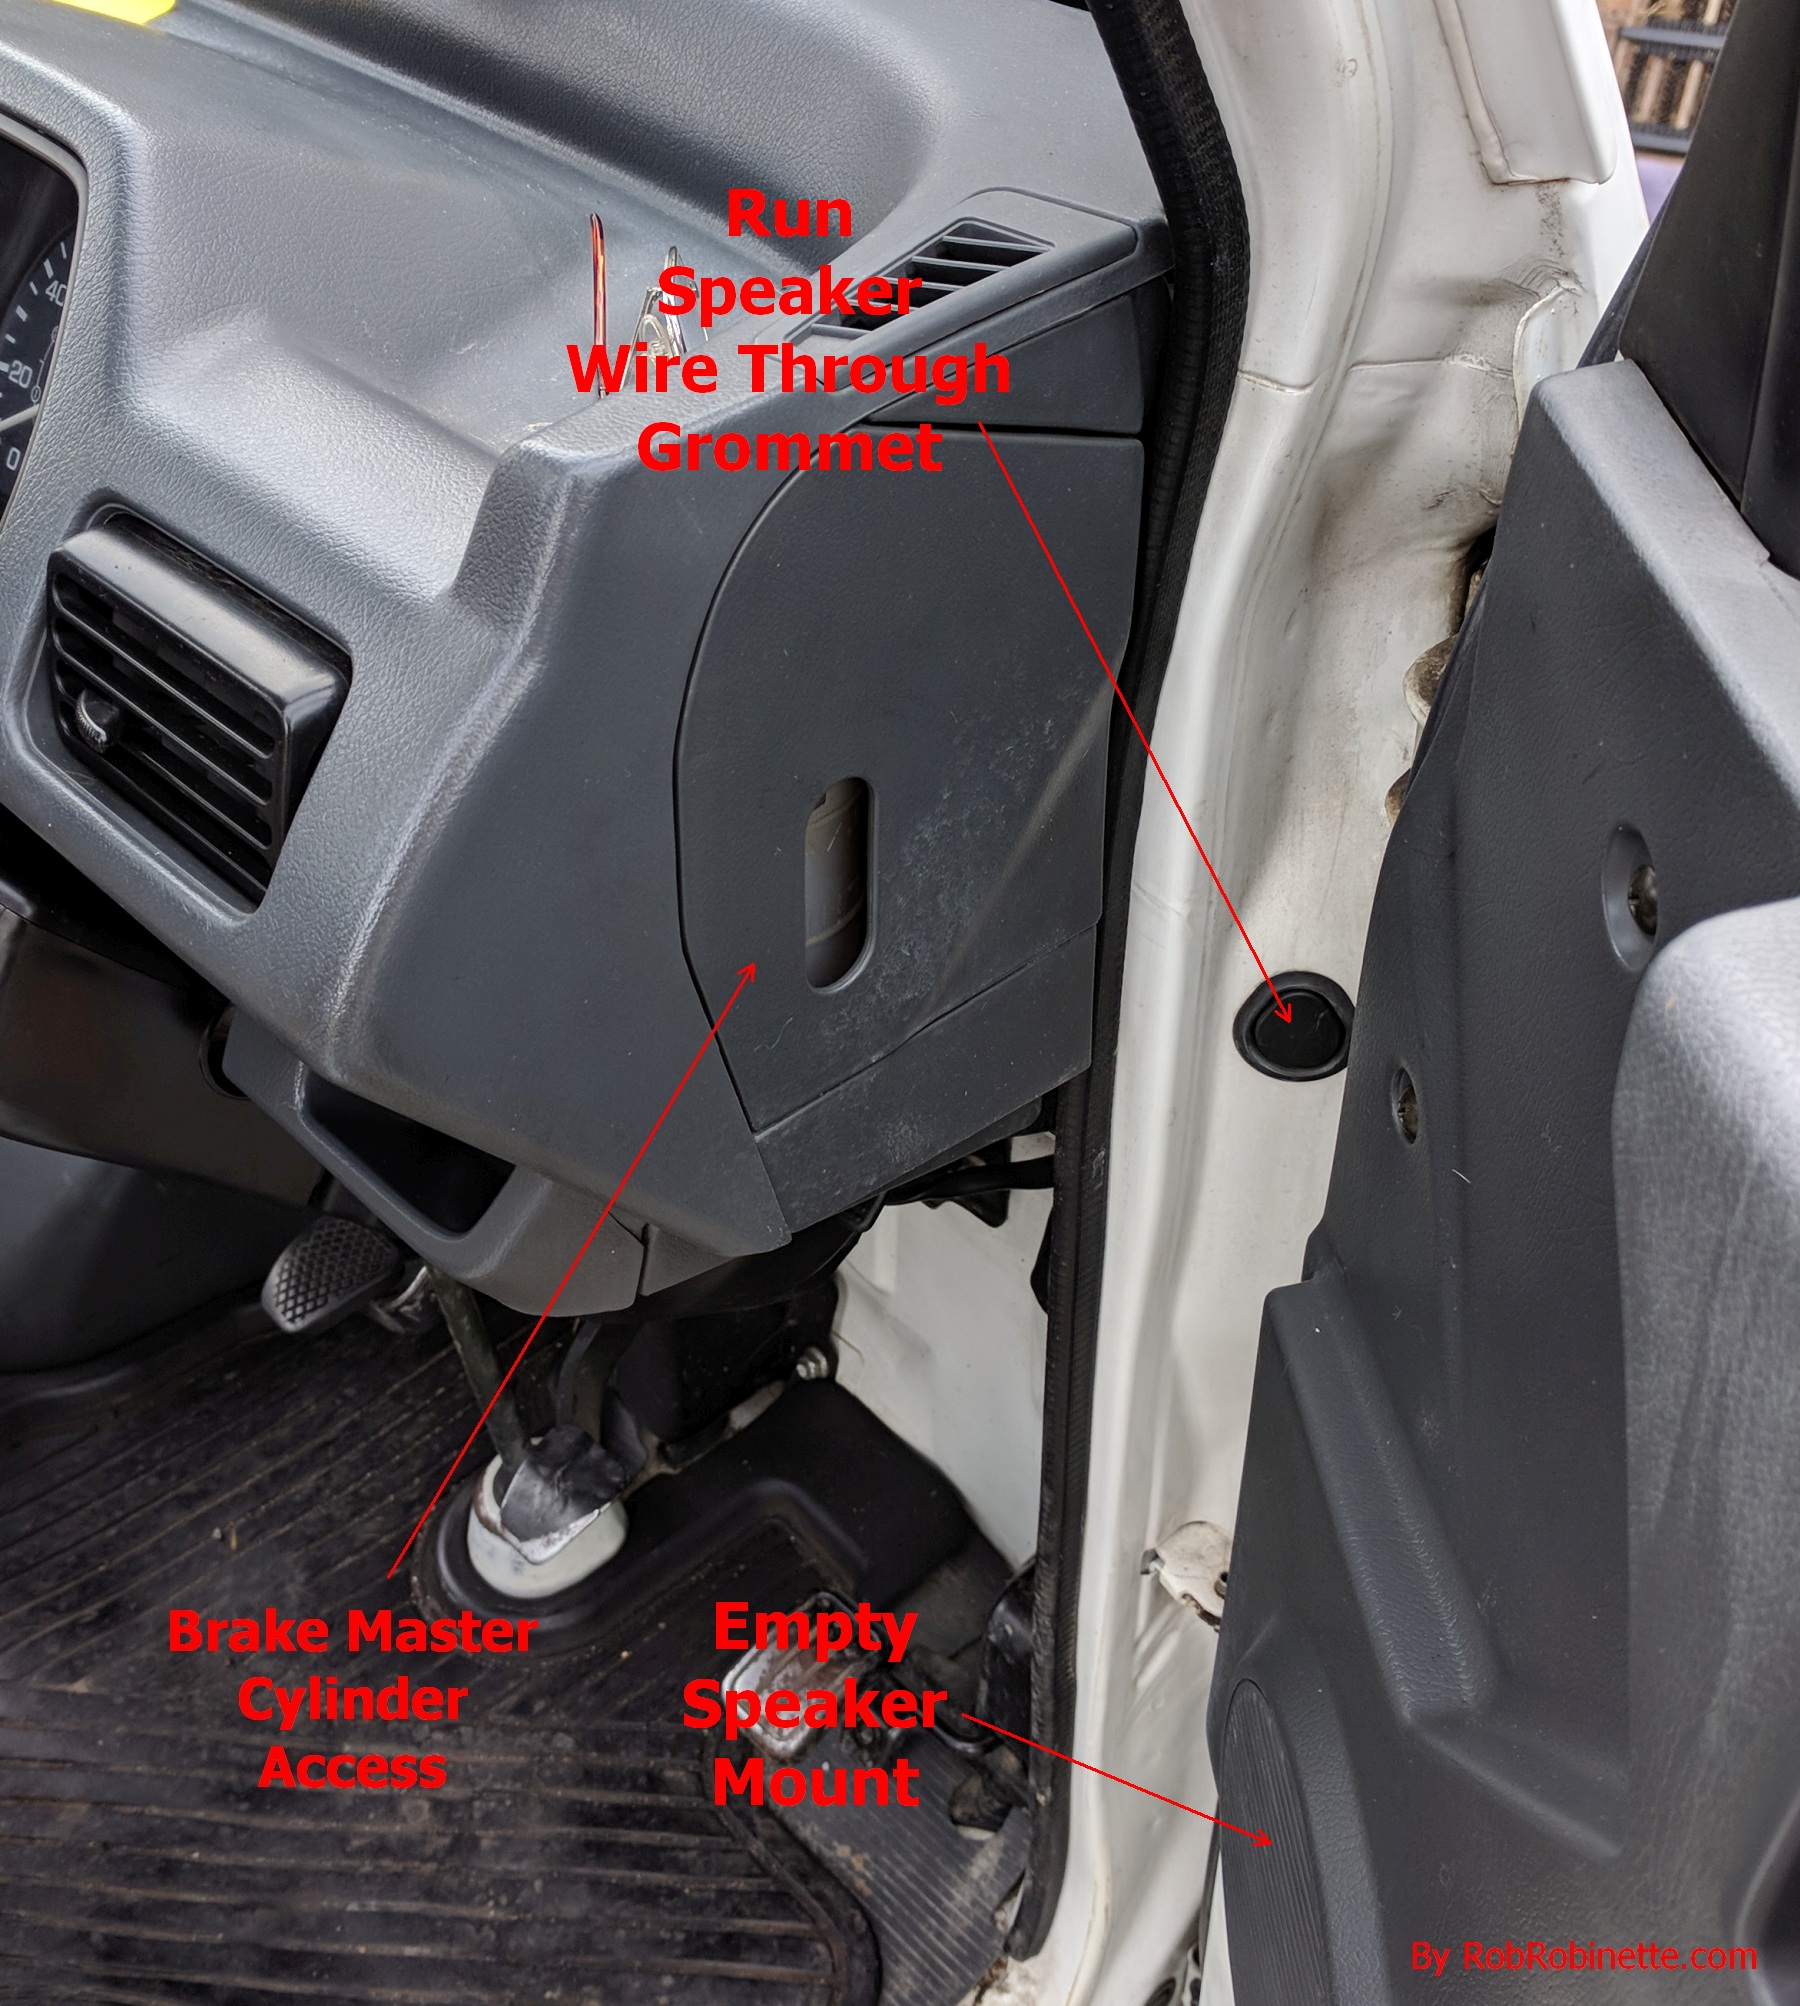
Speaker: There is one speaker in the passenger door. There is a place to mount a second speaker in the driver door. If your ACTY has the right door speaker wire (mine did not) it is located behind the brake master cylinder which is located behind a pop-off access panel on the right end of the driver's dashboard (see photo below). Open the driver door and you'll see the panel on the side of the dash board. You'll have to un-bolt the brake master cylinder/reservoir to get to the wire. It is taped to another wire bundle. After cutting the tape that holds down the speaker wire it will be long enough to splice in more wire to make the run to the new right door speaker. If you don't have the right speaker wire don't fret, it's very easy to run a new speaker wire through the door grommet (shown below) and on to the radio.
To get to the right stereo channel speaker wire remove the brake master cylinder access door by pulling it off then unbolt the master cylinder to give you room to reach behind it and access the wire which is taped to another wire bundle.
Be aware the stock speakers are very shallow. If your new speakers are much deeper than stock you'll have to add a ring or spacers to move the speaker out away from the window track.
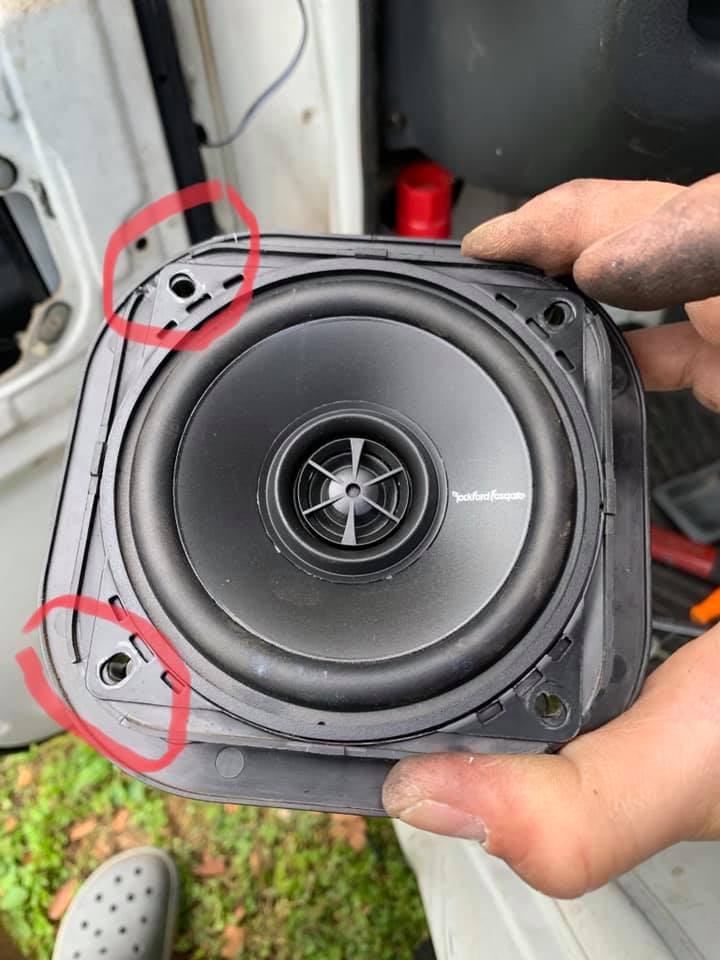
These Rockford Fosgate RFx4 Prime 4 inch speakers fit but you have to trim off the plastic ridge at all 4 corners (highlighted above) and remove the speaker cup with a razor knife. They are coaxial speakers (tweeter & woofer) and sound good in the small ACTY cabin. Photo and speaker information by Dave Heaps.
Dave Heaps describes the door panel removal: Remove interior panel by removing the 5 Phillips head screws (2 at the ends of the grab handle under the plastic caps, 1 behind the door open latch and 2 towards the front of the panel out in the open). Partially open the door open latch and remove plastic bezel. Remove the window crank by pulling slightly away from the door and pulling the retaining clip out (a seal pick and/or small needle nose help). After that, work around the exterior of the panel gently popping the plastic rivets, then remove the panel by pushing up and foreword from the rear, bottom corner. Once the panel is off, remove the old speaker and cup via the 4 Phillips head screws. Ditch the old speaker. Next, cut the back of the speaker cup out with a Razor knife to allow clearance for the new speaker’s bigger magnet. Then shave the new speakers' lip at the 4 corners on the front of the cup (circled in red above) to allow the new speakers larger frame to sit flush in the cup. Reinstall everything in reverse order.
6.5 inch Pioneer TS-G1340R 2-Way Coax Speakers
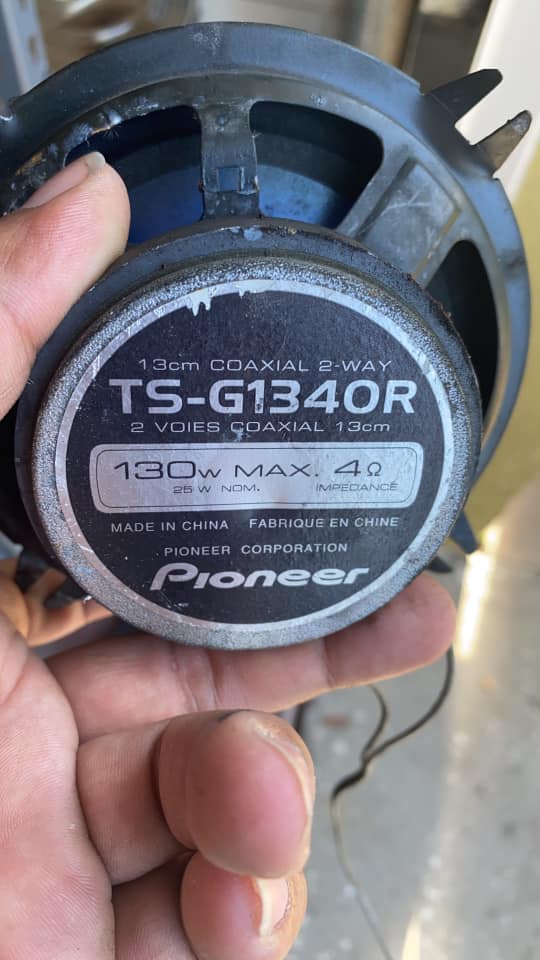
These 6.5" speakers fit by adding a nut as a spacer between the back of the speaker and the door. The door cover fit over these speakers without problem.
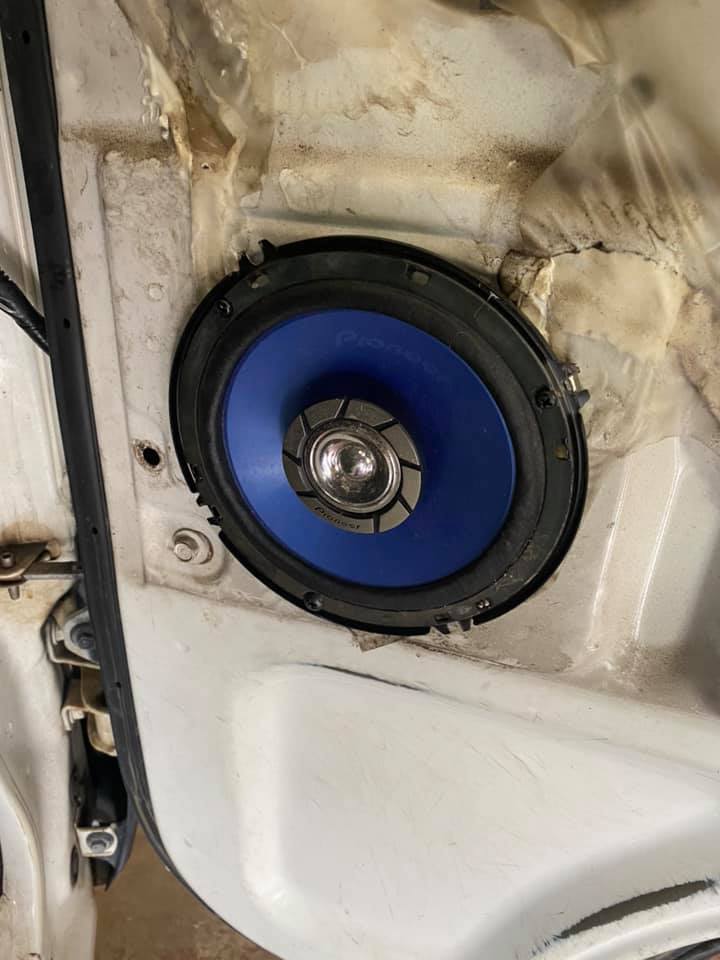
Photos and install by Jesse Colon.
There is room under the seats for speakers.
Speaker Under Seat
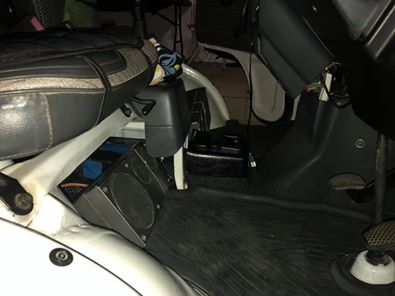
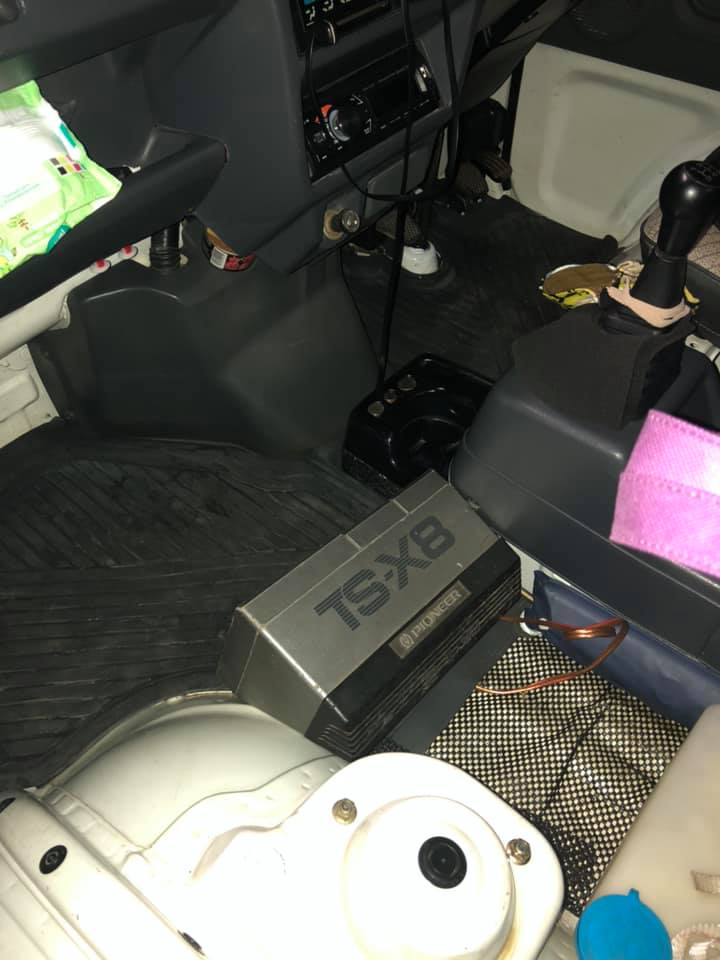
Photo by Raymond Peredo.
Add a Tachometer
Here's how to tap into the ACTY tachometer wire. Make sure your tachometer is compatible with 3 cylinder engines. The control box and tac wire are located under the passenger seat. The seat lifts up for easy access.
Tachometer Wire
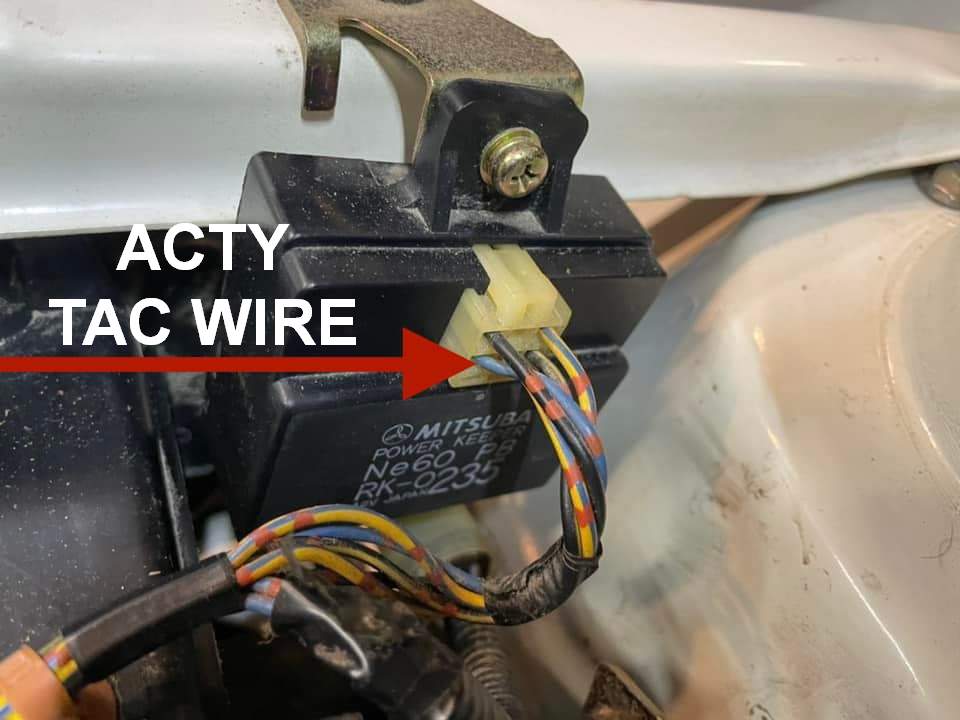
This box is located under the passenger seat.
Wire Tap
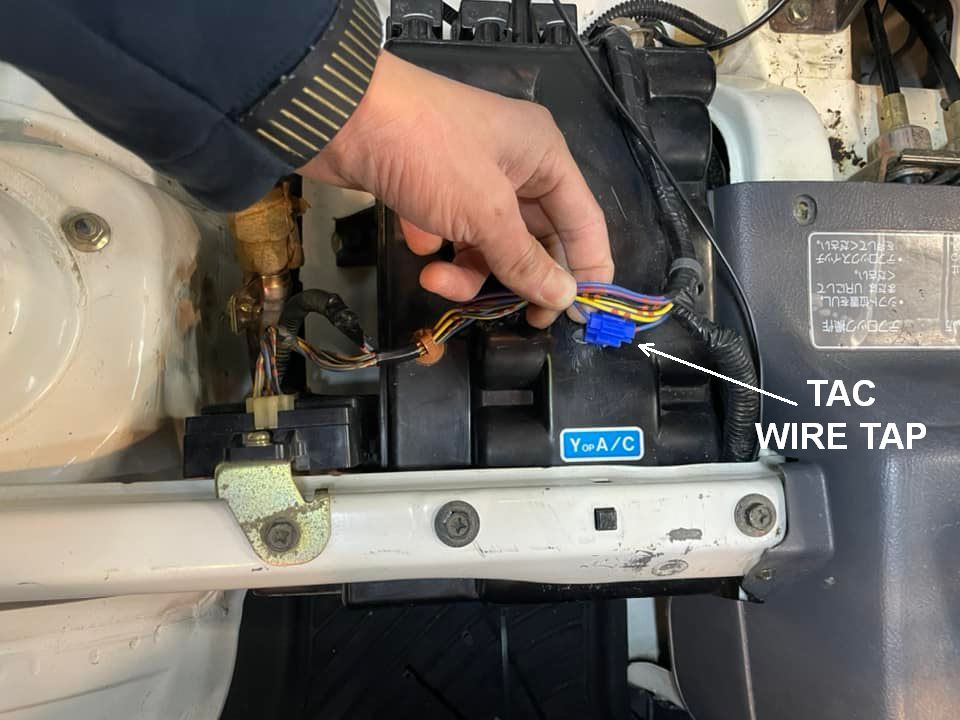
The box in the first picture is located at the lower left in this photo.
Trevor Corsi used VViViD "yellow gold" vinyl wrap to tint his headlights yellow. I plan to do mine too.

Headlight mod and Amazon link by Trevor Corsi.

By Brandon Johnson
LED Equivalents
Large Koito 921 12v 18w 396 (921 blinker bulbs) x6
Small Koito w5w 12v 15w e4 (194 corner marker bulbs) x6
Stanley 12v27/5a Japan 2n (1157 dual brightness brake lights) x2
Turn Signal Flasher Relay Replacement
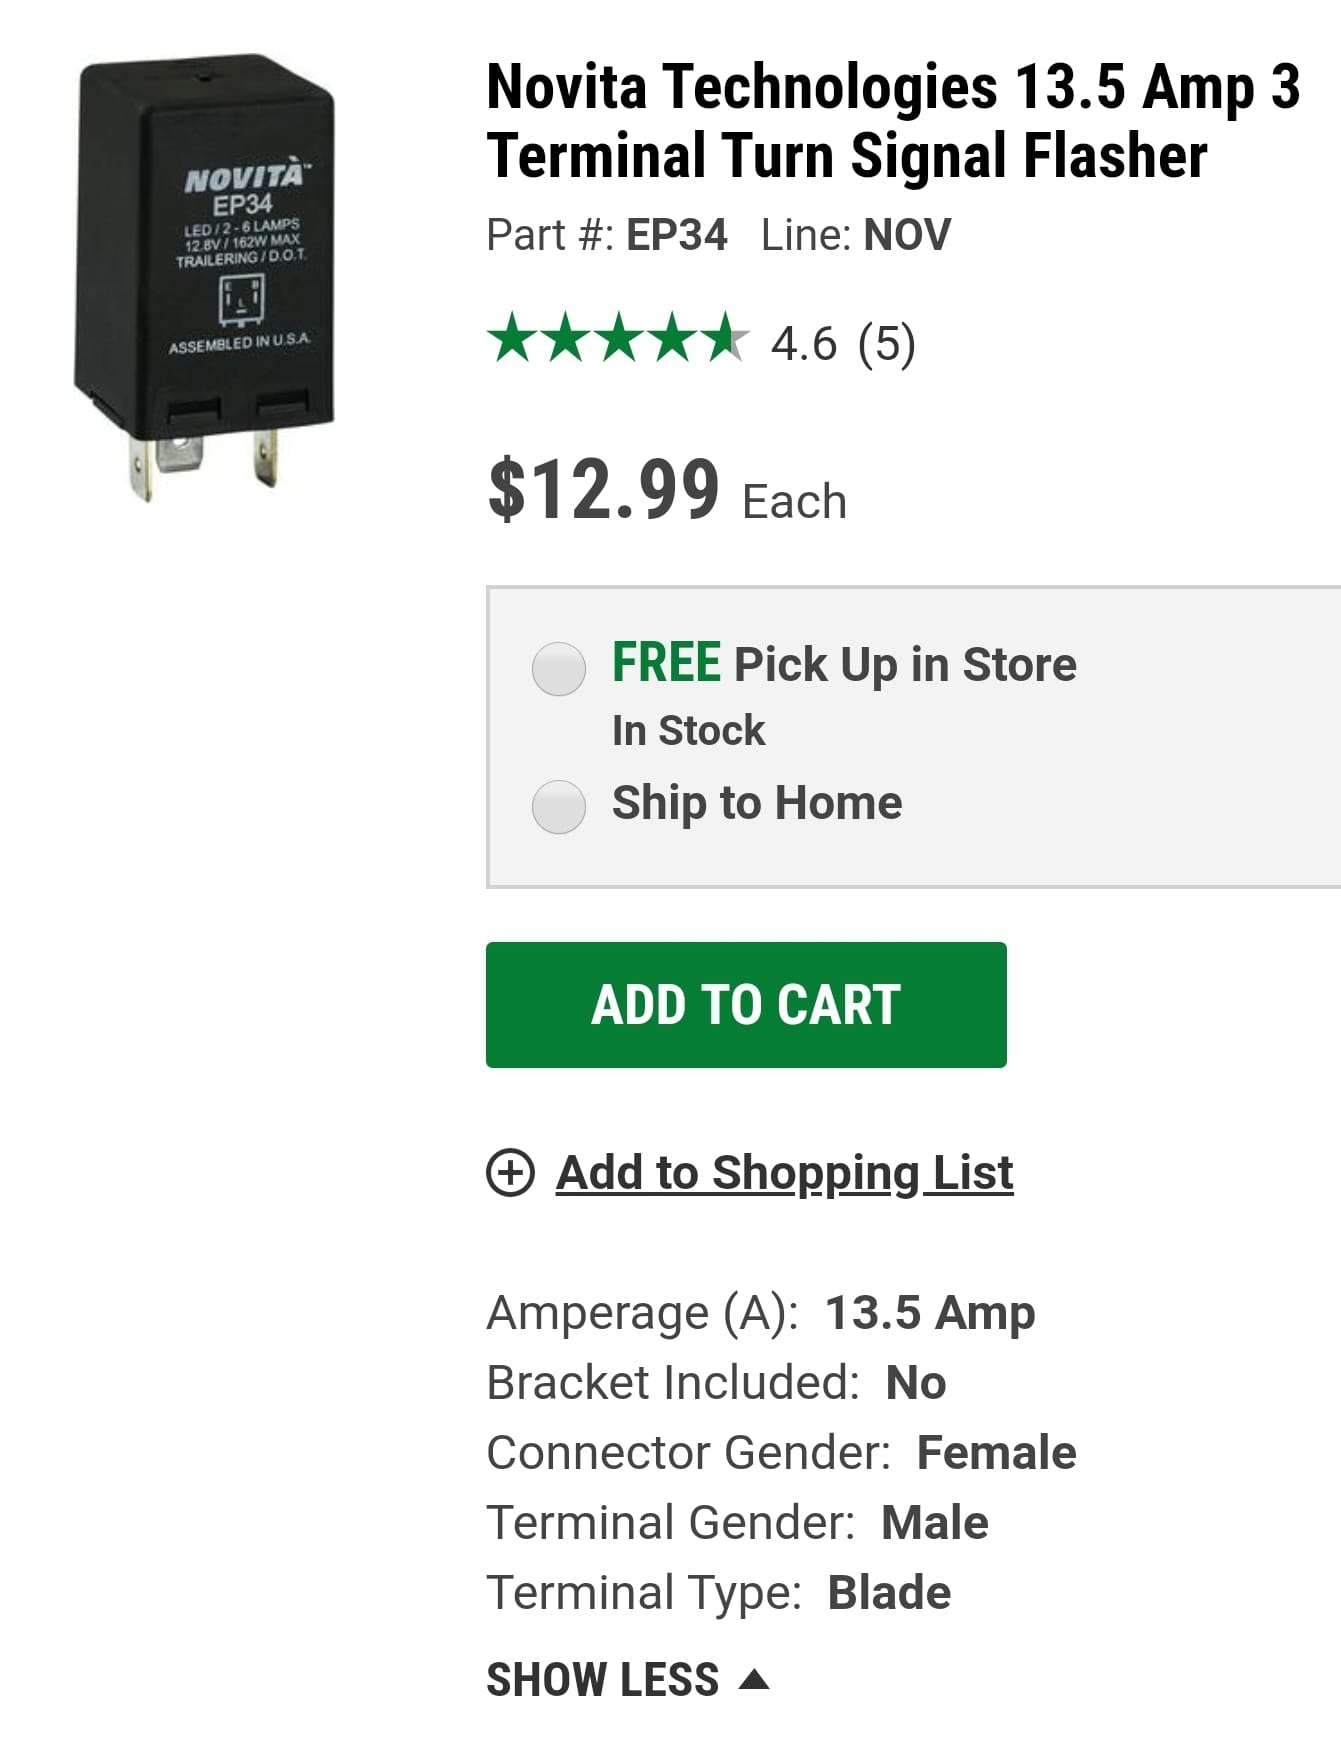
EP34 Flasher Relay available on Amazon.
Steering Wheel and Mount
NRG SRK-190H Steering Wheel Short Hub Adapater For Honda Civic (88-91) This hub adapter is so short it must be used with a quick release kit
Matching NRG Steering Wheel Quick Release Kit - Black Gen 2.5 - Part # SRK-250BK
Get a steering wheel with the standard 6-bolt pattern as shown in the photo below. I highly recommend a flat steering wheel with little to no dish to keep the steering wheel close to the stock position. A dished wheel will raise the wheel and make it hard to reach the turn signal stalk but it does offer up more leg room between your knee and wheel.
I love the Momo Team steering wheel installed by Alex Simotas shown below. The wheel is available in 280mm 11inch and 300mm 11.8inch diameters. It has 40mm 1.6inch of dish. A quick release kit allows you to easily remove the steering wheel which makes it much easier for big guys to get in and out of the cab. Keep in mind a smaller wheel will make it much more difficult to turn the wheel at low speed with fat tires.
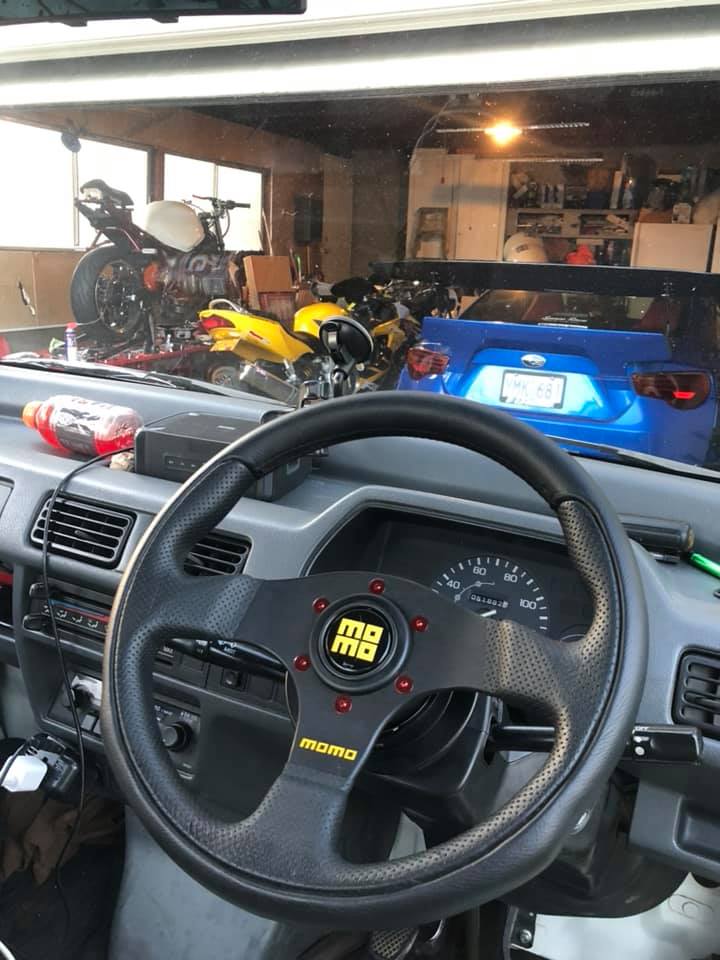
Momo Team steering wheel 280mm, 11inch diameter with 40mm 1.6inch dish using NRG SRK-190H hub and NRG SRK-250BK Quick Release. Even with the shallow 40mm dish the steering wheel is moved about an inch higher than stock. This 280mm diameter wheel is quite a bit smaller than the stock wheel. I would recommend the larger diameter 300mm (11.8 inch) version of the Momo Team wheel. Photo and mod by Alex Simotas.
Momo Team 280mm Steering Wheel.
Momo Team 300mm Steering Wheel.
NRG Hub Adapter.
NRG Quick Release allows you to easily remove the wheel for easy cab entry and exit.
3D Printed Cup Holder by Mark Vaughan
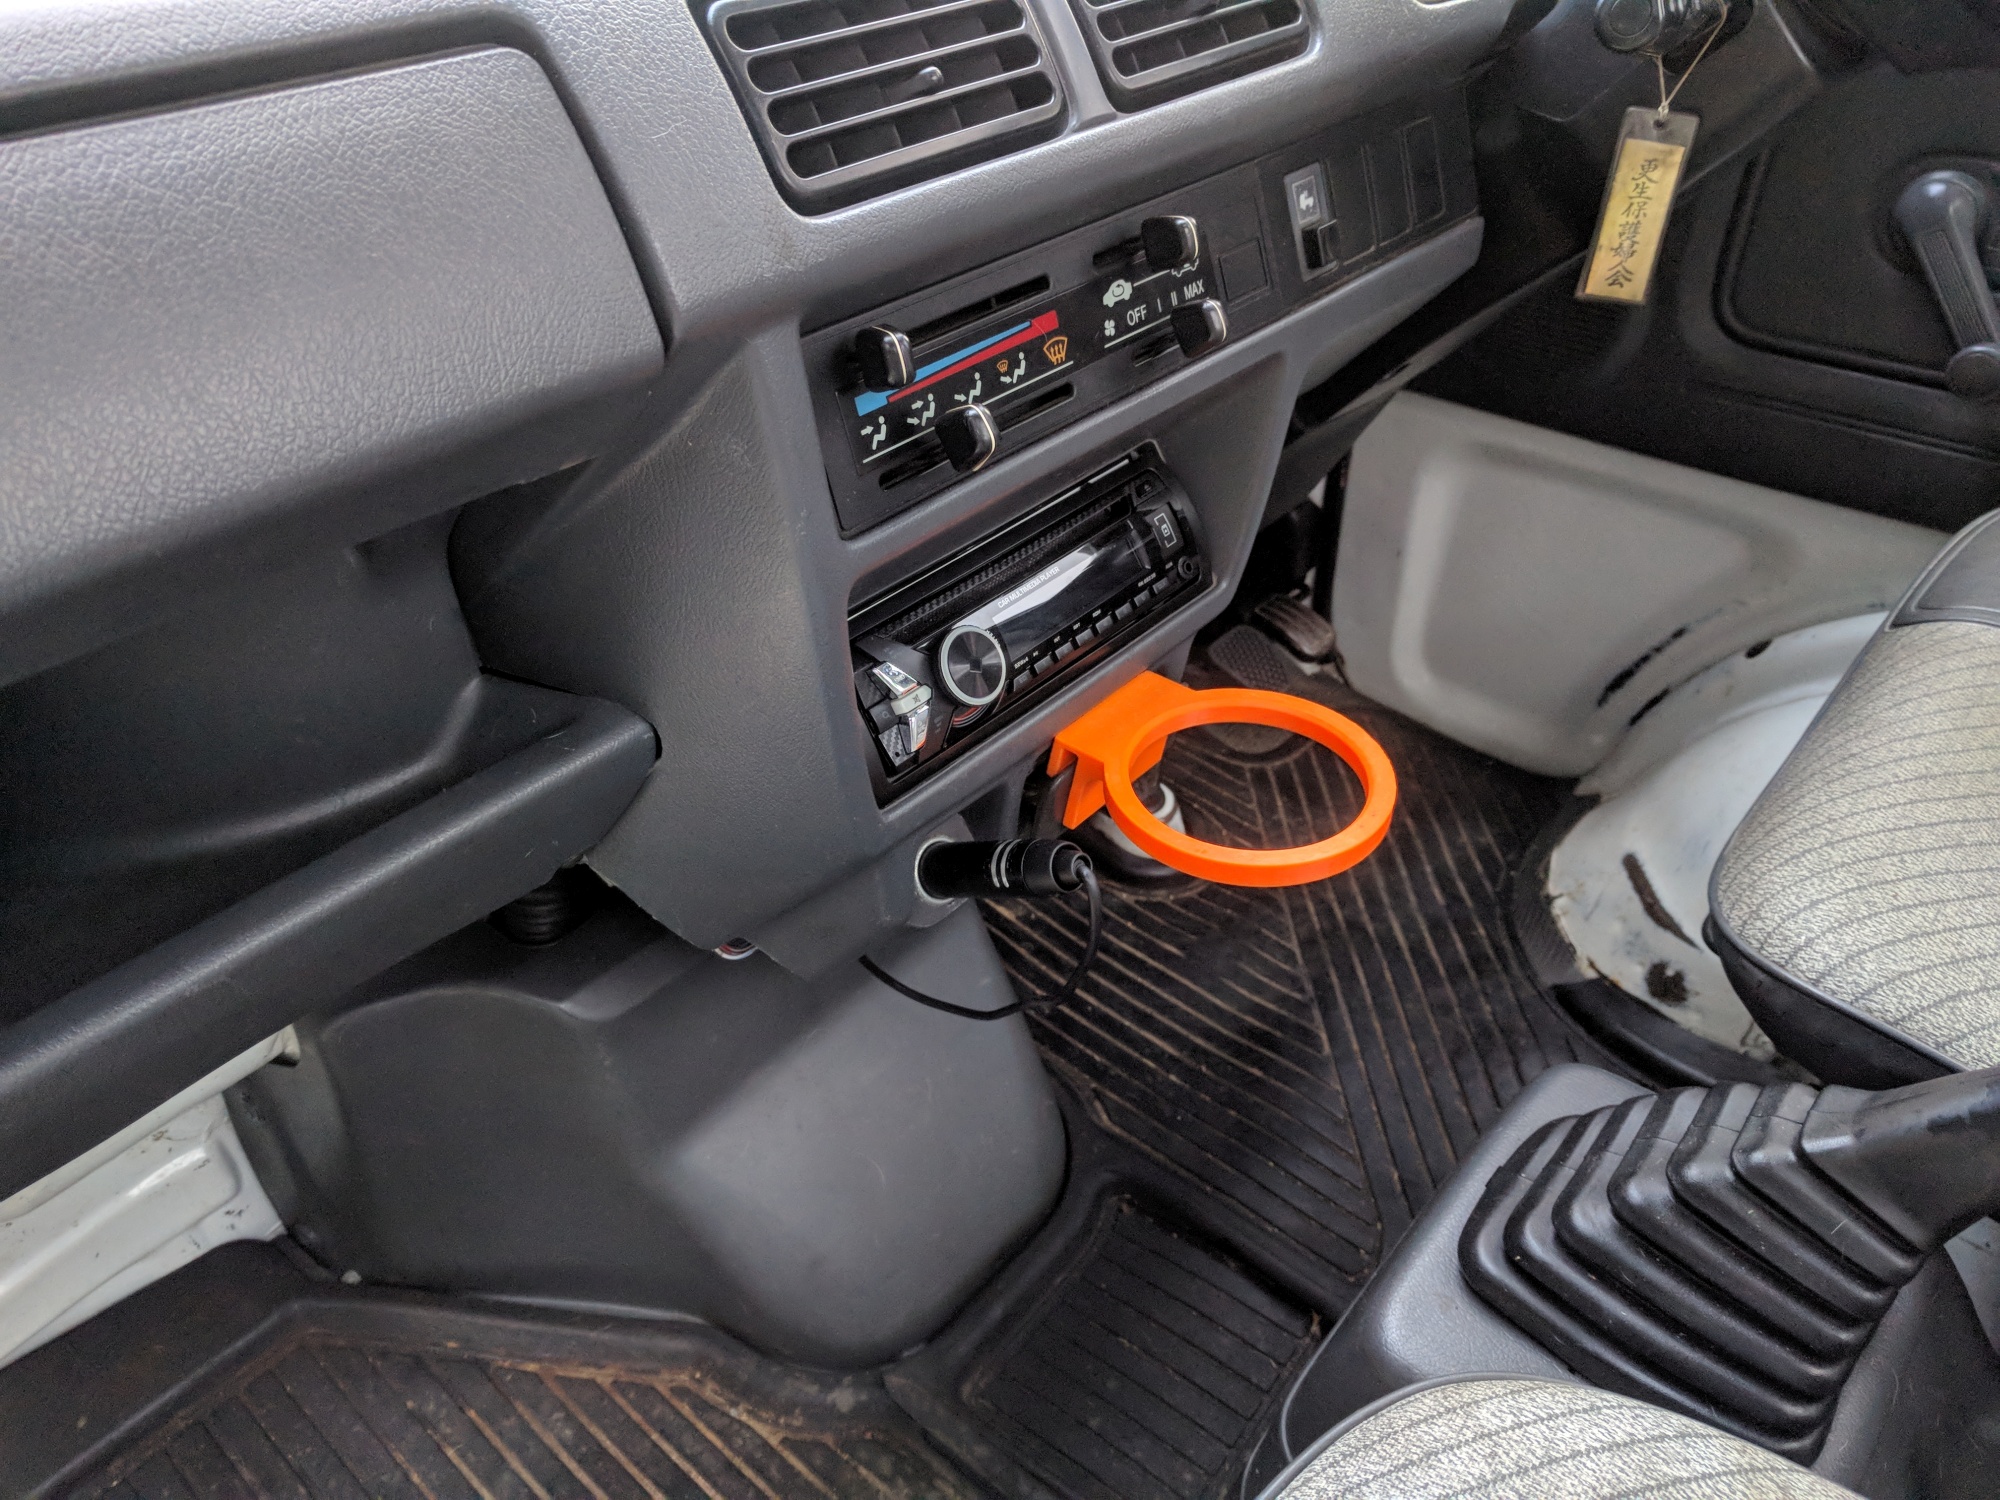
Download the 3D printer file from thingiverse.com.
Honda "Real Time 4WD": The rear wheels normally drive the truck. When the rear wheels begin to slip the transaxle sends torque to the front wheels.
2/4 Wheel Drive Selector: Note the SDX and TOWN have selectable 2WD/4WD. The STD is 2WD only and the ATTACK is 4WD only. On the drivers side where the front drive shaft (propeller shaft) enters the transmission, there is a 10mm lock bolt that holds the 10mm selector bolt (10mm bolt with a 30mm shoulder). Loosen the lock bolt about 3 turns. There is a nub or bump on the selector bolt shoulder that will prevent it from turning all the way around. Rotate the bolt as far as you can counter-clockwise (left) to select 2-wheel rear drive. Turn it full clockwise (right) for 4 wheel drive. Tighten the lock bolt. In two wheel drive the propeller shaft and front drive shafts will still be turned by the rotation of the front wheels but no engine torque will be sent to the front wheels. One ACTY owner reported his gas mileage went up by 3 miles per gallon in 2 wheel drive. Another ACTY owner reported a smoother ride with less vibration after switching to 2 wheel drive. I have a steering wheel vibration at 58mph that goes away when 2 wheel drive is selected. Not all ACTYs have this selector bolt.
2WD/4WD Selector
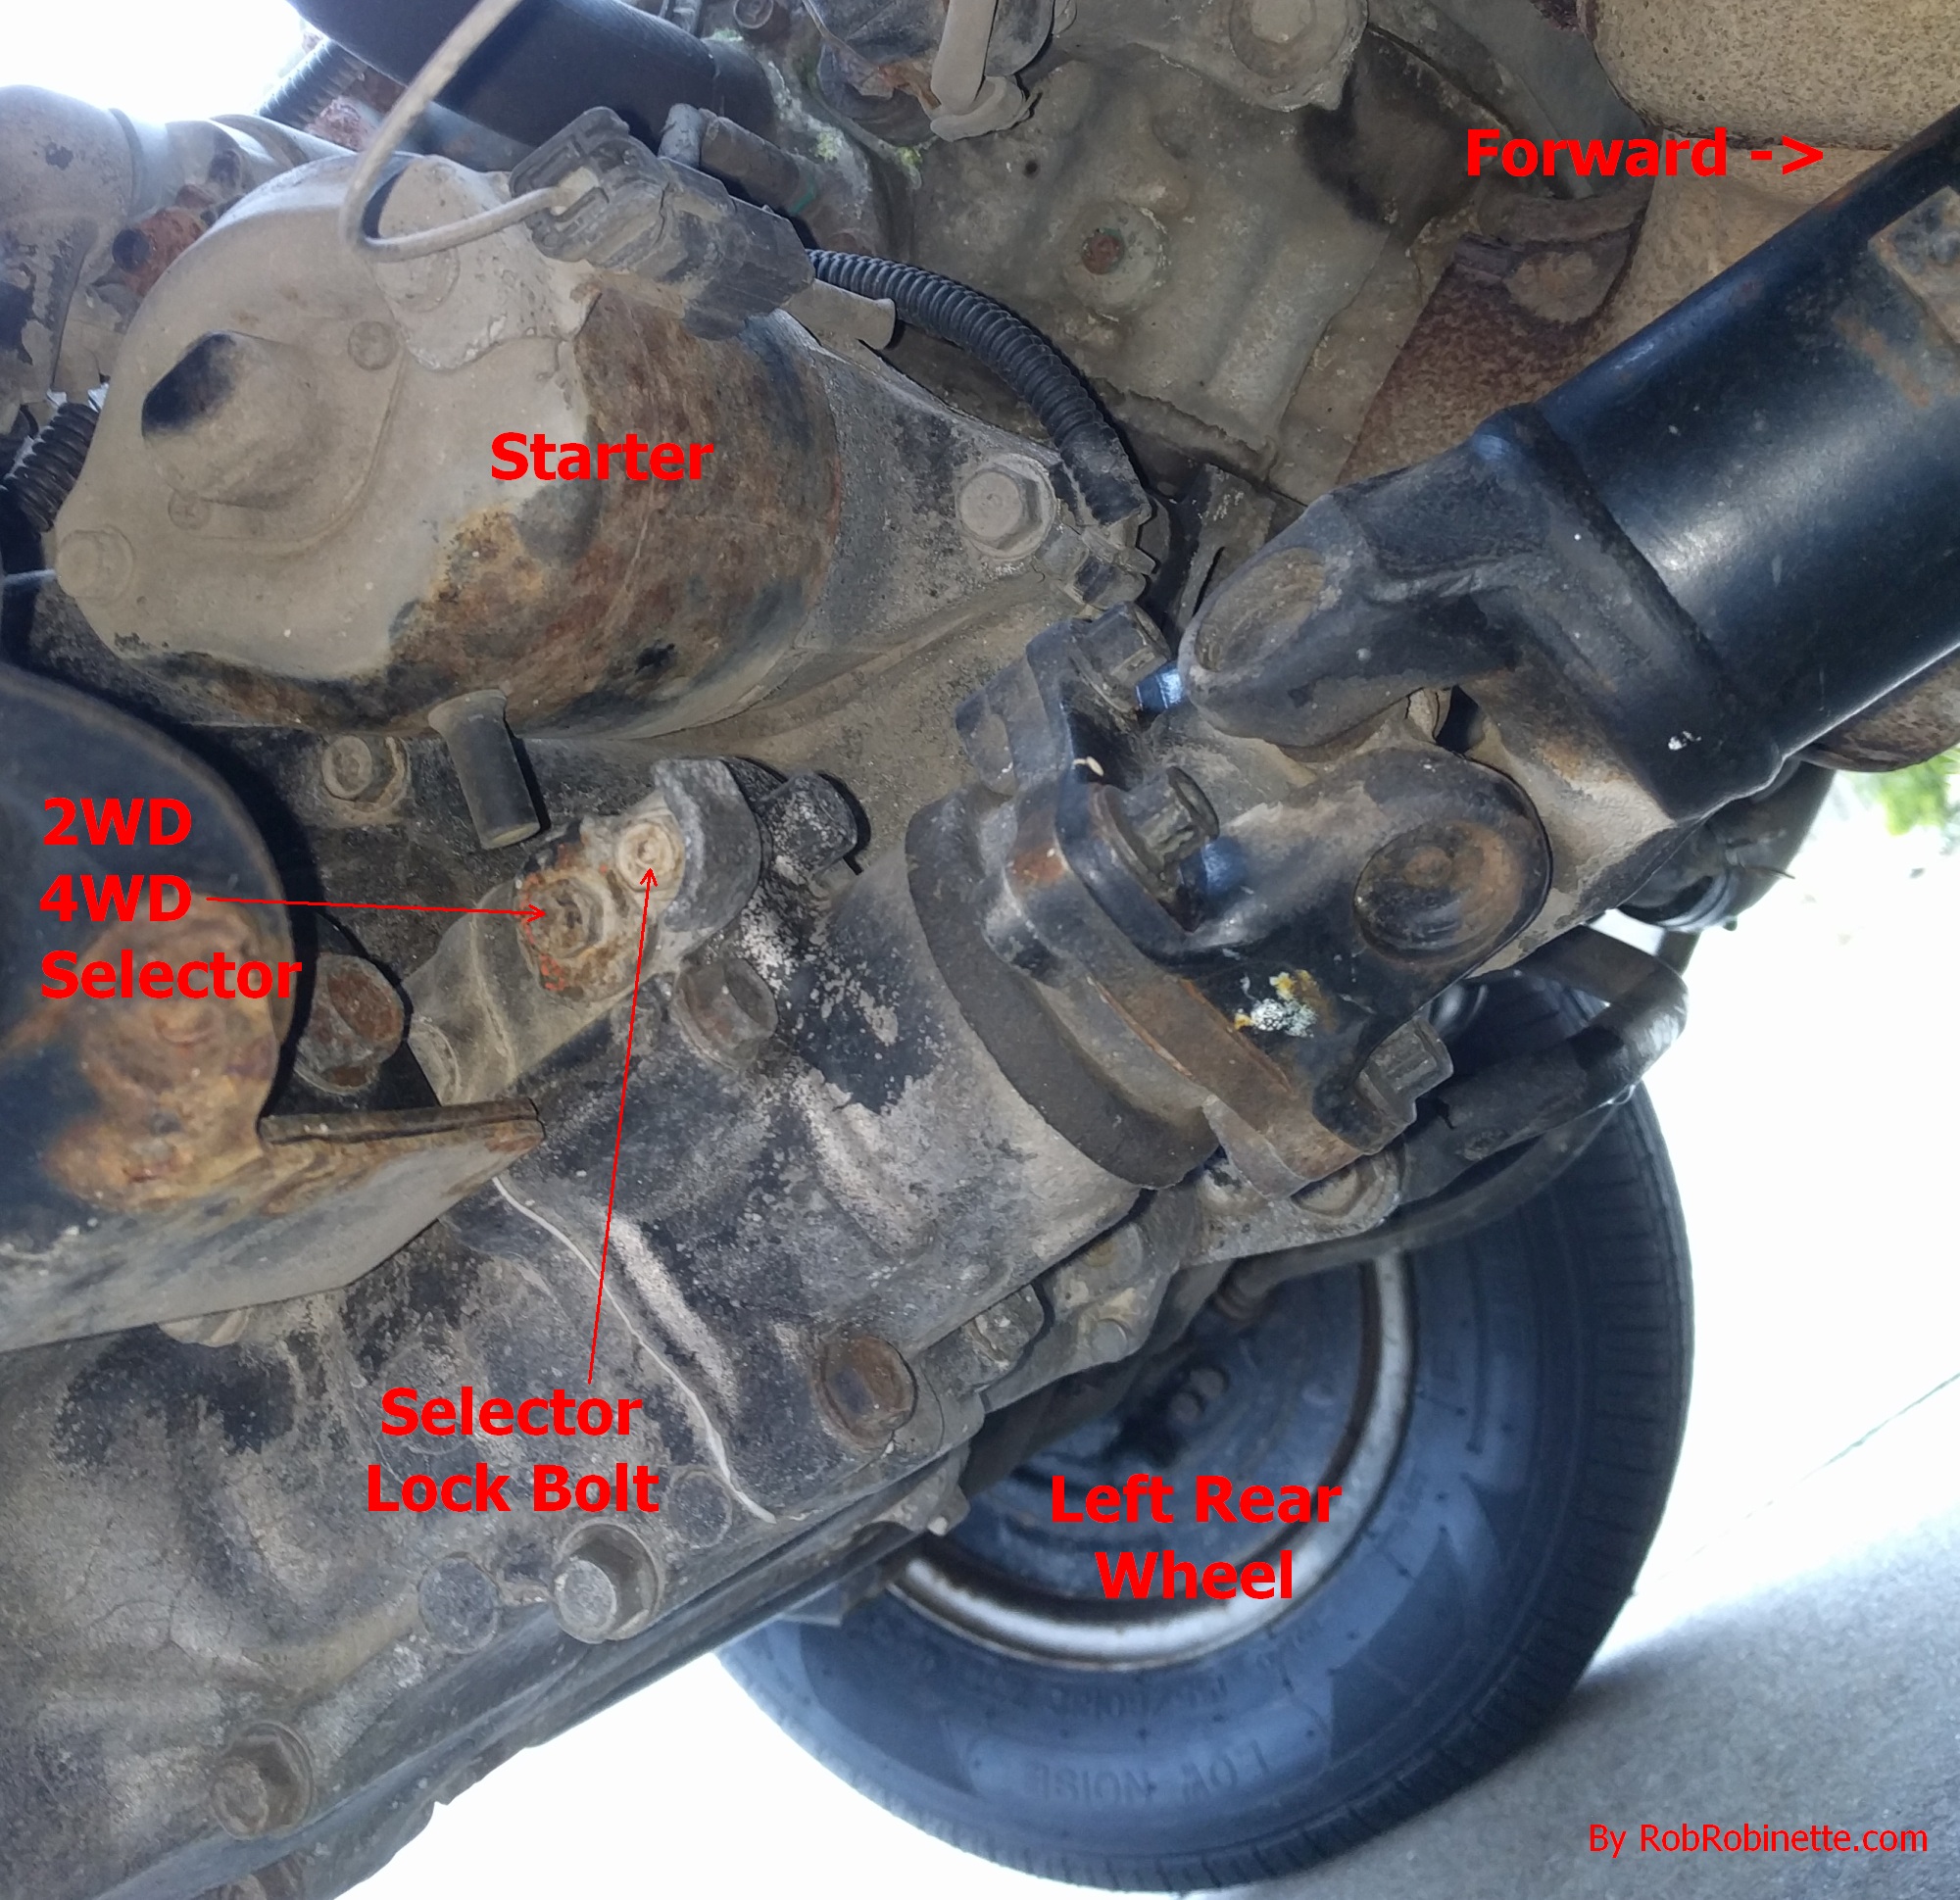
Loosen the Lock Bolt several turns then rotate the Selector Bolt as far as you can counter-clockwise to select 2-wheel rear drive. Turn it full clockwise for 4 wheel drive. Tighten the lock bolt.
Engine Bay From Driver Side
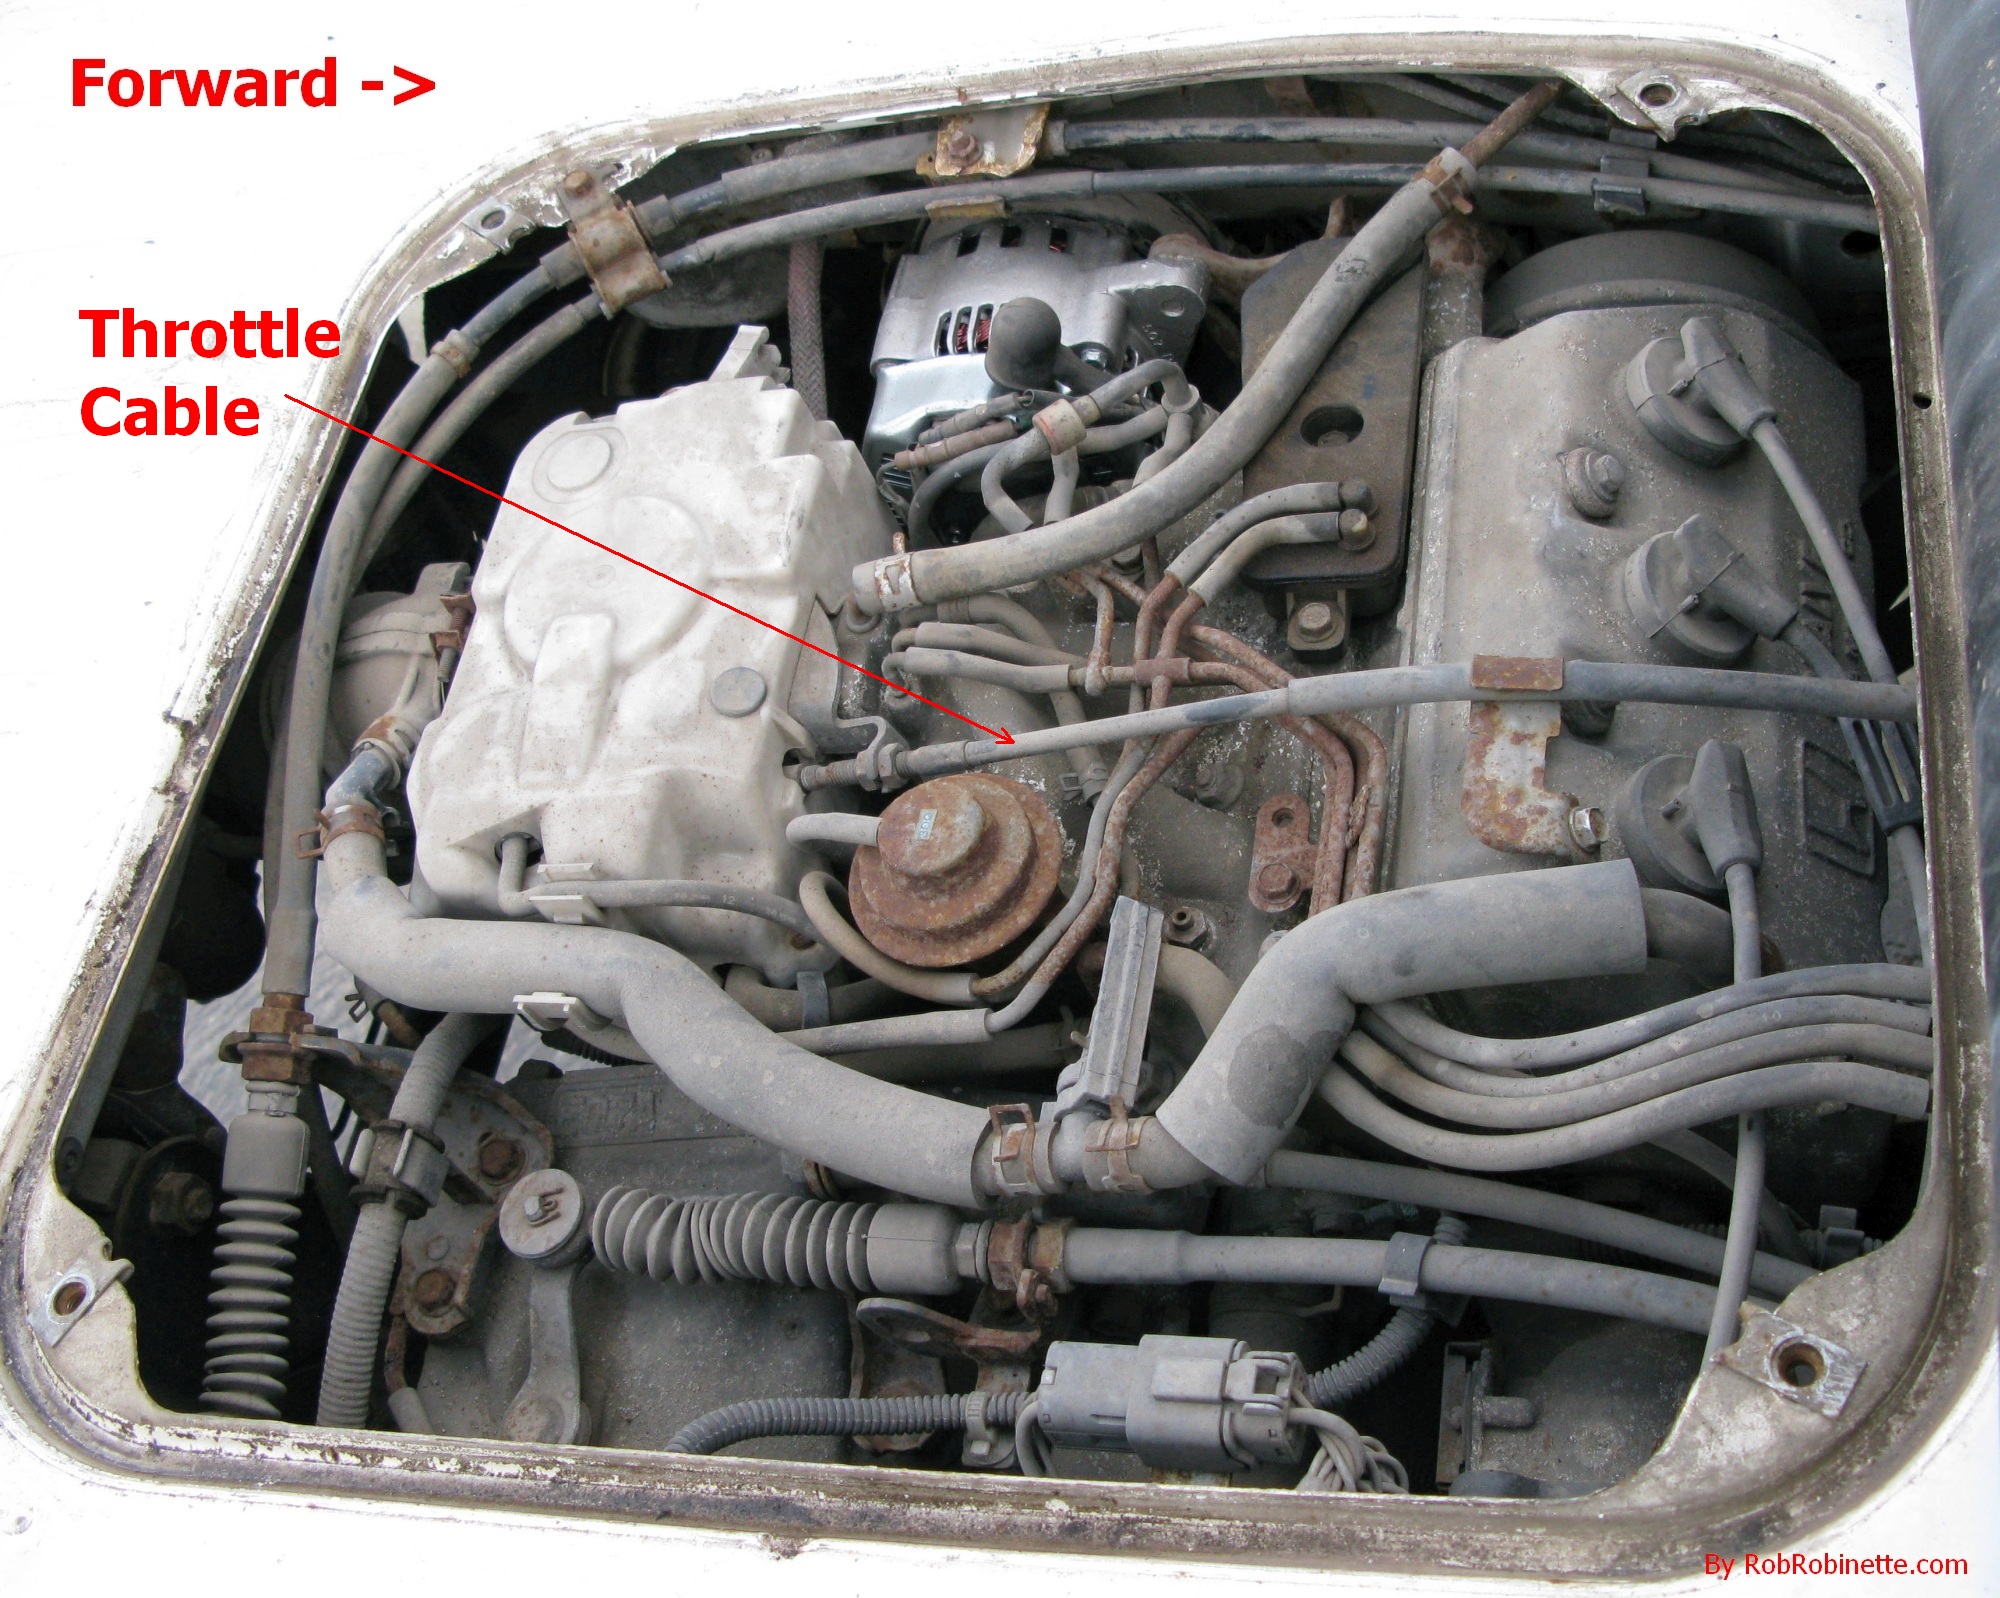
Engine bay view from other side of the truck.
1989 to 1997 ACTY Specifications
Idle Speed: 950 <> 1000 RPM
Fast Idle: 2200 to 3200
CO@ 3000 RPM <= 0.1
Oil Pressure: 55 to 64 PSI, 3.8 to 4.4 BAR
Fuel Pressure: 1 to 2 PSI, 0.07 to 0.14 BAR
Fuel 9.8 gallons, 37 liters of regular, low octane (87 in USA) gasoline
Reported Gas Mileage: Ranges from 35 to 53 miles per gallon (15 to 22.5 kilometers per liter)
Engine Compression: 9.8:1, 14 BAR (203 PSI) at 250 RPM (normal starter spin rate) with 9.5 BAR (138 PSI) minimum, max difference between cylinders of 2 BAR (29 PSI). If compression is low adjust the valves and try again.
Valve Clearance Cold: Intake 0.18 to 0.22mm, Exhaust 0.25 to 0.29mm
Emissions:
CO@ 3000RPM => 0.1%
HC@ 3000RPM => 200 PPM
Coil resistance: 1.78 to 2.08 ohms
Trem 15(+): 12V
Ignition Timing: Manual Transmission 4 deg +/-2 deg at 1000 RPM, Automatic Transmission at 1150 RPM
Centrifugal advance: 0 @ 0 to 1400
18 to 22 @ 2400 to 2600
28 to 32 @ 5500
Vacuum range: 73 to 307 millibar
Front: Toe in: In 1mm +/-3 mm
Camber: HA3 +1 deg +/- 1 deg, HA4 +1.2 deg +/- 1 deg, HA4 & HH4 +1.3 deg +/- 1 deg
Caster: HA3, HA4, HH4 2.3 deg +/- 1 deg; HH3 2.5 deg +/- 1 deg
King Pin Incline: +12 deg 30' (12.5 degrees)
Rear: Toe in: 0 +/-3 mm (rear is not adjustable)
Camber: 0 (rear is not adjustable)
Parking Brake: 44 lb (20 kg) pull in the 8 to 12th notch.
Brake Pedal: Height from floor 145 mm, Backlash 1-10 mm.
Front Brake Disc: 10 mm minimum thickness
Brake Pads: 3 mm minimum thickness
Rear Brake Drum: 2 mm minimum lining thickness
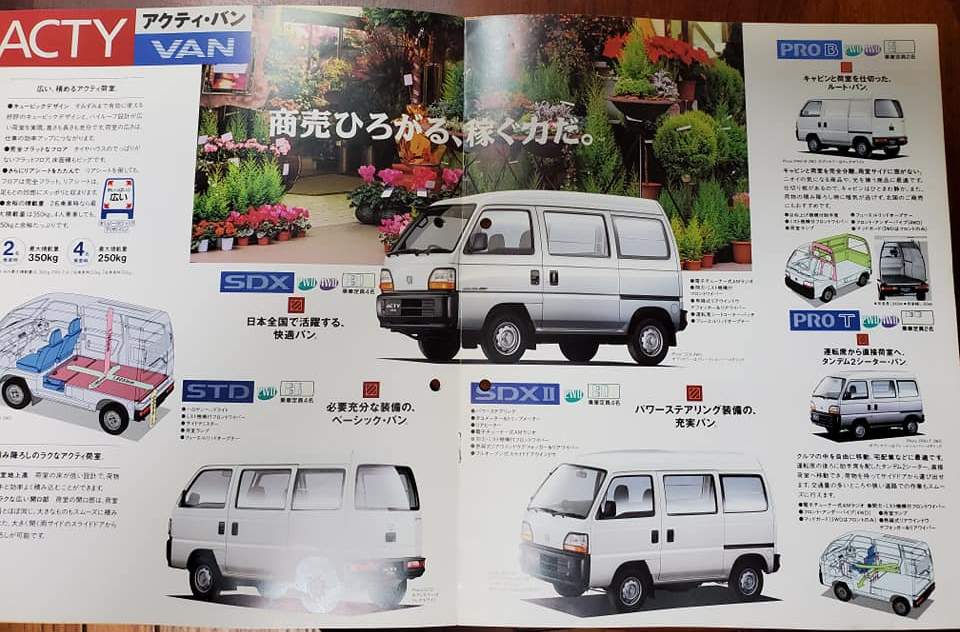
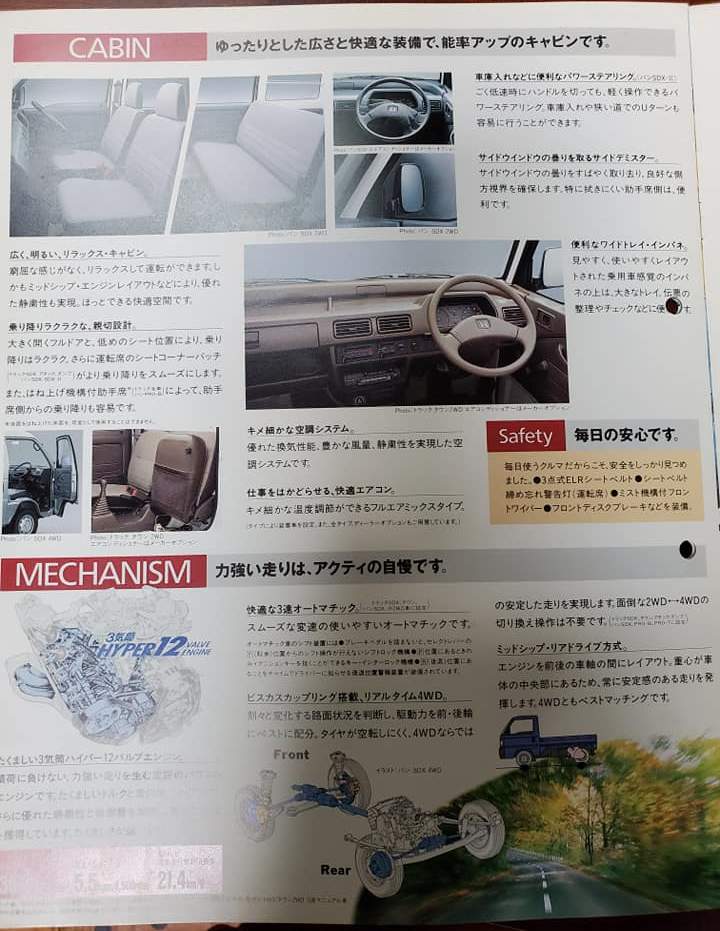
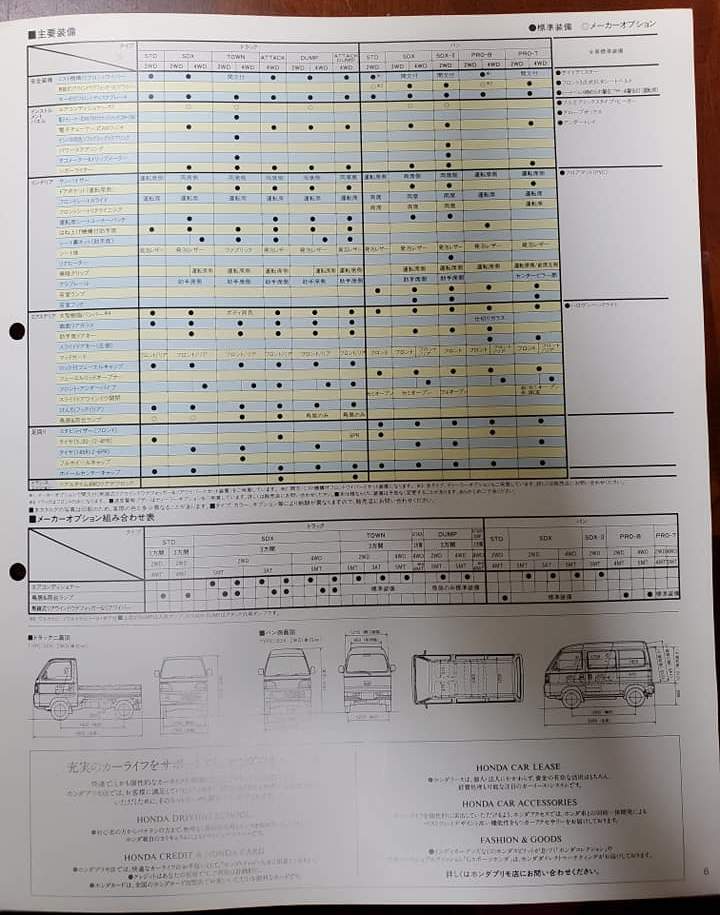
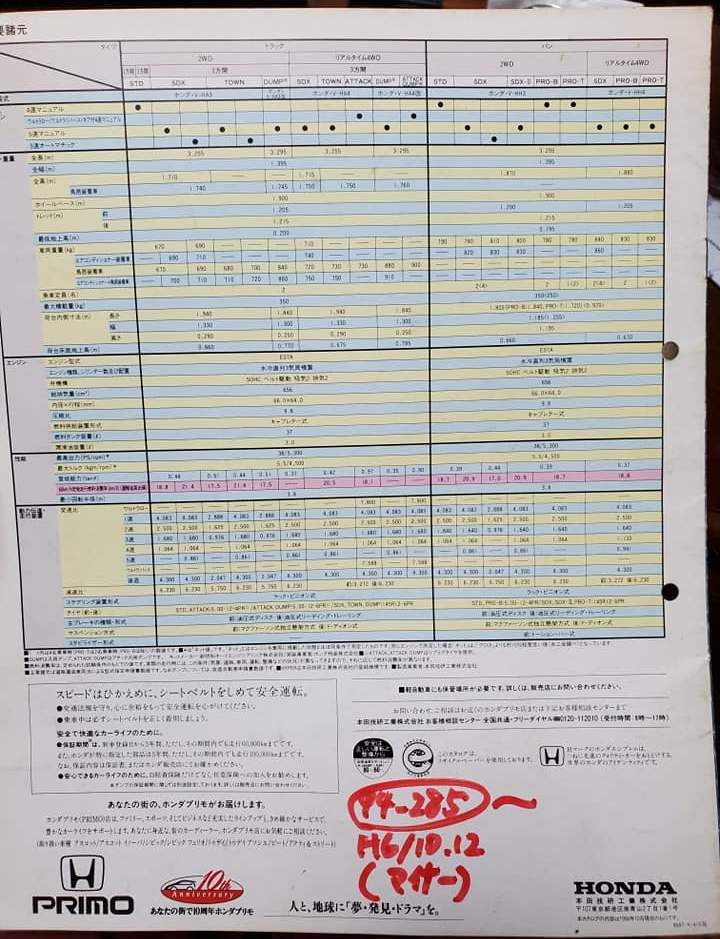
ACTY Truck and Van Brochure
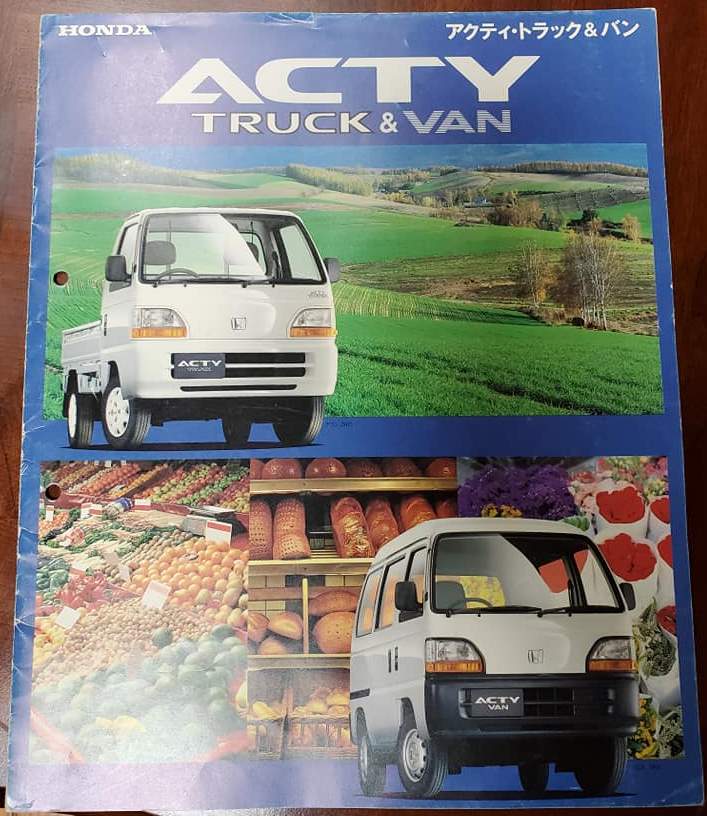
Photographed by Ziggy Chaudhry
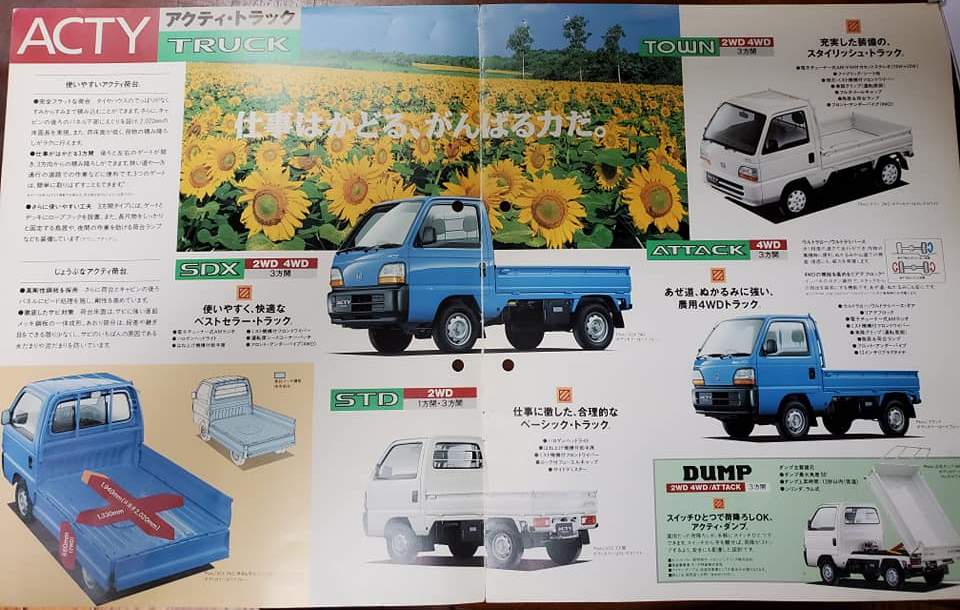
Note the SDX and TOWN have selectable 2WD/4WD. The STD is 2WD only and the ATTACK is 4WD only.