Convert Fog Lights to Daylight Running Lights (DRL)
By Ken Walanski
Objective: Modify the '93 RX-7 Touring Model fog-lights such that
they automatically turn on when the engine is running and turn off after the engine is
shut off. With the J.C. Whitney low-voltage controller, the Fog Lights operate at 9 volts
to prolong bulb life. After this conversion, the fog-lights cannot be operated by the
console mounted switch. According to the product brochure, this conversion meets Canadian
DRL Standards.
This mod can also be applied to after-market fog lights.
If you are installing the fog lights with this controller you won't have to run a wire to
a cockpit switch or use an electrical relay (big bonus). Just follow these instructions
and use the white (hot) wire from the DRL controller to supply the 9 volt power to both
fog lights.
You could also get the 12 volt DRL controller and hook it up to the white
parking lights in the front of the car to use them as DRLs. Just cut the hot wire
at the lights and connect the power wire from the DRL controller box.
Some states don't allow fog lights to be on at the same time as your
bright lights so this mod wouldn't really be legal but it's easy to get around. Just
disconnect the DRL controller's power wire (or remove it's fuse) when you take it in for
inspection and tell the guy the fog lights don't work. After the inspection hook them back
up.
1. Purchase DRL-Controller The controller replaces
your fog lights 12 volt power source from the fog light switch with 9 volts that is
supplied only when the engine is running. I got the controller from J.C. Whitney (312)
431-6102 or Fax at 800 537-2700. "Low Voltage Light Control" Catalog Item number
13HY5227R. I checked an older JC Whitney catalog and found yet a different part
number. So, I'd advise interested parties to call JC Whitney and get a current catalog
from which to order. Costs about $25, plus shipping. It is a small black box. They also
sell a 12-volt controller for those who want full brightness from the bulbs. The
low-voltage is supposed to prolong bulb life and reduce power requirements.
Note
The DRL-Controller described here
was manufactured by Hamsar Diversco, Inc., 5320 Downey Street, Burlington, Ontario,
Canada, L7L 6M2, (905) 332-4094, and is their Model 70986 "Visi-Light". Since
J.C. Whitney can switch suppliers, it is possible that another manufacturer's controller
will install differently, particularly with respect to wire colors. Be careful.
2. Disconnect the Console Fog-Light Switch You
absolutely must permanently disconnect the fog-light switch inside the car. If not, the
DRL-Controller fuse will blow when the fog-light switch is activated. Gently pry up the
console and disconnect the fog-light switch and tape up the wire ends. See Other How To's for instructions on raising the console.
3. Find a Place to Mount DRL-Controller You must be
in close proximity to the positive battery terminal, a spark plug wire and one fog light.
I located a place immediately under the tip of the master cylinder on the driver's side
fender bulge. There was a vacant 8mm x 1.25 bolt hole with enough space for the
DRL-Controller. Double check the threads so that you don't strip them.
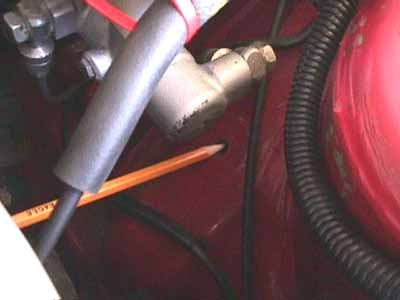
Mounting hole below master cylinder
3. Fabricate a mounting bracket for the DRL-Controller
I bought a piece of 18-gauge sheet metal at Home Depot and cut out a mounting bracket. You
can also use sheet aluminum available at hardware stores. My bracket is the size of the
DRL-Controller with a 1-inch by 1-inch tab off to one side. The tab has a hole drilled for
a bolt. The tab is bent at about a 30-degree angle for better fitment. Prime and paint the
bracket.
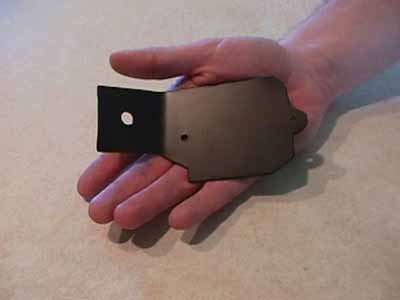
Mounting bracket
Drill two pilot holes in the mounting bracket and screw
the DRL-Controller to it with sheet-metal screws.
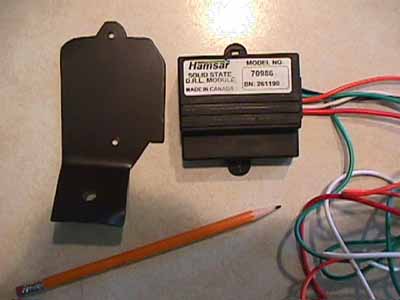
Controller and bracket
4. Install the DRL-Controller & Mounting Bracket in Car At this point the DRL-Controller is attached to the mounting bracket, and this
assembly can be installed with a single bolt if you used at the location described above.
I put a layer of electrical tape between the bracket and the car to minimize corrosion.
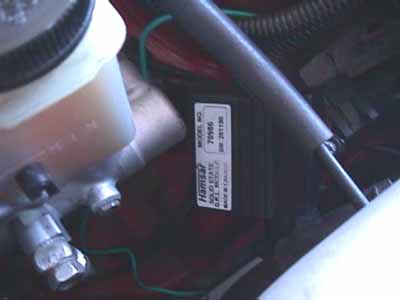
Controller mounted
5. Verify Wire Colors The wire colors can be very
confusing. The wires coming from my DRL-Controller had the following colors and functions.
Your colors and functions may be different, so check them.
Green: Wrap Around Spark Plug Wire
Black: Ground Connection
Red: Fused, Hot From Positive Battery Terminal to DRL-Controller
Orange: Hot to Hi-Beam (not used in this mod)
White: 9-volt Hot (labeled "Low Beam")
6. Disconnect Positive Battery Terminal and Connect Wires
Again, pay particular attention to wire color.
Green Wire: Wrap several times around a spark plug
wire. Use two tiny tie-wraps to secure.
Black Wire: Find ground point and mount. I used a strut tower bolt.
Wrapping around to the DRL-Controller mounting bracket bolt should also work.
Red Wire: Connect to Positive Battery terminal. This wire has a
fuse.
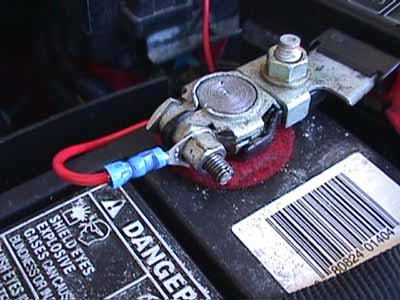
The positive battery connection
Orange Wire: Not needed. Cut down if you wish.
White Wire Although White, it is a HOT wire when
the DRL-Controller is activated. It must be connected to the HOT wire at the fog-light,
which is Black on my car. With the stock fog lights tapping into this one black wire will
power both fog lights. Again, the DRL-Controller-white wire is a 9-volt HOT wire; do not
connect it to the white wire at the fog-light because that is a GROUND wire and will short
out the controller when it's activated. If unsure, use a volt-meter to verify which wire
has 12 volts and which one is a ground. One more time: connect the DRL-Controller-white
wire to black wire at the fog-light.
For after-market fog lights connect the
DRL-Controller's white (hot) wire to one side of both fog lights and ground the other fog
light wire (ground wire is normally black).
Also, the white wire from the DRL-Controller was too short to reach
the Driver's side fog-light. Add several feet of appropriately sized wire and run it
behind the bumper to the fog-light. Remove the fog-light housing with a 10mm socket; it
will now be connected to the car with two wires, one black and one white. With a plastic
splice connector or other appropriate means, connect the DRL-Controller WHITE wire to the
BLACK wire at the fog-light. (See note below.)
7. Reconnect Positive Battery Terminal
8. Start Engine See if fog-lights come on. If not,
check the fuse. If it has blown, check the functions of the black and white wires
connecting to the fog-lights. Also make certain that the console fog-light switch has been
disconnected. At this point your fog-lights should be fully functional DRL's.
9. Tidy Up Once everything is working, use
tie-wraps to secure the various wire runs. Replace Battery Cover.
All finished
Note
The installation described above should NOT work if the wiring
diagram shown on page E-1 Section Z of the Shop Manual is correct. Page E-1 shows the
fog-light ground wire to be Black, and the hot wire is shown as White. However, when I
initially installed it this way, my DRL-fuse blew when I started the car, indicating a
dead-short. So I then treated the Black wire at the fog-light as the "hot" wire
and this solved the problem. The only way I understand this could happen is if the Shop
Manual reversed the White and Black wires in the diagram. As I have only a rudimentary
electrical knowledge, comment would be appreciated by an electrical engineering types.
Ken Walanski
|