Other How To's
You can search this page by using your browser's
EDIT/FIND command
Column mounted AutoMeter air/fuel
gauge and 2 inch mounting cup
How to Tap Into the
O2 Sensor at the ECU to Install an Air/Fuel Gauge
I asked this question a couple of weeks ago and didn’t get an answer so I dug out
the Shop Manual while installing an HKS FCON and looked for the oxygen sensor wire at the
ECU. I wanted to tap into the O2 sensor at the ECU to install a
Cyberdyne/Intellitronix air/fuel meter. The O2 sensor wire is a solid black wire on the
only 16 conductor ECU connector. The ECU is located behind a plastic panel next to the
passenger’s right foot. The Shop Manual calls the O2 wire 3C. When viewing the
connector from the wire end and with the locking clip on top, it is the second wire from
the right on the top row (it’s the only solid black wire on the connector). I put a
wire tap that accepts a blade type male connector on wire 3C so I could easily remove the
wire it later.
Rob Robinette
Remove the shifter console (see next How To) and tap into
the ash tray light. I used crimp-on wire taps. Run both the power and ground wires from
the ash tray light under the center console and dash to your gauge. Just using the ash
tray light's power lead will not work, use both the power and ground. You can also paint
your gauge's light bulb with red acrylic paint to match the 7's red instrument light.
The console simply pops up. It's in one big piece that goes from the front
side of the shifter to behind the alarm light. I got it off by pulling it
straight up. I grabbed it at the shift boot and popped it up and then pulled the
corners up. To completely remove it unscrew
the shift knob and disconnect the electrical harnesses under the console which
is easily accessible once you pop up the console.
Trico Narrow Blade Refill 45-200 is an exact replacement for the 3rd gen stock wiper
blades. Simply pull out the old rubber insert and slide in the Tricos. You get to keep the
trick stock aluminum blade holder and only replace the rubber blade. It was the easiest
blade replacement I've ever done. I got mine at Pep Boys but I think Wal-Mart and K Mart
carry them too.
Disconnect the negative battery cable for 1 minute and press the brake pedal for 10
seconds.
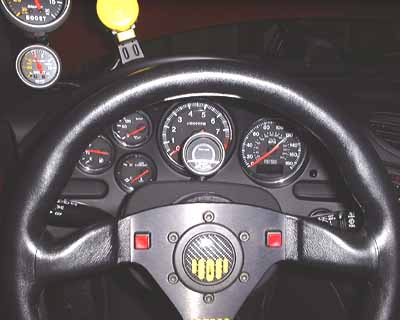
I just finished installing a Sparco "Ring" steering wheel on my 3rd gen. It
looks and feels great. I am very impressed with the fit and finish of the Sparco
leather wheel. I now have more thigh room and the Ring is "D" shaped (cool). Here are some tips.
The stock wheel is about 15 inches (380 mm) in diameter (wheels are measured outside
edge to outside edge). The Sparco Ring is 12.8 inches (325 mm) in diameter, it cost $145
with shipping from Autocraze (on the web).
Sparco steering wheel's are compatible with Momo hubs and spacers.
Using a Momo hub ($55) for a 2nd gen and one Momo spacer ($19) brings the
wheel out to the stock location. The Momo spacers are stackable but you need longer screws
if you use more than one spacer (the spacer comes with screws that work with one spacer).
I used two spacers and six 5 x 65mm regular pitch screws from Maryland Metric (they have a
web page). Someone now makes a hub that allows you to connect the horn using the
clock ring. I don't remember which vender sells it and it isn't cheap but it
beats jury-rigging a horn button.
The main wheel nut is 21mm. It was easy to remove with a 1/2 inch breaker bar. The
wheel came off by lightly bumping the back of the wheel with my hands. You have to be
careful here to keep from collapsing the steering column.
I added two small, red, square, momentary push buttons (from Radio Shack) for horn
buttons. I put them at the 3 and 9 o'clock position for thumb access. They look like the
control buttons so popular in CART and F1 (very cool).
I'm going to hook up the horn by using a spring connector to make contact with the
metal ring on the bottom of the hub. This is a real pain in the butt. I plan to find the
horn wire by probing the now disconnected steering wheel electrical connectors with a
grounded wire, when the horn goes off I know that's the one.
It took two tries to get the wheel centered for straight line driving.
I was able to remove the air bag warning light bulb by using a long screwdriver. The
bulb only has to turn about 1/8 of a counterclockwise turn. From below the dash, I pushed
the right side of the bulb base with the screwdriver and it turned and fell out. This was
much easier than removing the dash.
The new wheel blocks the view of the top 1/3 of the tach (I'm tall).
A wheel change is a lot of work but I think it was worth it. The wheel is closer so I
can move the seat farther rear, I have more leg and thigh room, the steering feels
quicker, it looks super and I don't have to worry about that damn shotgun shell pointing
at my face.
Connecting the cruise control buttons on the steering wheel will be next to impossible.
Auto manufacturers got away from the old style horn connector because they had to make
multiple electrical connections with the air bag, horn, cruise control, and radio control
stuff. A sliding connector won't work for this so they went with the "clock
ring" wound wire device that's on the 3rd gen and most other modern cars.
The horn button can be worked because the Momo hub has a metal ring built into it for a
spring plunger horn contact but you will have to come up with the plunger (or spring metal
to make contact with the horn ring) yourself.
Rob Robinette
A few weeks ago someone mentioned that they couldn’t tap into the dimming circuit
in their 3rd gen for use with one of the new digital boost gauges and so it was
always on full-bright. I just finished installing a tachometer in my truck. Its dimming
circuit is on the ground wire (i.e. the lights get a full 12 volts but the ground’s
resistance is varied to dim the lights). Because of this I couldn’t use the trucks
dimming circuit so I installed a variable potentiometer on the tachometer’s light
wire to control the brightness.
I used Radio Shack part # 271-342 "15 Turn Cermet Potentiometer, 1k Ohm."
It’s a variable resistor and costs less than $2. I spliced the potentiometer into the
tach’s light power wire by attaching one end of the tach’s light wire to the
potentiometer’s connector nearest the adjustment screw, and the other end of the
light wire to the potentiometer’s middle connector. You don’t need to connect
the potentiometer’s third connector (farthest from the adjusting screw). I soldered
the wires to the connectors and insulated the bare connections with heat shrink tubing. I
plugged the tach’s light power wire into a switched (by the ignition key) 12 volt
source and adjusted the adjustment screw until the tach light was as bright as I wanted
it. Of course the light won’t dim with the other dash lights but it is much better
than having it on full-bright. Note that this won’t work with the
Cyberdyne/Intellitronix air/fuel gauge because it doesn’t have a separate light power
source. If you install a potentiometer you will lower the voltage to the logic circuits
that control the display and render it unreliable. On another gauge I painted the bulb red
using an acrylic paint and that dimmed it enough without having to do any electrical work.
Rob Robinette
I've worked under mine on jack stands. They are quite secure (watch the NASCAR guys
bashing away at times with the car "safely up" on jack stands). I'm sure you
could knock it off if you tried hard enough, but it's pretty secure. I use three jack
stands. I drive the car onto two 2X8s under each front wheel - offset so it goes up on the
first then climbs the second. This gets the front up enough to get the floor jack
under the front cross member (just aft of the oil pan, has ridges on it). I jack
that way up (watch the HKS Superdragger touch the floor) and put jack stands under the
front "frame rails" (outside edge of car), as far forward as
possible. I then GENTLY lower the car onto the front jack stands. Move the floor jack to
the bolts protruding down ahead of the differential and lift it there. I
place a third jack stand under the diff. (it locks in place there due to its shape). I've
gotten in and out of the car with no problems, and torqued hard on various fasteners
underneath. If you're still nervous you can place stands/metal ramp tops under the wheels
- they don't have to touch the tires to provide safety - they just stop the car from
falling more than a few inches.
David Beale
1) Disconnect the rear parking brake cable from the caliper: Remove locking clip and
pull on cable to free it from groove. Pay attention to clip attachment so you remember
which side of the bracket to put it back on.
2) Remove the Lock pin (which is the bottom bolt that secures the caliper):
Yep. It will be tight. Alternately you can take out the top pin/bolt and let it pivot
down instead
3) Pivot the caliper upwards on the Guide pin (which is the top bolt that secures the
caliper). The manual shows the caliper to be pivoted nearly 180 deg:
Get a small bungee cord or something to hold it up while you are working
Does the Guide pin (top caliper bolt) need to be loosened at all? The manual makes no
mention of it: NO
The manual indicates the Lock pin requires high temp grease. Should have grease on the
smooth part of the bolt already. One side of the caliper slides on these to bolts to apply
force to the rotor and stop you.
ADDITIONAL
Block a wheel and start with parking brake off
Retract caliper piston by using a large pair of needle nose pliers or cutter to screw
it in clockwise. Screw in in complete turn only so that notch will always be lines up (see
manual). If you do not do this to retract the piston you will pay hell getting the parking
brake back on, even if the new pad slide right in without doing it (I spent 30 min cursing
trying this once)
Re-torque caliper bolt to 65 ft lbs.
If you need air conditioning you can have a pulley machined, and have it pressed out
and into the new pulley using the bearings from the stock idler pulley. Then you can dump
the PS all together, which also requires getting a hydraulic hose fabricated to flow the
PS fluid through. Any good hose shop that deals with heavy equipment can handle this. It
will require your original PS hose with the Banjo fitting, and the other line with the
flare fitting, some cutting, and brazing (on their part) and most likely a couple AN
fittings. Cost for the pulley was $80 for me, and cost on doing the custom hose was about
$45
I had the same problem on my car. Someone in the list mentioned spraying silicone
lubricant down the window tracks. This fixed the problem for me.
Connect the tach wire to the negative wire of one of the two trailing coils. I used the
#2 trailing coil (nearest firewall) and tapped into its blue and yellow wire. Set the
tach’s cylinder setting to 4. Using this method my shift light would illuminate at
two times the setting of the light, it was set for 3000 rpm and the light goes off at 6000
rpm so I set the light for 3600 rpm and now the light goes off at 7200 rpm.
For those interested in changing the diff fluid, the fill plug is 23mm and drain plug
is 24mm. You’ll need a 3 inch extender for the top plug unless you have a really flat
ratchet. I’m also interested in different ways of how some of you filled your diff as
I ended up with about ½ quart on the garage floor! It’s hard getting the redline
higher than the drain plug plus pour it downward. I had to use a bendable skinny funnel
barely wide enough for 75w90 to flow through. Those of us not lucky enough to have a
vacuum pump/hose would like some tips--buy the pump that looks like a big syringe with a
flexible hose. I don’t think it costs more than $10. Sears and most auto parts stores
will have them.
First take the plastic cover off the steering column, then
remove the 2 bolts that hold the steering column to the dashboard. Now push the steering
column down so you can get access to the two cut-off bolts that hold the ignition to the
column. Here's the tricky part, the bolts that are used are tightened until the head
breaks off (I think). What you need to do here is get a flathead or even better a small
chisel. I always used the flathead. Make a notch in the round bolt head and then tap
counter-clockwise to loosen. All you need to do is loosen a little and you can hand-loosen
the rest. For reinstallation I would just use regular bolts but you will have limited
space to work with so get small bolts.
Anthony 93 R1
1) Roll down the driver’s window.
2) Exit the car & close all the doors & hood and lock the car.
3) Reach into the car through the window and open the door, the alarm should sound. Or
lock your girl friend in the car and have her open the door.
I installed a GReddy timer last weekend without the 3rd generation RX-7 specific wiring
harness. Many thanks to the two list members who were willing to disassemble their
vehicles and look at where their HKS timer wires hooked into the ignition switch wires to
assist me in identifying the proper wire color codes. I couldn't find any web posting for
this procedure; all installation pages said use the RX-7 specific harness which was not
available. For those about to undertake this project and do not have the RX-7 specific
harness, I post this wire connection procedure.
1. Connect the 12V red wire from the GReddy timer to the black wire with the green stripe
on the ignition harness.
2. Connect the blue ACC wire from the GReddy timer to the solid blue wire on the ignition
harness.
3. Connect the green ON wire from the GReddy timer to either the black wire with the white
stripe or the black wire with the yellow stripe on the ignition harness. The RX-7 specific
harness connects this wire to the black wire with the yellow stripe. These are IG1 and IG2
wires and either will work.
4. Connect the black wire to ground.
5. For the purple speedometer signal wire from the GReddy timer, connect it to the green
with red wire on the ECU. To identify it, remove the electrical plug nearest the carpet
from the ECU. This is a 22 pin plug with two rows of 11 pins, but not all slots have wires
coming from them. Position the plug so the lower left slot is empty.
Count the wires in the top row from the left. The 5th wire should be green with red.
Martin
This mod will allow the alarm system to be armed when the key is removed from the
ignition with the vehicle idling using a turbo timer. Make sure you disconnect the
negative cable to the battery before performing this mod.
The 20 pin connector from the car’s alarm CPU located behind the driver's left
foot kick panel (see page Z-90 of the Workshop Manual, this is not the main ECU) has 2
wires you need to look at, cut wire 1C (Black with Yellow) and tape up the non-ECU end (it
goes to the ignition switch). Using a splice connector connect the ECU end of wire 1C into
1B (white).
Source for Mazda Special Service Tools (SST)
I received an American Kowa Seiki catalog. For those who don’t know AKS is
the distributor for Mazda Dealer Tools (SST). They recognize the workshop manual
SST part numbers and are the de facto point of contact for SSTs for Mazduh.
I have made purchases from AKS for their FD bushing installer
($275, as opposed to $375
from the dealer) and the knuckle tool. Past experiences from other List members
indicate that AKS does not sell to the public anymore.
However, on the coupon introduction it states: “Can’t find that special
tool you’re looknig for? Call us!” etc... Signed by Harry DiNenna. Which
means you can probably purchase SSTs again.
America Kowa Seiki, Inc
13939 Equitable Road
Cerritos, CA 90703
800.824.9655
562.407.5860
Drew
Stereo Install Tips
Good guys and Circuit City etc will charge quite a bit to install. The only important
part to buy is the adapter that converts the OEM stereo harness to something manageable.
That can be bought
at the Goodguys and Circuit City for ~$8... Then if you want to install a single din
radio (the thinner ones) you need a din conversion kit. Again can be bought at the stores.
For ~$25
After a request I will post the defense I used in my ticket, it is a
proven winner YMMV. I had more evidence however it was specific to my case. Keep in mind
it was 9pm.
Police Officer Cross Examination
How long have you been a police officer? How long have you been a
certified radar operator? Prior to writing the ticket on Oct. 25, when was the last time
you calibrated your radar set? Which way was you police car facing while you were running
radar? Cop: Facing Southbound traffic in the median strip. Which lane of traffic were you
observing? Cop: The left lane. Were you able to readily identify the makes and models of
vehicles coming toward you? Cop: To an extent. Were you able to determine the colors of
vehicles? Identify drivers? Cop: I do not recall. Do you recall approximately how many
vehicles were in the group of cars that you observed the target car? Cop: I do not recall.
Was the target vehicle overtaking vehicles in front of it? (This is valid because I had
two witness and myself that said I was following a car.) Cop: The car was in the left lane
overtaking cars in the right. Did you have to wait for other vehicles to go by before you
went to peruse the target vehicle? Cop: I do not recall. Can you give an approximation of
the time and distance that elapsed before you caught up to the vehicle you stopped? Cop: I
do not recall. For what period of time did you loose visual contact with the target
vehicle. Cop: I did not. Me: You were able to pull on to interstate I-81 without looking
in the direction of traffic? Cop: I guess so. How were you able to determine that the
vehicle that you stopped was the target vehicle? (I had pics of a Honda Accord taillights
at night. They look a lot like a 1986-88 2nd gen lights) Cop: They looked the same.
Then I explained exactly what really happened in excruciating
detail. There was a Honda Accord that passed me.
Closing Statement
I truly believe that an honest mistake was made with respect to this
ticket. There were several opportunities for a simple mistake to take place. It was 9:00
PM at night and quite dark making it quite difficult to identify the make and models of
cars. Mr. Ewing (the witness that I was following) has an identical Mazda RX-7 to my own.
The taillights f a 1992 style Accord are very similar to my own. When I went through radar
I was the second of three cars. When the Trooper X caught up to me I was the third car.
This was the space previously occupied by the Honda Accord that passed me. I have seen
first hand the damage caused to vehicles and their occupants due to excessive speed.
Because of this I try to the best of my ability to operate my vehicle in a safe and
courteous manner. These efforts can be seen in my perfect driving record. Your honor, I
believe that the elements for a reasonable doubt have been introduced in this case and I
will ask for an aquital. Always sum up to the judge something like: "Sir, I believe
in the police and fully support them. However in this case I believe this hard working
police officer made a mistake. I do not fault him for that, it was a reasonable thing to
do, but citing me for this violation was improper because of X, Y and Z."
|