S2000 RacingBrake Front 12.8" Big Brake Kit
By Rob Robinette
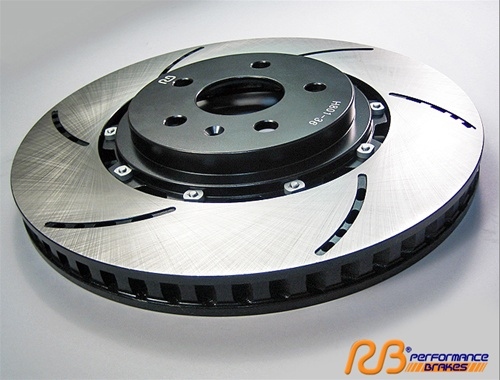
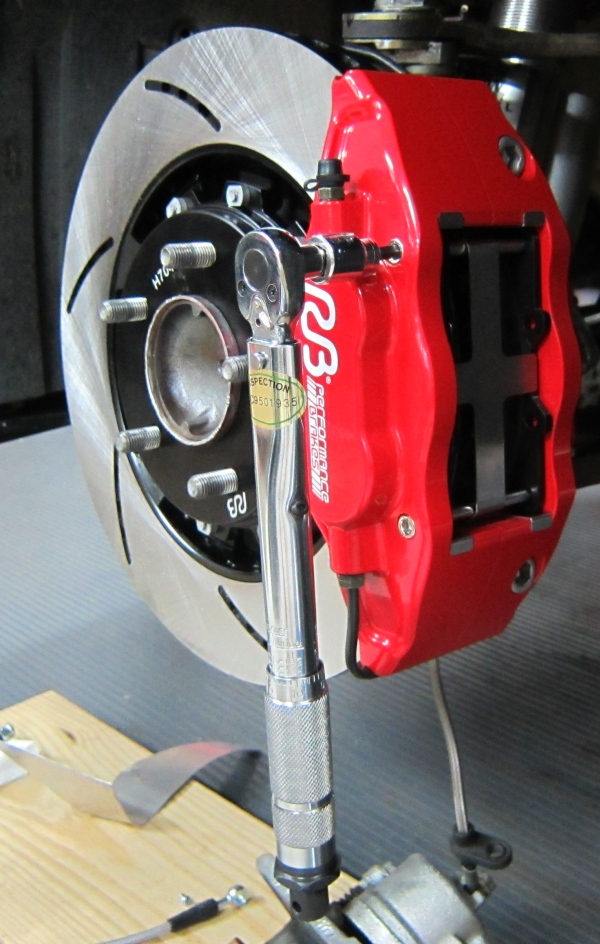
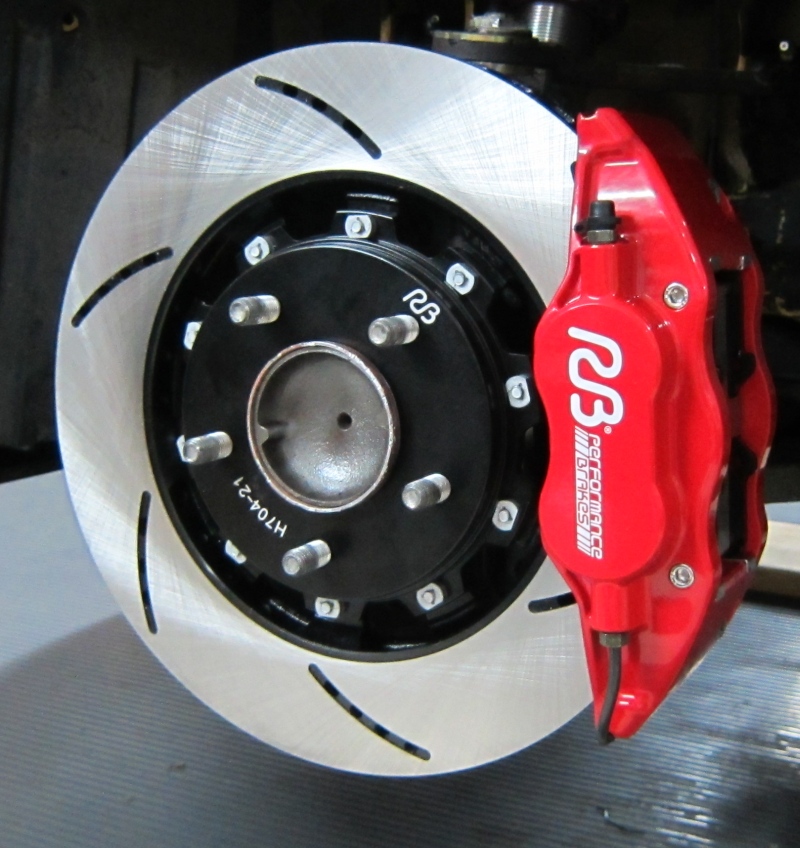
The RacingBrake S2000 Front Big Brake Kit
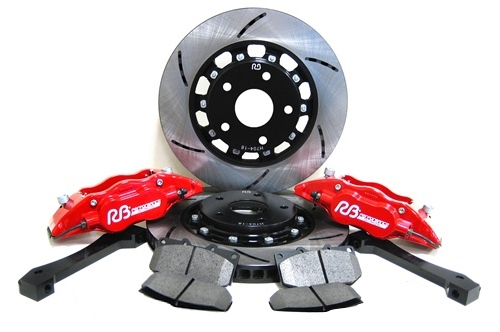
The included front & rear stainless steel brake lines are not shown.
In Jun 2013 I decided it was time for a proper big brake kit (BBK) with a larger than stock rotor (stock is 11.8 x 1" or 300 x 25mm). I wanted the additional front torque delivered by a larger diameter rotor and the extra pad and rotor service life a BBK gives. After doing a lot of research I decided on the RacingBrake S2000 Front Big Brake Kit (Part Number: 2146-K) with its huge 12.8 x 1.1" rotor (324 x 28mm). I paired it with a set of Racing Brake XT960 race pads.
I've been running RacingBrake front rotors since 2008 when I got tired of cracking OEM rotors every 3 or 4 track days (3.5 to 5 track hours). I ran RB rotors with both the OEM brake caliper and with the Accord caliper upgrade. I got 23 days and 27 hours of track time on my first set of RB rotors so I'm very familiar with RacingBrake's high quality long lasting braking components.
S2000 RB BBK Fitment Guide
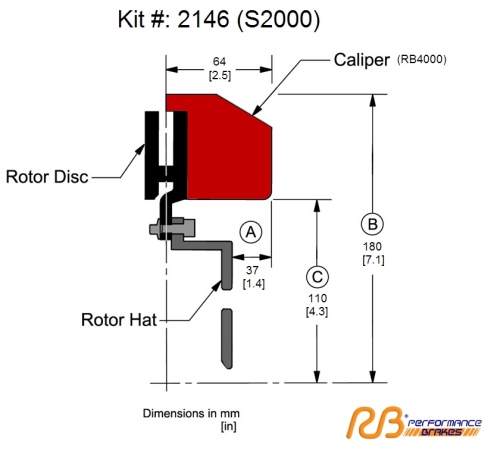
Note dimension A above at 1.4" (37mm). The Stoptech BBK measures 1.53" (39mm) so the RB big brake kit's wheel clearance is better than the Stoptech's BBK by about 1/8" or 2mm. UPDATE: I've been told the actual difference between the two kits is about 1mm.
This kit shares rotor rings with big brake kits for the NSX and much heavier BMW M3. Replacement rotor rings are available here: RB BBK Rotor Rings
The RacingBrake BBKs Features (why I chose RB's kit over the Stoptech and other BBKs)
Lightweight Forged Aluminum 4 Piston Caliper
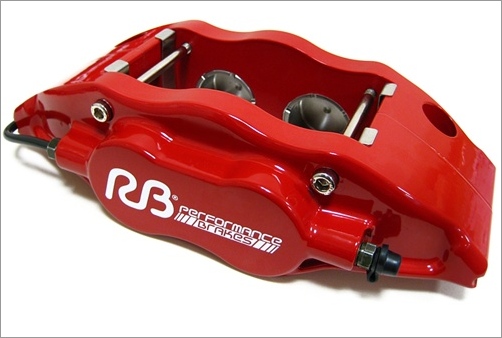
Sexy!
Weighs only 5 lbs.
1/8 inch (2mm) more wheel clearance than the Stoptech BBK.
Piston Material: Made of stainless steel instead of aluminum like most common material that can substantially reduce the heat transfer (approx 1/10 of aluminum) from the pad to brake fluid. The piston is also vented for extra cooling. You don't have to run expensive brake fluid like Motul or AP to prevent fade. ATE Super Blue and Type 200 are my favorite brake fluids. They're inexpensive, long lasting and work great with big brake kits.
Vented Stainless Steel Piston
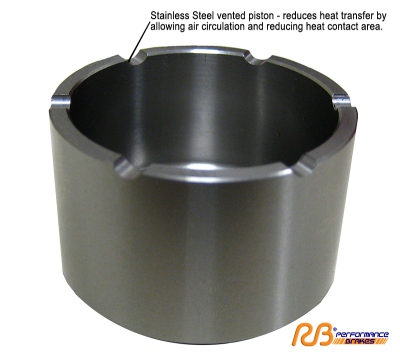
Piston Double Sealing System: The dust seal acts as a secondary back up seal (in case of primary seal failure) in addition to its normal dust sealing. This offers extended service life before any rebuild is required and makes this caliper winter road salt worthy.
Common Brake Pad Size
FMSI number D460 & D647 for 89-96 Nissan 300ZX, Subaru STi with 4-pot conversion, 89-93 Skyline GT-R R32 and Mitsubishi 3000GT.
Brake pads available from:
RacingBrake full line from street to race PD647-xx, the XT970 is their track only race compound at $212. This is my pad of choice.
Hawk Brake full line HB178x.564. The .564 refers to the pad's thickness in inches.
The DTC-60 is Hawk's most common track/race pad for this caliper: HB178G.564 $191
Hawk HB178x.564 Pad Dimensions

Carbotech CT460 full line available (XP10 is $195)
Performance Friction 01 Compound PF460-011544 $250
Lots of generic street pads from $29, just search for "brake pad D460."
Radial Mounting: Caliper mounting bolts pass vertically through the caliper. Results in near elimination of caliper torsional deflection which leads to greater braking torque and less pad taper. This feature is an RB exclusive.
Hardware: Brake pad pins and banjo connections were designed for easier installation and pad replacement.
Surface Coating: Liquid paint is used, which is more resistant to chipping than powder coating.
Caliper Adapter: Light weight 7075-T6 aluminum alloy
Rotor Design
RB's unique and patent pending rotor designs make their discs cooler and longer lasting.
RB Aluminum Hat and Iron Alloy Rings
Open Slot Rotor Rings
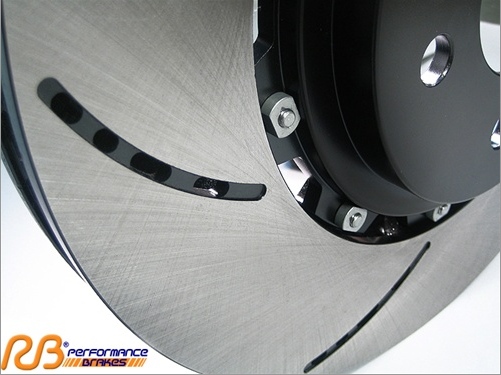
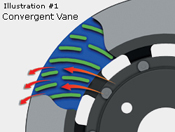
The cooling vanes are of a curved, convergent nozzle design, which increases airflow and turbulence and makes discs cooler.
The center-mount flanges for hat mounting to the rotor ring have several benefits.
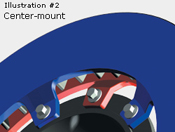
The stress load transferred from the ring to the hat is balanced. Air inlets are wide open to both inboard and outboard sides of the rotor. More air suctions and even temperature on both sides of the disc surface. Heat transfer from the disc surfaces to the hat is even and minimized by increasing the flange length and the airflow around the flanges. Mounting flanges are on both friction surfaces ultimately provides excellent heat balance. The center-mount design allows the ring to be used on either side of the vehicle simply by mounting the hat on either side of the ring (unidirectional).
True Floating Rotor Design
Exclusive full floating design with 10.9 grade alloyed hardware.
Hardware is DACRO coated and crimp locking. DACRO is highly corrosion resistant
and provides a film for easier movement between the hat and rotor ring as disc
expands and contracts and the crimp design provides positive engagement without
rattling or torque loss at temperature.
Installation
Keep in mind the calipers and caliper brackets are aluminum alloy so it's important to follow the RB torque specs for everything that screws into the caliper and bracket including the pad pins and caliper bleeders. It's easier to strip an aluminum thread than iron so you can't just crank on the mounting bolts like you can with OEM iron calipers.
I recommend adding some Locktite Blue to the caliper bleeder threads to prevent "weeping" of brake fluid. Actually I recommend using Locktite Blue on all the brake system fasteners except the brake lines' flare and banjo fittings.
Torque Specs
Caliper Adapter bolts 45-50 lb-ft (17mm adapter to knuckle)
Caliper bolts 35-40 lb-ft (10mm hex caliper to adapter)
Banjo bolt on hydraulic line 15 lb-ft (180 lb-in)
Bleeders 10 lb-ft (120 lb-in)
Brake Pad pins 10 lb-ft (120 lb-in, 5mm hex)
Caliper Adapter Installed
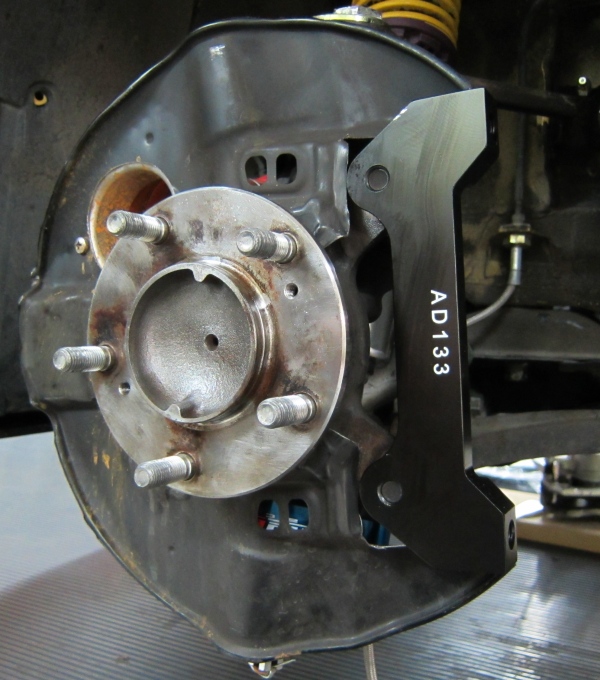
Install with "AD133" facing you. OEM 17mm bolts torqued to 47 lb-ft.
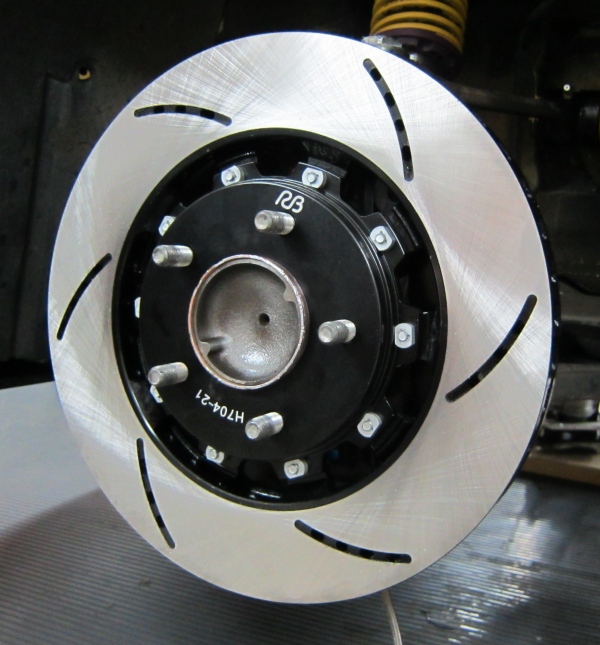
Two Piece Rotor Installed
Torquing Radial Mount Caliper Bolts (10mm hex)
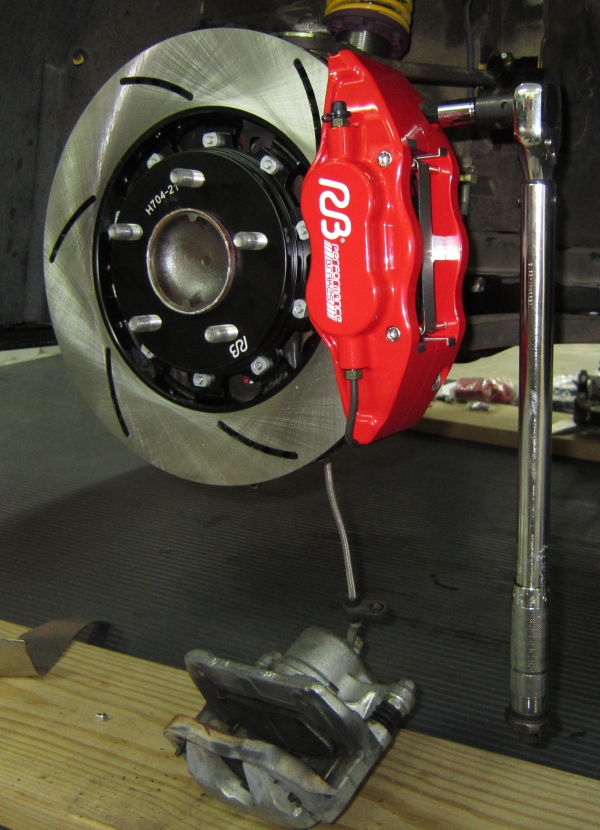
Torqued to 48 lb-ft. Note old caliper is still connected to brake line to prevent leaking.
Brake Pads Slide In
Torquing Pad Pin Bolts
Torqued to 10 lb-ft (120 lb-in) using 5mm hex.
High Quality Lines With OEM Style Bracket Mounts
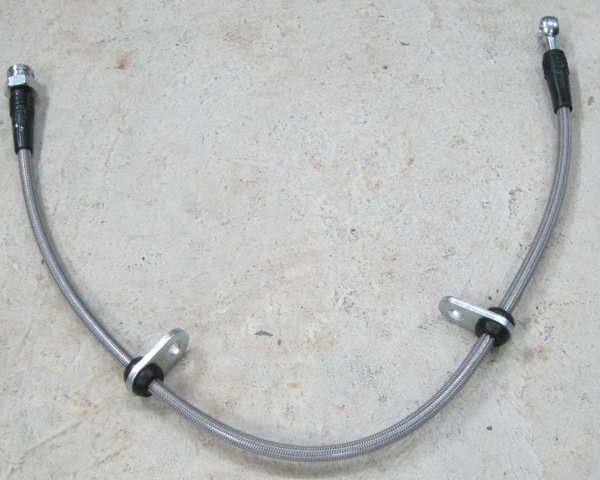
Bonus! Kit includes front and rear high quality stainless brake lines. Torque the banjo bolt to the caliper with 15 lb-ft (180 lb-in). Use included copper washers on both sides of the banjo fitting. I left the old brake caliper connected to the brake system until I had the new caliper completely installed. I then quickly disconnected the old line from the hard line and connected the new line to minimize fluid leak and air injection.
I saved the brake line connection for last. With the caliper and rotor installed and the brake line banjo bolt secured to the caliper I ran the brake line the same route as the old line and got it ready to be connected to the brake hard line in the fender well. The line runs from the caliper banjo bolt to the caliper bracket then in front of the shock to the shock bracket, behind the shock and over the sway bar and up to the hard line flare fitting.
WARNING: You must use a 10mm flare wrench on the brake line fitting or you run a very high risk of rounding the corners of the fitting. A flare wrench is made to slip over the brake line and grab more surface area to loosen the brake line flare fitting. Most auto parts stores stock 10mm flare wrenches for just a few dollars. They are available on Amazon too.
With the new brake line in the ready position you're ready to swap the brake lines. Have some rags or paper towels handy to catch the brake fluid drippage from the brake line. Hold the large brake line nut on the bottom of the brake line wheel well bracket while you loosen the 10mm flare fitting with the flare wrench. Mine were tight and difficult to break free. Don't remove the flare nut yet, just break it loose.
Next look closely at the position of the brake line clip that holds the hard line and caliper line together. You'll need to reinstall it to this same position. To remove the clip I used a screwdriver to pry the brake line clip out far enough to get a pair of pliers on it to pull the clip off the wheel well brake line bracket. With the clip off unscrew the flare fitting then quickly screw it into the new brake line and just snug it--don't try to tighten it until you get the clip back in which will secure the line to the wheel well bracket. The clip slides into a groove on the brake line fitting. Be sure and fully seat the clip then tighten the flare fitting while holding the 17mm bolt on the new brake line.
Secure the brake line to the caliper bracket and the shock bracket using the old hardware.
Installation Complete
I knew I'd probably need hub spacers to run my CE28 17x9 +63 wheels so I purchased some 3mm wheel spacers in advance. You can run 3mm spacers with stock wheel lugs. The caliper to wheel clearance was very tight--around 1mm with the 3mm spacers but I decided to give it a try anyway. The wheel spokes ended up scraping some paint off the caliper after my initial track day so 5mm spacers and extended lugs are required with these wheels. I do not believe RPF1 17x9 +45 wheels will fit even with 5mm spacers.
Bleeding
You'll need about a quart of brake fluid for the initial fill/bleed. I like ATE Super Blue or 200 (same fluid but amber in color). Follow the normal Honda S2000 sequence of left front (both bleeders), right front (both bleeders), left rear, right rear. The RB calipers have an inside and outside bleeder so bleed the outside first, then the inside.
Racing Pad and Rotor Bedding
RacingBrake recommends a special procedure for bedding their race compound brake pads. Do not brake to a stop and try not to engage ABS during any part of the bedding process. Tape over brake ducts for the bedding process if you have them. Bedding race pads should only be done on a race track because of the high speeds required to bed high temp racing pads.
Start with 6 to 8 moderate brakings from 60 to 80 mph down to about 30mph to warm up the brakes. Then complete 6 to 8 brakings from racing speed--usually 100mph + for the S2000. Use an abrupt brake application and release during bedding and don't drag the brakes to warm them up. This procedure will get your front and rear brakes very hot. New rotors should heat discolor after this procedure. Try to use the brakes as little as possible as you return to the paddock and do not set the parking brake--just leave the car in gear. I like to slowly coast into my parking spot and shut down the engine and then use the clutch to stop the car so I don't have to touch the brake pedal.
Caliper Rebuild Instructions are here. If you do split the caliper put Locktite Blue on the caliper join bolts and torque them to 21 lb-in.
Track Review
The brake pedal was surprisingly solid considering I only did the initial bleed after installation. I'm going to continue bleeding my brakes after every track day until I get all the brake line & caliper swap air out. The firmer pedal made it much easier to modulate the brakes during hard, high speed threshold braking.
When I initially moved from the OEM S2000 brake caliper to the Accord calipers I noticed the brake pedal went lower in the stroke due to the larger Accord brake pistons. I had to adjust my heel-and-toe technique to cope with the lower brake pedal. The RacingBrake big brake kit has moved the brake pedal back up to the stock level and heel-and-toe is easier to accomplish.
With my previous setup using Accord calipers and RacingBrake stock diameter rotors up front paired with a rear +1" rear big brake kit I was getting into ABS in the rear well before reaching the ABS threshold in the front. Adding the front big brake kit solved this brake bias problem completely. Braking is now balanced and controlled--it took me several laps to push my brake points back to where they needed to be. I love the initial bite of the RacingBrake XT960 pads with this kit.
When I get more data on brake pad and rotor life I'll post it here.
Rob Robinette
Also see my RacingBrake stock size brake rotor review.