Modern Player Telecaster Plus© Guitar Mods
Replace Pickups, Add 3-way Toggle Switch for Series/Split/Parallel Humbucker, Add "Neck On" Mod, Add Kinman Treble Bleed and Replace Fender Precision Bass Pickups
By Rob Robinette
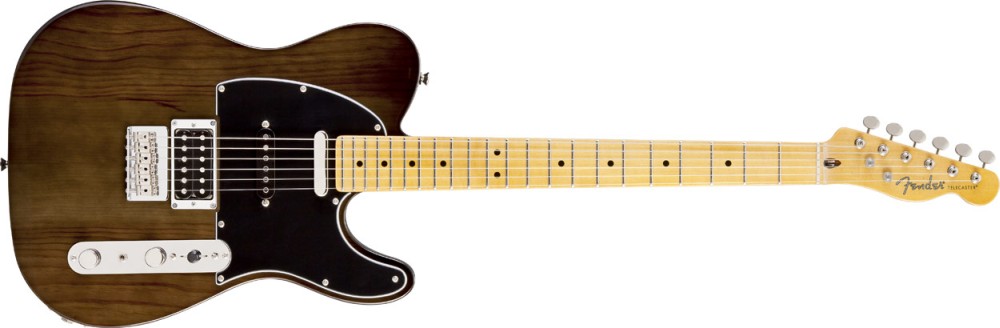
The Fender Modern Player Telecaster Plus is a fantastic value and the craftsmanship is very impressive with this guitar. It's shocking how much guitar you get for $399 delivered. It does not have the traditional Tele tone due to the lead (bridge) humbucker, but it's a very, very versatile guitar and even more so with a couple of easy mods. You owe it to yourself to play one of these if you get a chance, you'll be impressed.
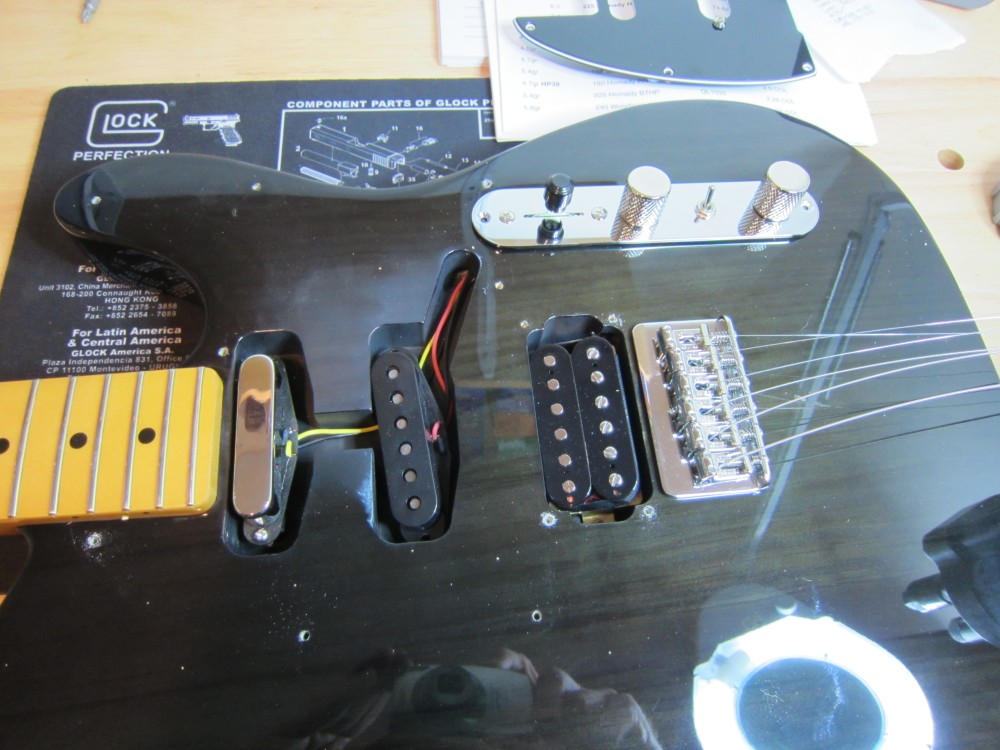
I decided to upgrade the pickups on mine to add more tonal variety. The original neck pickup is a Modern Player Tele, the mid pickup is a Modern Player Strat and the bridge pickup is a Modern Player Humbucker. I decided to replace the neck pickup with a DiMarzo Area T stacked humbucker and the mid pickup with a Seymour Duncan high output single coil Quarter Pound Staggered SSL-7. I went with the Reverse Wound/Reverse Polarity (RW/RP) option so it would be humbucking when paired with the neck pickup or with the bridge humbucker in split, single coil mode. This choice ended up causing magnetic polarity problems. The standard, non-RW/RP version of the Quarter Pound with North up magnetic polarity would have been the correct choice. See Magnetic Polarity Problems below for the details.
The original bridge pickup was a Modern Player Humbucker. Strangely it had only three output wires and was wired in parallel mode from the factory. Most humbuckers have four wires and are wired in series mode for the highest output and famous humbucker tone. With only three wires the factory humbucker is not compatible with a series/split/parallel switch. With the factory split coil switch you get two options: Parallel and single coil.
Factory Humbucker Wire Colors
Red = North Start
White = South Finish
Green = North Finish & South Start to Ground
Coil split switch position 1 up
Red + White = North Start + South Finish out to 5-way selector switch = Parallel Mode
Coil split switch position 2 down
Red only = North Start to 5-way selector switch = Split Coil Mode
Factory Pickup Magnetic Polarity
The factory pickups are: SN...N...S (bridge humbucker: South screw:North slug...mid North...neck South)
Due to the weak output of the factory's humbucker's split coil mode and limited three wire setup I decided to replace it with a very high output (but still passive) Seymour Duncan SH-8b Invader humbucker. Its very high output makes the split coil mode sound clean and clear and its four wires are compatible with a series/split/parallel switch. All three new pickups are exact fit drop-in replacements so no routing or pickguard trimming was required.
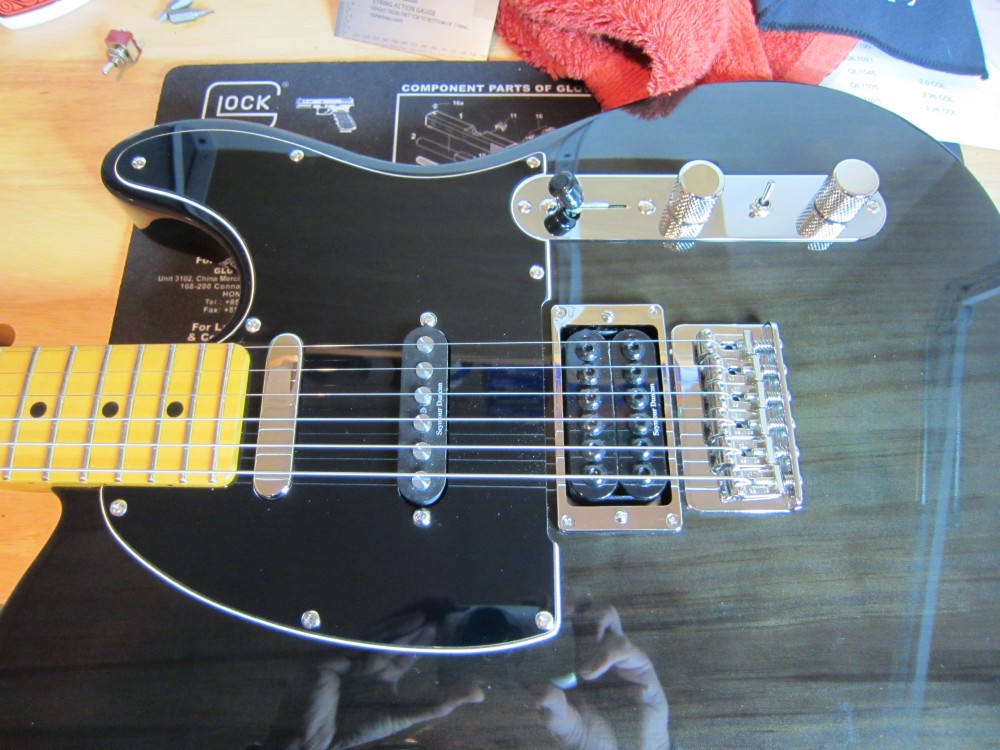
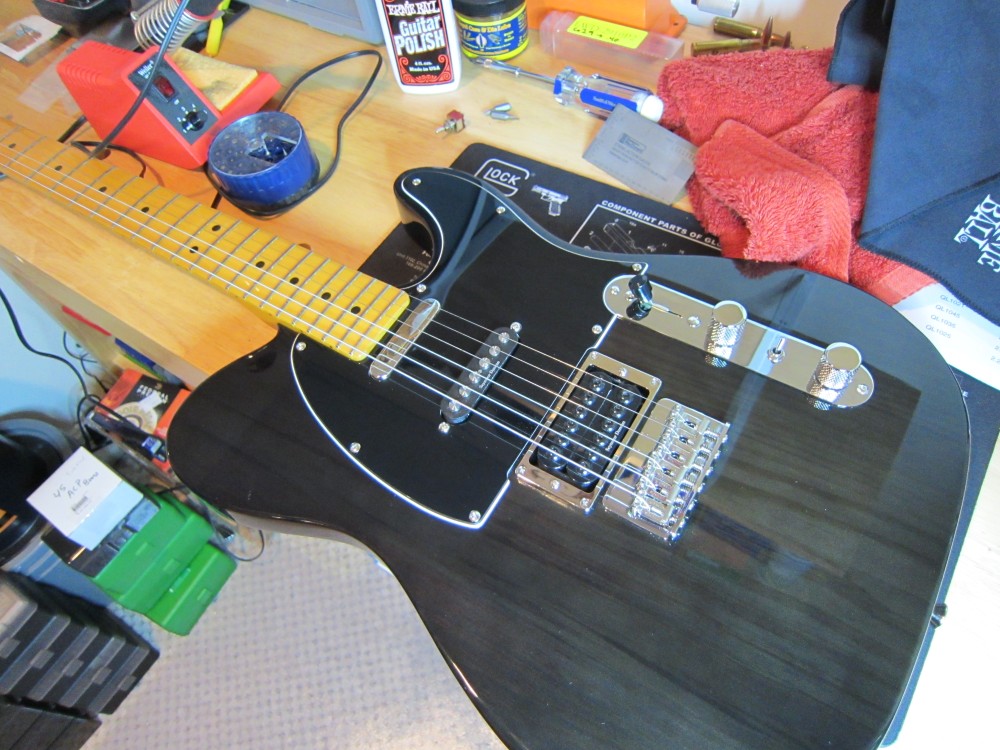
The Modern Player Telecaster Plus From the Factory
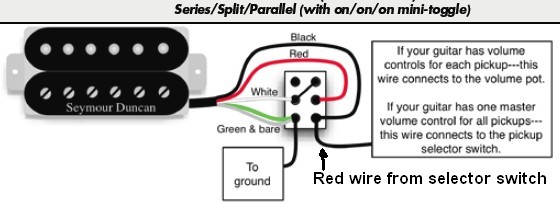
I had to replace the stock humbucker coil splitting 2-way mini-toggle switch with a DiMarzio 3-way DPDT on/on/on mini-toggle switch to add series/split/parallel functionality to the SH-8 humbucker. The 3-way switch looks exactly like the original 2-way switch.
I followed Seymour Duncan's wiring diagram included with the SH-8b to wire the 3-way toggle switch (diagram shown below). Series gives you the standard high output and hum cancelled humbucker tone. The split position gives you single coil output for a much quieter, cleaner output. The parallel position is kind of between series and split, both coils are used for hum cancelation but less output is achieved in parallel versus series mode.
The neck pickup is a Modern Player Tele and I originally wanted to leave it in place since it sounded good and I wanted to keep the standard Tele twang from the neck pickup. But in the end replacing the neck pickup with a DiMarzio Area T was the easiest way to fix my magnetic phase problem caused by my installation of the RW/RP Quarter Pound pickup at the mid position.
I made the pickup changes to get a standard but hum canceling Telecaster tone with the Area T neck pickup, an aggressive humbucker tone with the Invader bridge pickup and nastier than standard Stratocaster tone from the mid position Quarter Pound pickup.
See my amp modification page: VHT Special 6 Ultra Head Mods
The modifications are pretty easy as long as you can use a solder gun. The most challenging part was wiring the 3-way toggle switch. The 3-way switch is very cool and adds a lot of tonal flexibility to any guitar with a 4-wire humbucker pickup.
Strings & Pick Guard Removal
Start by carefully removing the guitar's strings. I released them from the tuners and hung them off the end of the guitar to keep them out of the way. Loosen the mid pickup's height adjustment screws (turn them counter-clockwise) to free it from the pickguard. The humbucker pickup is held in place by the four small screws at its corners so remove them and release the two pickup height adjustment screws. Remove the pickguard screws using a good fitting Phillip's head screwdriver (#1 bit) and carefully lift off the pickguard. All three pickups should stay in the guitar body as you remove the guard.
The Factory Pickups
Carefully remove the control board by removing its two end screws. I placed the board on a towel to keep from scratching the guitar's body.
Remove the stock pickup wires by heating their wire's solder joint with a solder gun while pulling gently on the wire until it pulls free.
Remove the red wire that runs from the selector switch to the coil split mini-toggle switch--this carries the humbucker's hot out from the coil split switch to the selector switch. Remove the humbucker wires (red and white wires at the coil split switch, green and shield at the tone pot).
Control Board Wiring
The factory Neck Pickup has yellow (hot) & black (ground) wires, Mid Pickup has red (hot) & black (ground) wires, humbucker has black coax wire containing red (outer screw coil hot--this is the coil that is active when the split switch is down in split mode), white (inner coil hot--this coil is isolated and deactivated when the split switch is down), green (ground for both coils) & shield (ground) wires.
Push the new pickup wires through the wire hole into the control cavity. I trimmed the mid coil's leads because they were too long but the humbucker's wires were about right so I left them alone. After getting the wire lengths right I tinned the ends of each wire.
Note: The stock humbucker is a 3 wire pickup and wired in parallel mode with the green ground wire being shared by both coils. Because of this the stock humbucker is not compatible with a series/split/parallel 3-way toggle switch.
Control Board Factory Wiring
Factory Humbucker Wiring Detail
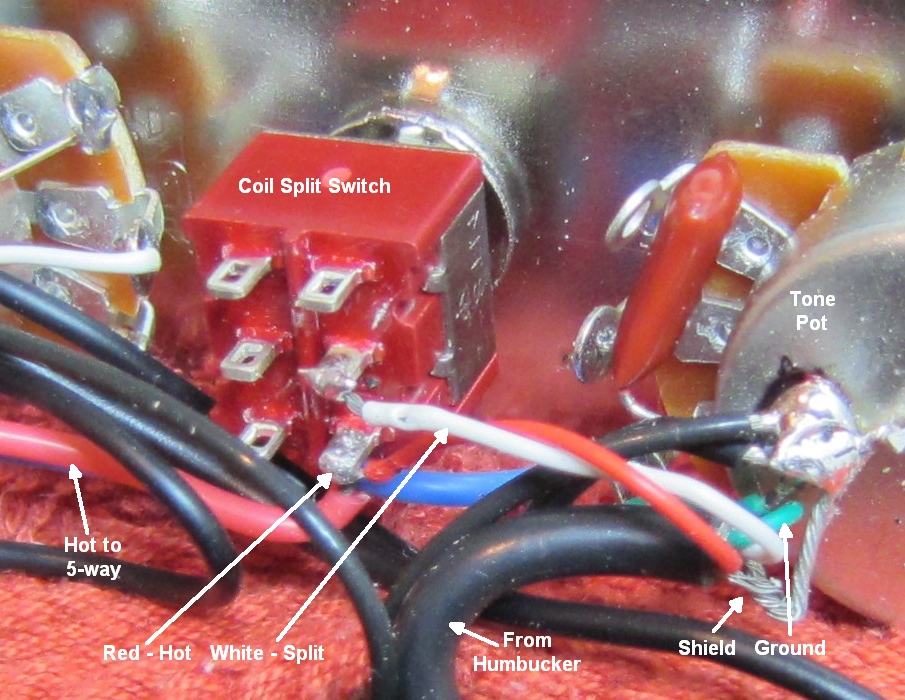
The humbucker red (South coil hot) and 5-way switch red wire are both soldered to the coil split switch's lower right terminal. The humbucker white (North coil hot) is soldered to the right mid terminal. The green (ground for both coils) and shield are both soldered to the tone pot ground.
How to Install a 3-way Series/Split/Parallel Toggle Switch
Install the new Dimarzio 3-way DPDT on/on/on Type 2 mini-toggle switch in place of the 2-way coil split switch. Install the jumper wire that runs from the switch's left middle pole to the upper right pole. Wire the new 4-wire humbucker to the 3-way switch following the diagram below. I like to run the wires through the holes in the switch terminals and bend them for a tight fit using needle nose pliers then solder them into place. Connect the red wire from the guitar's 5-way pickup selector switch to the toggle switch's lower right post--this is the hot output. Connect a ground wire to the toggle switch's lower left post to the Tone or Volume Pot's ground "solder mound" using a short piece of multi-strand copper wire. Note: The orientation of the DiMarzio 3-way switch does not matter (there is no "upside down"), just wire it like the diagram below.
How the 3-way Toggle Switch Works
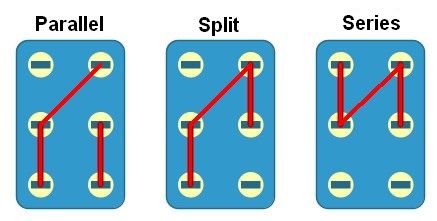
UP MIDDLE DOWN
Note: The following wire colors are Semour Duncan standard humbucker wire colors.
Switch Up--Parallel Mode: Slightly different tone and less output than series. Green and White wires are grounded, Red and Black wires are connected together as hot output--both coils have a ground and a hot output.
Switch Centered--Split Coil Mode (outer coil on, inner coil off): Single coil, no humbucking and lowest output. Green and White wires are grounded, Red wire is grounded (via the diagonal jumper to the grounded White wire) which shorts out the inner coil's Red output wire), Black wire is outer coil's hot output.
Switch Down--Series Mode: This is the normal humbucker configuration and tone and the highest output. Green wire is grounded, White and Red wires are connected to each other via the jumper, Black wire is hot output--both coils' output flows out of the Black wire.
Magnetic Polarity Problems
Humbucking pickups use common mode noise rejection to reduce hum picked up from surrounding electrical sources like fluorescent lights. Any noise that gets into both pickup coils is nullified when the two signals from the two coils are combined because the noise signals from the two coils are of opposite phase. In other words the positive noise signal is added to the negative noise signal and they wipe each other out. The guitar string signals are not nullified when combined because the opposite magnetic polarity of the pole pieces corrects the signal polarity so the string signals from the two coils are added together instead of being nullified.
Just like two humbucker pickup coils, two separate pickups can be paired together to work as humbuckers and reduce noise if the two pickup coils have opposite current flow and magnetic polarity.
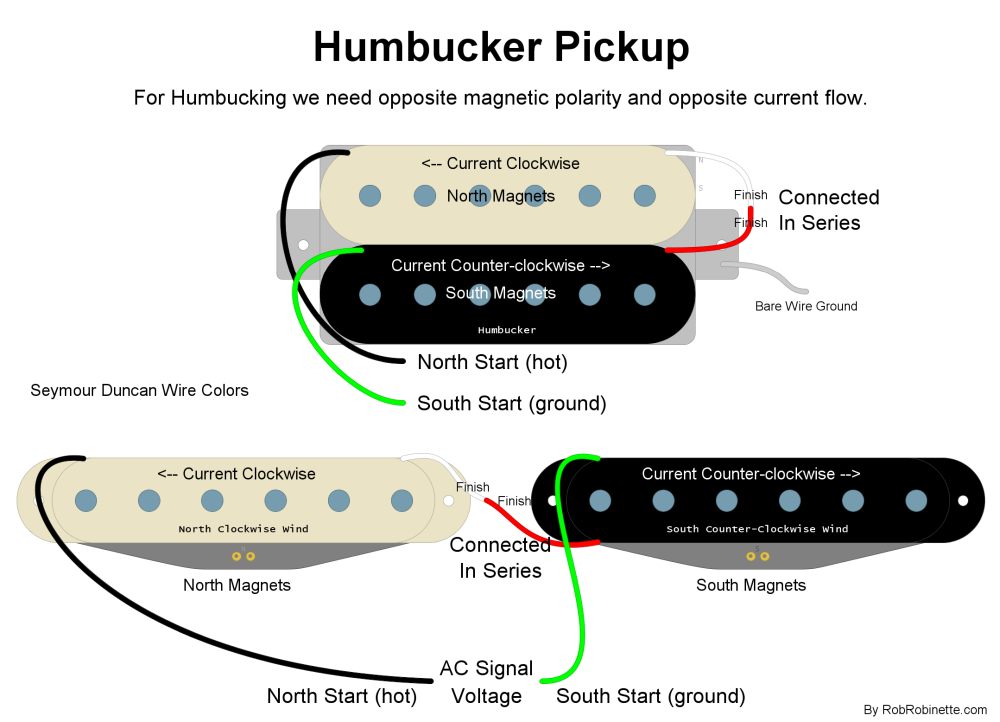
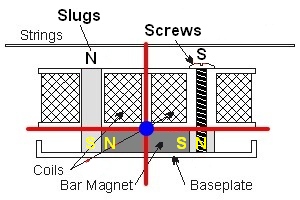
The lower section shows the two coils of a humbucker pulled apart.
You need two things to get hum cancelation in a humbucker or between two single coil pickups: Opposite electrical flow in the two coils (one coil's current flows clockwise, the other counter-clockwise) and opposite magnetic polarity (North+South).
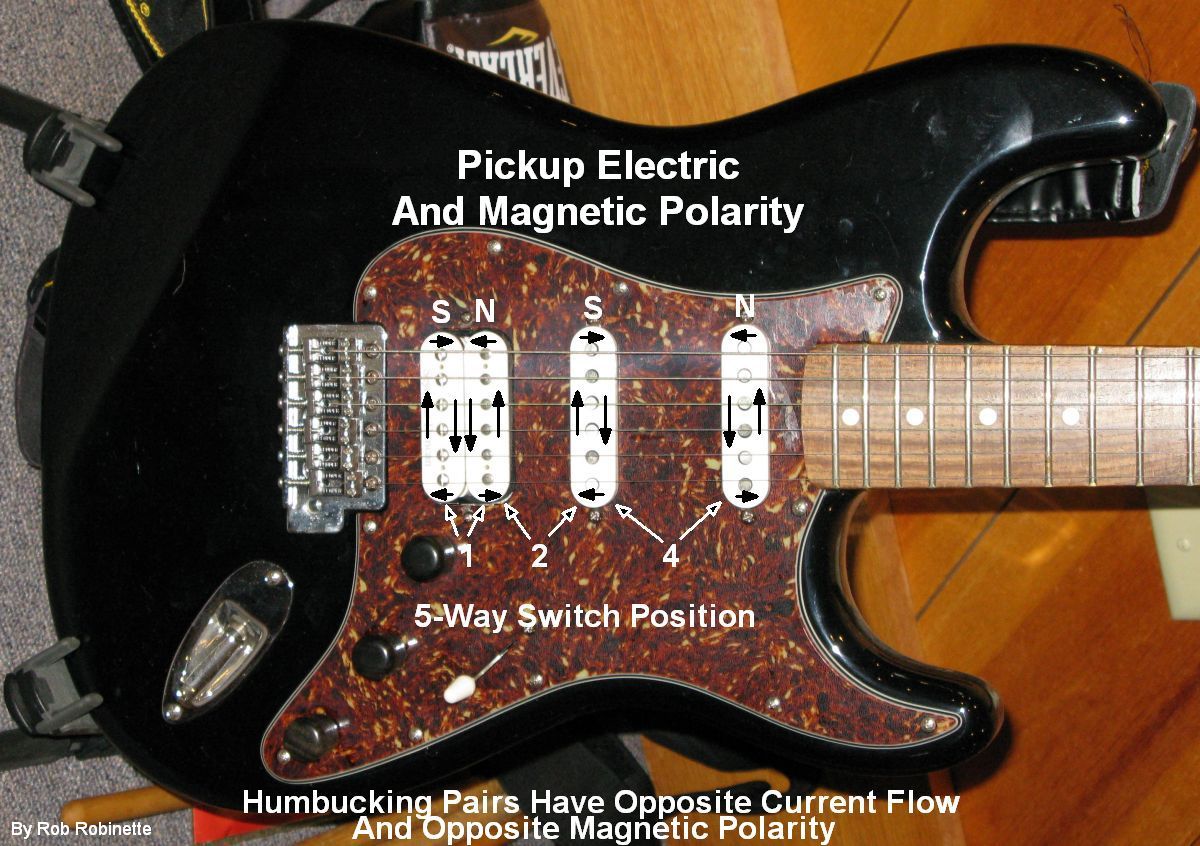
The two coils of the bridge humbucker circulate electric current in opposite directions. The same is true when you select switch position 2 which pairs the right humbucker coil with the mid pickup and switch position 4 which pairs the mid and neck pickups. The magnetic poles of the left humbucker coil are South up and the right coil is North up. In switch position 2 the North humbucker coil is paired with the South mid pickup. In switch position 4 the South mid pickup is paired with the North neck pickup. 5-Way switch positions are: 1 Bridge Humbucker, 2 North Humbucker coil + South Mid Pickup, 3 Mid Pickup, 4 South Mid Pickup + North Neck Pickup, 5 Neck Pickup.
It is pretty obvious when you pair two coils out of electrical phase (both coils' electrical flow running in the same direction)--the guitar tone is weak and tinny. The solution is easy, just swap one of the coil's two hookup wires to reverse its electrical flow.
It's much harder to detect by ear when a pair of coils are out of magnetic phase--they will sound normal when paired but there will be no hum cancelation so you may notice some 60Hz electrical hum. The easiest way to check the magnetic polarity of two pickups is to carefully move the two pickups close together--top pole to top pole. If they magnetically repel each other they are the same polarity and will not hum cancel. If they attract each other they are opposite polarity and will hum cancel when paired. You can also purchase a $9 polarity checker from Stewmac which makes checking installed pickups a breeze.
Normal Humbucker Magnetic Polarity
Several weeks after I replaced the bridge and mid pickups I tested the guitar's pickups' magnetic polarity using a Schatten Design Magnetic Polarity Tester. That's when I discovered the wrong magnetic polarity between the Fender neck Tele and Semour Duncan SSL-7 RW/RP Quarter Pound Strat mid pickup. The mid + neck pickups had the correct electrical phase but magnetically they were out of phase with a South+South pairing so no hum canceling.
The factory pickups were: Bridge humbucker: Screw coil South : Slug coil North....mid North....neck South (SN....N....S)
This configuration gave hum cancelling in switch position 4 (neck + mid pickups). You also got hum cancelling in switch position 2 with the split humbucker + mid pickup (South screw coil + mid North).
I found out too late that Seymour Duncan pickups have the opposite polarity as modern Fender pickups so the new Seymour Duncan Quarter Pound RW/RP mid pickup is South up--the same as the neck pickup.
With the new bridge and mid pickups installed the polarity was: NS...S...S
The preferred solution to this magnetic polarity mismatch would be to use a standard, non-RW/RP Seymour Duncan mid pickup which has a North up magnetic polarity, then the polarity would be: NS...N...S You would wire the bridge humbucker so the South coil is active when split. You would also have to reverse the electrical polarity of both bridge humbucker's coils by swapping the green & black wires and swapping the red & white wires. The mid pickup would also need to have its wires swapped to get the correct electrical polarity. The Factory neck Tele pickup would not have to be altered to pair correctly. A normal Area T neck Tele pickup would also pair correctly.
Another quirk in this setup is the Seymour Duncan Invader humbucker in split mode has the active North coil closest to the bridge which is backwards to the norm. On most bridge humbuckers the bridge side coil (screw coil) is South and the neck side (slug coil) is North. When split you want the coil closest to the neck to be active because it will sense more string movement. Normally you can simply spin the entire pickup around to solve this problem but the pickup has a "Seymour Duncan" logo on it that would be upside down if spun around. I ended up with the bridge side coil active when split.
The moral of the story is to verify the magnetic polarity of your pickups before you start to solder. This $11 simple to use magnetic tester is available from StewMac here: Mag Tester. It would also be a good idea to connect your new pickup using alligator clips so you can confirm you're electrically in phase with the other pickups before you solder.
I solved the polarity issue by replacing the factory neck Tele pickup with a DiMarzio Area T stacked humbucker with 4 wire output. The Area T is stacked vertically--one coil on top of the other. The lower coil is used exclusively for hum cancelation--it is too far from the guitar strings to generate a signal.
The Area T normally comes with South polarity but I had DiMarzio swap the polarity to North up. DiMarzio did the magnet swap for free. I believe Seymour Duncan will do the same for their pickups. With a North polarity neck pickup I now have hum canceling between the neck and mid pickups (5-way switch position 4). Connect the Area T's grey and green wires to ground, the red wire to the 5-way switch and either leave the short black and white wires alone or extend them to the 5-way switch as I did for auto coil split (see next section for details).
Neck Pickup Auto Coil Split
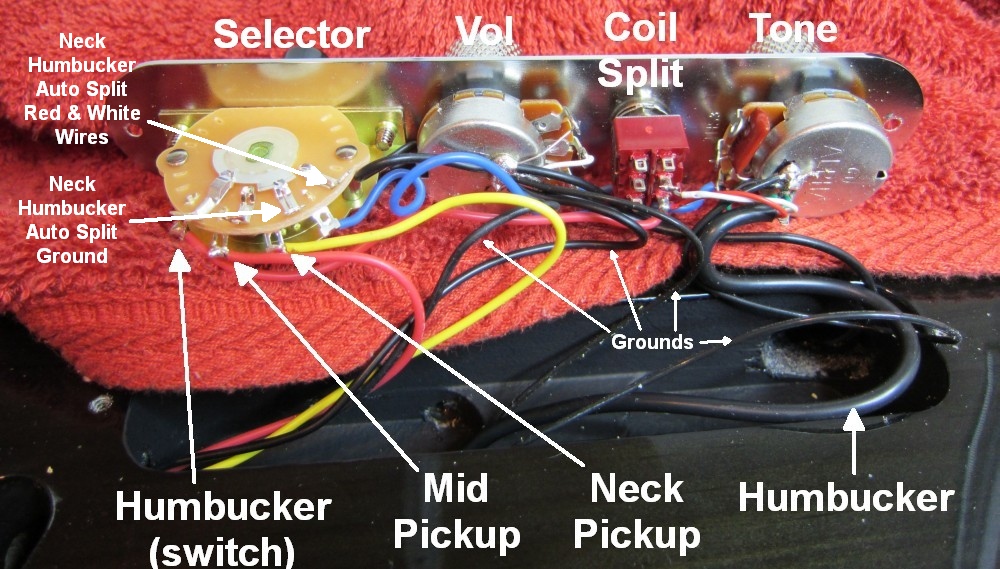
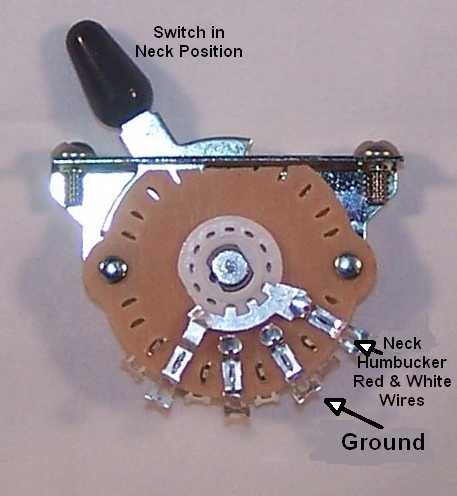
I connected the Area T neck pickup so it would be split in position 4 (neck + mid). I did this so the neck pickup's lower coil would be split off (upper coil active) so it would pair with the mid pickup in hum canceling mode. I did this by running a single wire from the DiMarzio Area T's short pre-soldered black and white wires to the 5-way switch's terminal shown below labeled "Neck Humbucker Red & White Wires." For Seymour Duncan pickups you would connect the red and white wires to this terminal. The two 5-way switch terminals used in this mod are on the opposite, empty side of the switch from the other connections.
I ran a wire from the volume pot's ground to the terminal labeled "Ground" below. When the switch is in position 4 (neck + mid) the switch connects the neck pickup's two wires to ground which shorts out the lower coil. With the wiring set up this way the Area T neck pickup in position 5 (neck pickup only) will function as a normal series wired stacked humbucker. In position 4 (neck + mid pickup) the Area T's bottom coil is automatically cut so I get hum canceling between the neck and mid pickups.
Neck Auto Coil Split
"Neck On" Mod
The "neck on" mod allows you at the pull of the tone knob to turn the neck pickup on regardless of the 5-way selector switch. With this mod you can select the neck + bridge (with the bridge humbucker in any of its 3 modes). The "neck on" mod will also allow neck + mid + bridge (with the bridge humbucker in any of its 3 modes). This mod offers 7 more tones so the tone selection with this guitar at 16 is ridiculous.
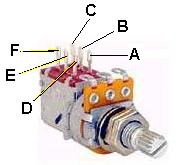
I replaced the factory tone pot with a DiMarzio 500k audio taper push-pull short shaft pot. I installed a .022uF Orange Drop capacitor between the tone pot's mid terminal and ground. The factory tone pot was an Alpha A250K (audio taper 250k ohm) and the tone capacitor was a 2A333 Mylar film .033uF. I'm pretty sure the volume pot is an Alpha A250K also. The lower 6 terminals on the push-pull pot are completely separate from the normal tone function. I used the push-pull section of the pot for the "neck on" mod so that when the knob is pulled up the neck pickup is activated. With the knob in the down position the neck pickup and 5-way switch function normally.
The wiring for this mod is very simple. You connect a wire from the neck pickup's hot wire at the 5-way switch to the push-pull pot's middle terminal (E in pic below). Run a wire from the push pull pot's upper terminal (D in pic below) to the volume pot's hot input. With the knob down the D & E terminals are disconnected so the neck pickup wire is isolated. With the knob up the D & E terminals are connected so the neck pickup wire is connected directly to the volume pot, bypassing the 5-way selector switch.
Push-Pull Tone Pot
After the "neck on" mod the tone selections are:
5-way Selector Switch Functions
Neck On switch in Off (down) position (normal 5-way switch mode)
1. Bridge in series/split/parallel mode [3 tones]
2. Bridge in series/split/parallel mode + Mid (with hum canceling in split mode) [3 tones]
3. Mid
4. Mid + Neck with hum canceling (neck stacked humbucker is auto-split)
5. Neck (both coils active in series humbucking mode)
Neck On Switch in On (up) position (neck pickup always on)
1. Neck + Bridge in series/split/parallel mode [3 tones]
2. Neck + Mid + Bridge in series/split/parallel mode (Mid + Bridge with hum canceling in split mode) [3 tones]
3. Mid + Neck with both neck coils active (Area T is not split)
4. Neck + Mid with hum canceling [Area T auto-split, same as #4 above]
5. Neck [same as #5 above]
For a total of 16 different tones.
Kinman Treble Bleed Circuit
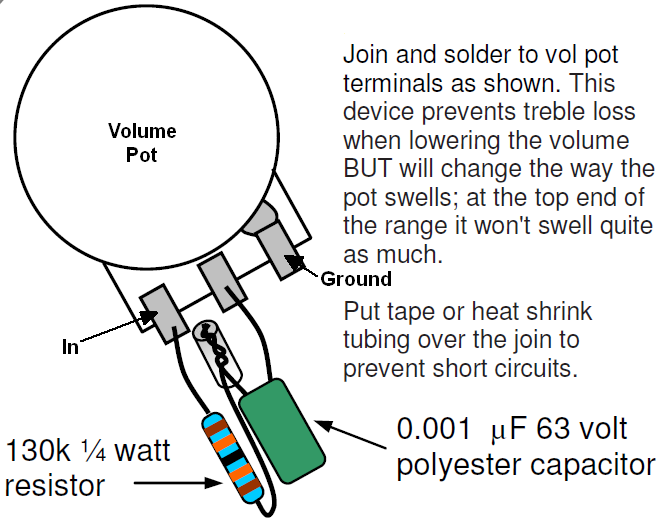
I wanted to install this mod so I could use the guitar's volume knob to control my VHT Special 6 Ultra all tube amp's volume and distortion. Without this mod as you lower the guitar's volume knob the high frequencies roll off and the tone gets darker. A treble bleed allows some high frequencies to "bleed" around the volume pot. The mod worked great, the tone doesn't change much at all from very low all the way up to full volume.
How does the treble bleed circuit work? The capacitor is a "bright cap" that lets high frequencies go around the volume control. The resistor limits the bright cap's effectiveness so the tone doesn't get shrill.
The bleed circuit is simply a .001uF (micro Farad) polyester bright capacitor and 130k ohm 1/4 watt resistor installed in series across the volume pot. The cap's voltage rating can be 5 volts or higher. The resistor's watt rating can be 1/4 watt or higher.
There are many variations of the treble bleed using different value capacitors and resistors and wiring them in parallel or series but the Kinman series circuit seems to keep the tone the most stable.
To wire the cap and resistor in series I twisted one leg from each component together, trimmed it just long enough to be able to hold it with a hemostat (to shield the components from the soldering iron heat) and soldered the twisted wires together. I covered the soldered stub with heat shrink tubing. I then held the bleed circuit with the hemostat close to the components and soldered the capacitor's leg to one volume pot terminal and soldered the resistor's leg to the other. Make sure the legs can't touch any metal or bare wires. If your component legs are long you can cover them with heat shrink tubing to insulate them. You can even bend the component legs so the circuit sits under the volume pot.
Kinman Treble Bleed Series Circuit
I got the components from owtfdwit04 on ebay. Just search for owtfdwit04 or "Kinman mod" on ebay. He sent two sets of the caps and resistors for $4.45 delivered.
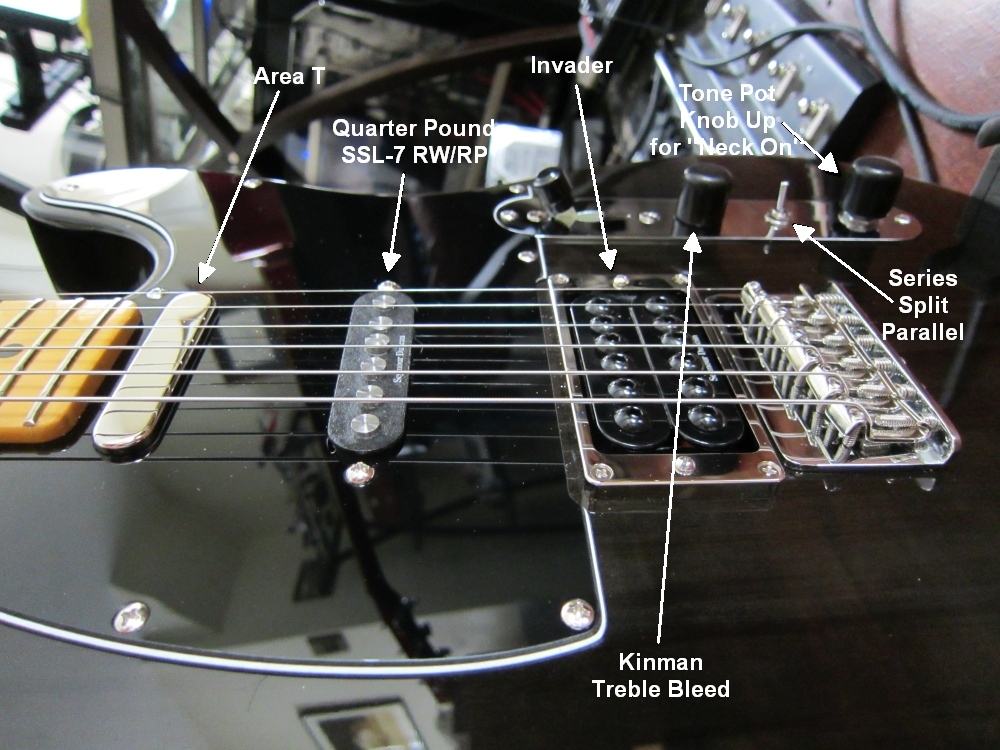
Finished
DiMarzio Area T stacked humbucker in the neck position, Semour Duncan Quarter Pound SSL-7 RW/RP high output single coil pickup at the mid position, Invader SH-8b high output humbucker at the bridge, 3-way series/split/parallel mini-toggle between the volume and tone knobs--switch is in down/series position, Tone push-pull switch for neck pickup on and Kinman series treble bleed circuit on the volume pot.
The mods turned out great. I can go from the famous Tele twang to monster grunge and there's a lot of tonal flexibility with 3 different pickups, a humbucker 3-way switch and "neck on" mod. The high output humbucker sounds nice and clean when in parallel mode or split and really cranks in series mode. The neck Area T stacked humbucker is dead silent and sounds like a classic Tele rhythm (neck) pickup should. The Quarter Pound Strat mid pickup sounds great too and all the combinations available with the 5-way switch and neck on mod make the guitar ultra versatile.
Take a look at Awesome-Guitars.com Modern Player Control Plate
Offers 68 different pickup tones!
Planned Upgrades
I was considering a black and white checkerboard pickguard but the pickguard of the Modern Player Telecaster Plus is not compatible with other Telecasters because the Modern Player neck has an extra fret and extends deeper into the guitar body than normal. Also the spacing on each side of the mid pickup may be different.
Nashville Telecaster Pick Guard

I got this email from Tony from England who made some nice mods to his MP+ Tele:
I bought a Fender Tele MP+ about 6 months ago and to be honest I've never looked back. I like being able to access so many different tones and sounds on stage without changing guitar and aesthetically it looks cool as a cucumber. However, I have had a few issues with it and have decided to mod/upgrade it a bit. The first thing I did was turn the control plate 180 degrees (and the 5-way selector 180 as well so it's still the right way round...) because when I was getting rowdy I kept knocking it into humbucker mode. I also turned the toggle switch 90 degrees so it's much harder to accidentally knock as well, and stuck some new knobs with white markers on so I can see my volume and tone settings without having to play a string... So far so good...[Rob adds: This control plate orientation also makes it easier to use your playing little finger to slide along the side of the volume knob to control the volume during play. You can even do a tremolo effect this way.]
Tony's Reversed Control Plate
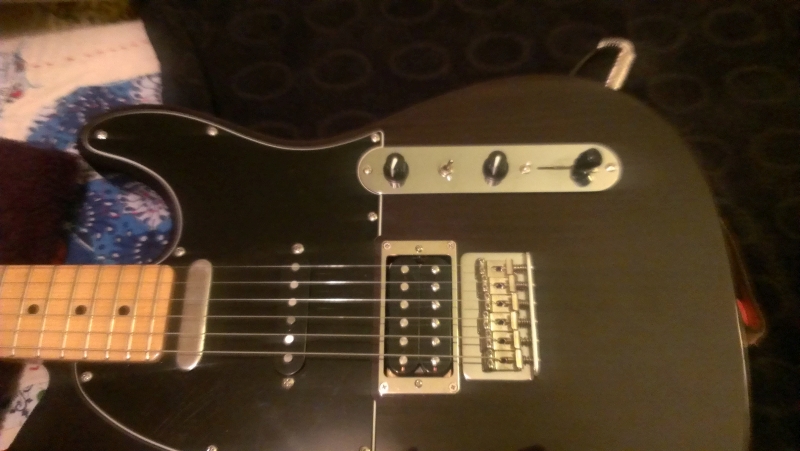
Photo by Tony from England
I also changed the pick guard to match the black and white theme I have going. I couldn't find a pick guard for the MP+ and I hear all pick guards are not created equal when it comes to hole placement etc so I decided to make one myself out of some plastic wall cladding I managed to get for free. I jig sawed it a fraction bigger than I needed and filed it back using the original guard as a constant guide (I also used the original as a guide to drill the holes so I was sure I would make no mistakes). I used a countersink drill bit so the screws would sit nicely and once I had it almost there I sanded it using some coarse grade sandpaper to get a 'roughly smooth' outline. Finally I used a very very fine grade glass paper to give it a professional finish. The cladding had a protective plastic covering which I left on until I was ready to screw it down. It fits like a dream and looks great. I'm pretty happy with it now.
Tony's Custom White Pick Guard
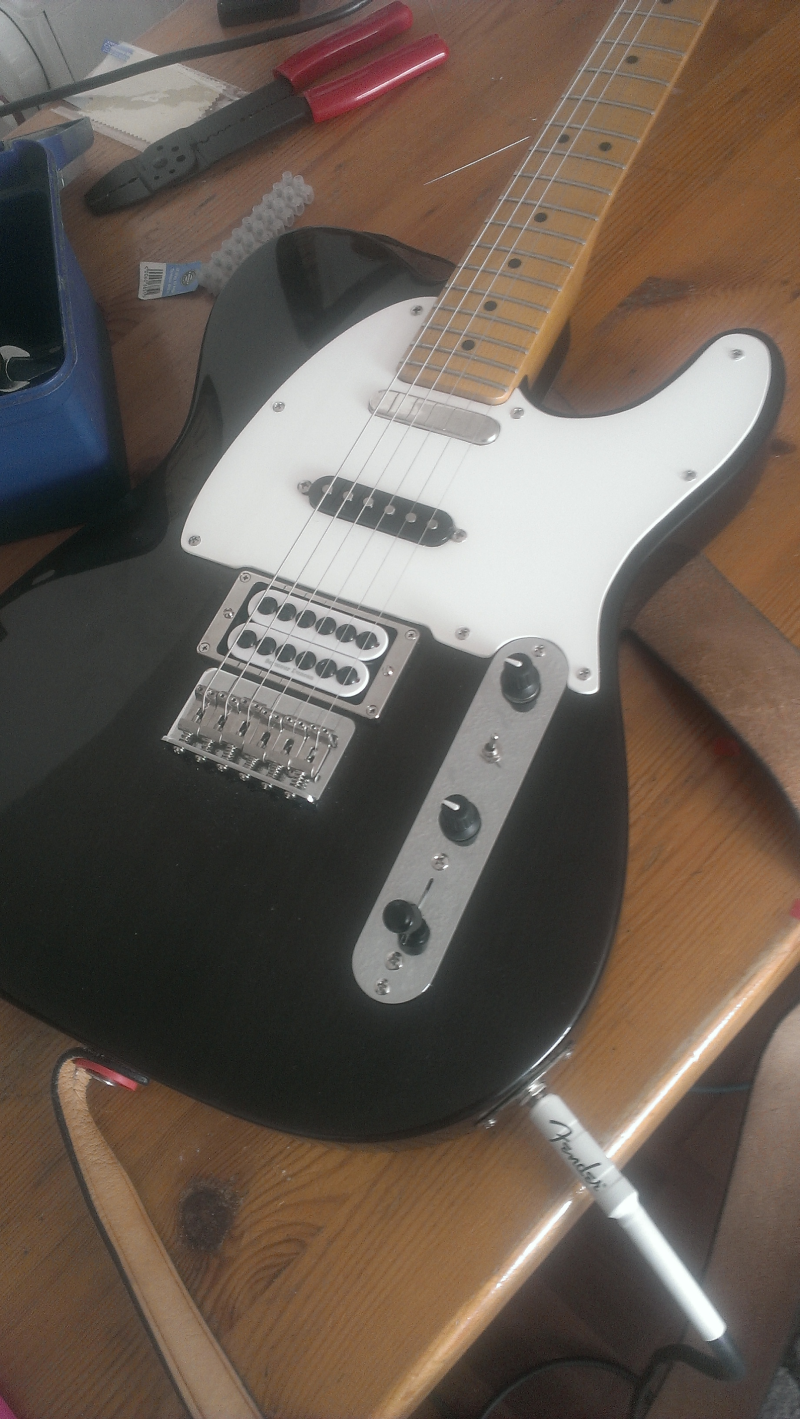
Tony also installed an Invader bridge humbucker in white. It looks fantastic with his custom made white pick guard. The white guitar cord is a nice touch too.
Photo by Tony from England
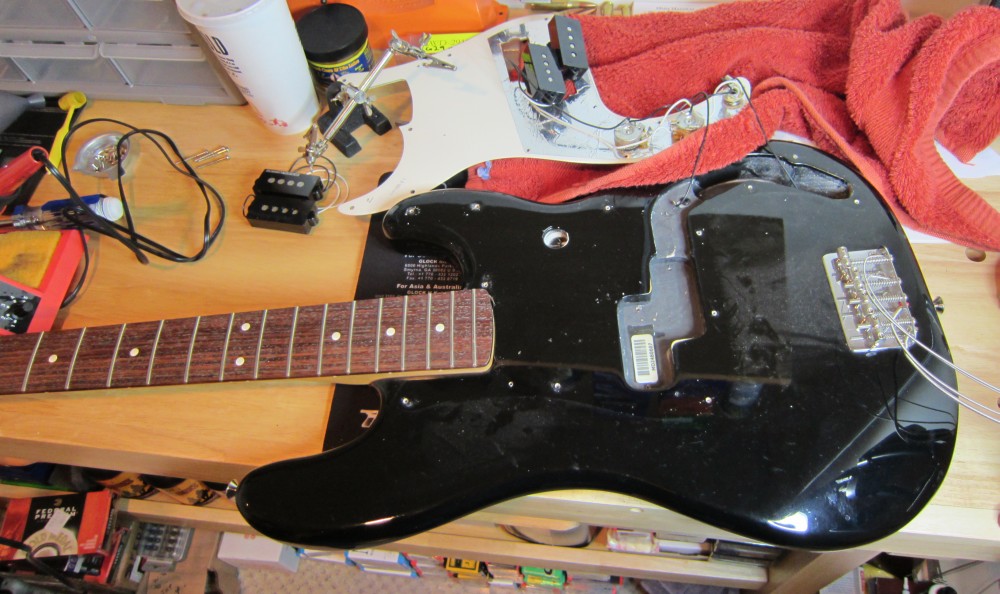
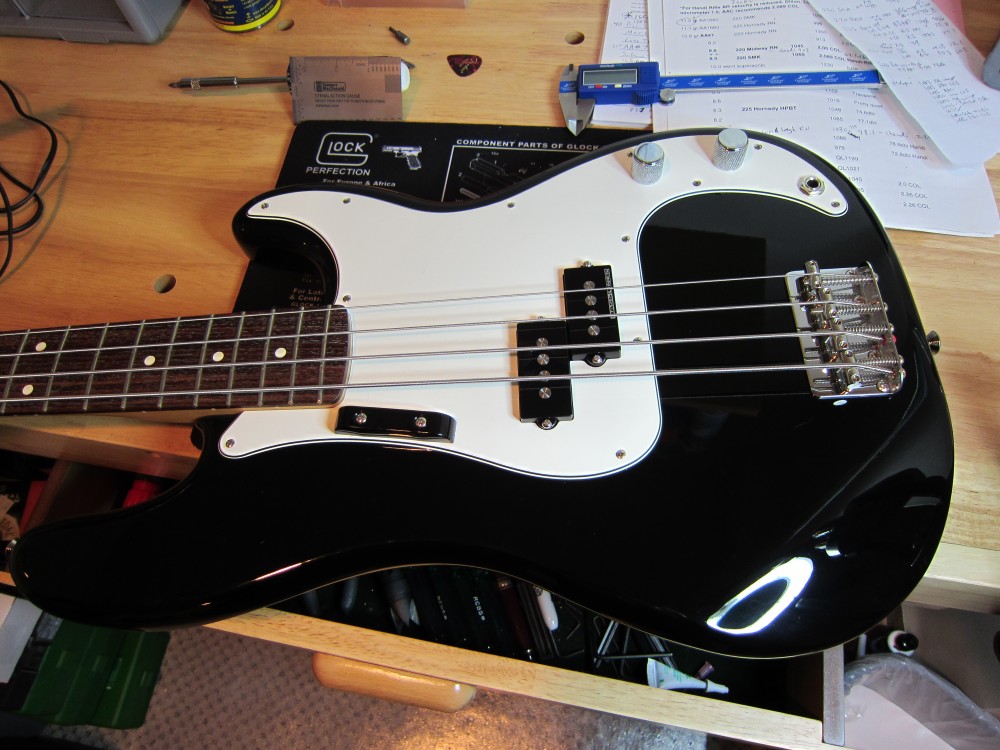
Fender Precision Bass Pickup Swap
I liked the tone of these Seymour Duncan pickups so much I decided to upgrade my Fender Precision Bass. All you have to do to replace the pickups is remove and re-solder the two pickup wires, black to ground, white to the volume pot. I put Seymour Duncan BassLines Quarter Pound SPB-3 pickups in and they sound fantastic. The two halves of this pickup are set up to be hum canceling.
By Rob Robinette
References
RCA Corporation, RCA Receiving Tube Manual, RC30.
Merlin Blencowe, Designing Tube Preamps for Guitar and Bass, 2nd Edition.
Merlin Blencowe, Designing High-Fidelity Tube Preamps
Morgan Jones, Valve Amplifiers, 4th Edition.
Richard Kuehnel, Circuit Analysis of a Legendary Tube Amplifier: The Fender Bassman 5F6-A, 3rd Edition.
Richard Kuehnel, Vacuum Tube Circuit Design: Guitar Amplifier Preamps, 2nd Edition.
Richard Kuehnel, Vacuum Tube Circuit Design: Guitar Amplifier Power Amps
Robert C. Megantz, Design and Construction of Tube Guitar Amplifiers
Neumann & Irving, Guitar Amplifier Overdrive, A Visual Tour It's fairly technical but it's the only book written specifically about guitar amplifier overdrive. It includes many graphs to help make the material easier to understand.
T.E. Rutt, Vacuum Tube Triode Nonlinearity as Part of The Electric Guitar Sound
[ How the 5E3 Deluxe Works ] [ Deluxe Models ] [ DRRI & 68 CDR Mods ] [ Amp Troubleshooting ] [ My 5E3 Build ] [ Spice Analysis ] [ The Trainwreck Pages ] [ Fender Input Jacks ] [ B9A Prototype Boards ]